
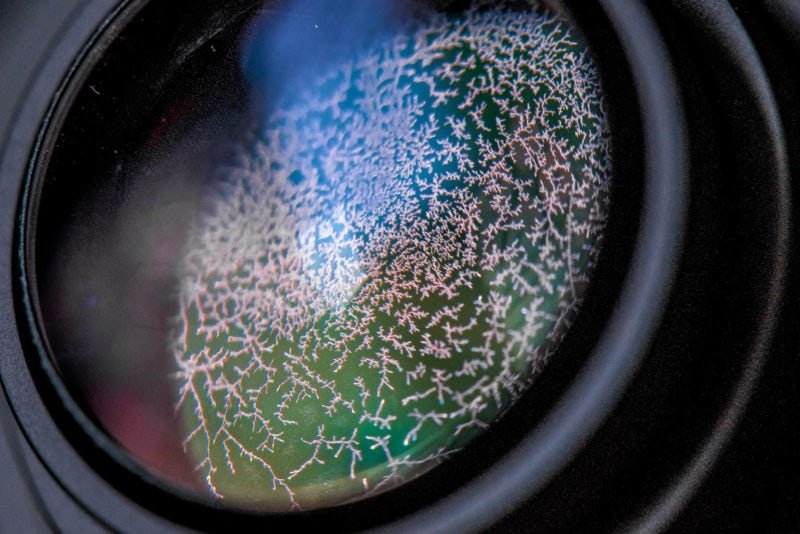
Lens fungus is a genuine threat to camera equipment stored in humid environments. It appears as white or gray web-like filaments growing on the inside surface of lens elements and can degrade image quality significantly — reducing contrast, creating flare, and in severe cases, permanently etching the lens coating. Cleaning external lens surfaces is straightforward, but internal fungus requires lens disassembly, which most photographers should leave to professionals. This guide covers what lens fungus is, how to treat surface fungus, when to DIY internal cleaning, and how to prevent it from recurring.
What You’ll Need
- Lens cleaning solution (isopropyl alcohol 99% or commercial lens cleaner)
- Lens tissue or DSLR sensor swabs
- Lens cleaning pen (Lenspen)
- Rocket air blower (not canned air)
- Lint-free microfiber cloth
- Lens spanner wrench set (for disassembly — advanced only)
- UV-C germicidal lamp (for prevention/treatment)
- Silica gel desiccant packets
- Dry storage cabinet or airtight container
Safety and Precautions
- Don’t use regular isopropyl alcohol on coated lens elements. 70% isopropyl alcohol contains water that can damage optical coatings. Use 99% isopropyl alcohol or a dedicated optical lens cleaner for internal cleaning.
- Never use canned air (compressed air duster) inside a lens. The propellant can deposit residue on internal elements and cause more damage than the fungus.
- Lens disassembly is a high-skill task. Internal lens elements are precision-aligned during manufacture. Improper disassembly or reassembly causes misalignment that can make the lens permanently unusable. Unless you have experience, take the lens to a professional for internal cleaning.
- UV-C light is hazardous to eyes and skin. Never expose your eyes or skin to UV-C light. Use only with appropriate precautions and in enclosed areas.
- Know when the lens isn’t worth saving. Severe internal fungus that has etched the lens coating is permanent damage. If the lens has significant optical damage, professional cleaning costs may exceed the lens value.
Understanding Lens Fungus
Lens fungus grows on optical glass when humidity is above 60% for extended periods — particularly in warm environments. Fungal spores are ubiquitous in air and settle on lens surfaces. They feed on the organic compounds in anti-reflection coatings, adhesives, and any organic matter (fingerprints, dust particles with organic material). Early-stage fungus appears as subtle white haziness or faint filament patterns. Late-stage fungus creates visible branching patterns and etches into the optical coating, causing contrast loss and increased flare that survives even after the fungus is killed and removed.
Step-by-Step: Cleaning External Lens Fungus
Assess Whether Fungus Is External or Internal
Before attempting any cleaning, determine where the fungus is. Look through the lens with a bright light behind it. Shine a flashlight through the lens and look at it from multiple angles. External fungus is on the front or rear element surface and appears to come into focus when you look straight at that element. Internal fungus appears to float between elements. If you can see the fungus clearly on the front or rear element, external cleaning may help. If it’s internal, professional disassembly is required.
Remove Dust with a Rocket Blower
Never touch a lens without removing loose particles first — touching dust while cleaning causes scratches. Use a Rocket air blower (not canned air) to blow loose dust and debris off the lens element before applying any liquid or tool. Hold the lens face down while blowing so dislodged particles fall away from the element rather than settling back on it.
Apply Lens Cleaning Solution
Apply a small amount of 99% isopropyl alcohol or optical lens cleaner to a lens tissue or sensor swab. Do not apply directly to the lens. Work in very small amounts — a single drop is usually sufficient.
Clean in Circular Motion from Center Out
Using the moistened lens tissue or swab, clean the affected area starting from the center and moving outward in a spiral motion. This prevents debris from the edge being dragged back to the center. Use light, consistent pressure. Do not scrub aggressively — lens coatings are delicate.
Inspect Under Light
After cleaning, inspect the lens element under good lighting from multiple angles. Shine a light through the lens to look for remaining fungus. If the fungus is gone, the cleaning was successful. If it remains and it’s external, repeat with fresh tissue.
Follow with a Lenspen (Optional)
A Lenspen has a dry carbon compound on the cleaning tip that removes residue left by liquid cleaners and polishes the coating. After liquid cleaning, a single gentle swipe with the Lenspen tip using the same center-out circular motion polishes the element and ensures no liquid residue remains.
Internal Lens Fungus: DIY vs. Professional Cleaning
Internal fungus requires lens disassembly to access the affected elements. This is an advanced procedure that involves:
- Removing retaining rings with a lens spanner wrench
- Carefully separating optical elements
- Cleaning individual elements with optical cleaner and lens tissue
- Reassembling with exact element spacing and alignment
For photographers with technical aptitude and dispensable lenses to practice on, there are detailed video guides available for many popular lens models showing disassembly procedures. However, misalignment of even a single element significantly degrades optical performance.
Professional lens cleaning typically costs $50–150 for most lenses and is almost always the better choice for valuable or complex lens designs. Service centers at major camera manufacturers (Canon, Nikon, Sony) and independent camera repair shops offer this service.
UV-C Light Treatment for Lens Fungus
Ultraviolet-C germicidal light kills fungal spores and can stop fungus spread without disassembly. The UV-C light doesn’t penetrate deeply into a closed lens, but it can kill surface and near-surface fungus accessible through the front and rear elements. Leave the lens exposed to a UV-C germicidal lamp at a safe distance (follow the lamp manufacturer’s instructions) for several hours. This treatment stops active growth but won’t remove dead fungus traces that have already etched the coating. It’s most valuable as a way to arrest early-stage fungus before professional cleaning.
How to Prevent Lens Fungus
Prevention is dramatically more effective than treatment. Fungus grows in humidity above 60% at temperatures above 60°F (15°C). Preventing these conditions prevents fungus:
- Store lenses with silica gel desiccant packets. Keep silica gel in your camera bag, lens cases, and storage areas. Replace or recharge desiccant when saturation indicators show it’s spent. Silica gel maintains low relative humidity in enclosed spaces.
- Use a dry storage cabinet. Electronic dry storage cabinets maintain 45–55% relative humidity automatically and are the best long-term storage solution for camera equipment in humid climates. They’re available from $50–200 and are widely used in Southeast Asian countries where lens fungus is endemic.
- Use lenses regularly. Lenses stored without use in static humid conditions are most susceptible. Regular use allows moisture to cycle through the lens and exposes it to varying conditions that prevent static fungal colonization.
- Don’t store lenses in closed bags in humid environments. A closed camera bag in a humid basement or closet is one of the most common fungus incubators. Store in open, ventilated spaces with desiccant if you’re in a humid climate.
- Clean fingerprints immediately. Fingerprints contain organic compounds that feed fungus. Always clean fingerprints off lens elements promptly before storage.
Pro Tips for Lens Fungus Management
- Buy used lenses only after fungus inspection. Always check used lenses for fungus before purchase — hold them up to light and look through at a bright sky. Internal fungus significantly reduces the lens value and optical performance.
- Mild fungus doesn’t always require immediate cleaning. Early-stage fungus that isn’t in the center of the optical path may have minimal effect on images. Monitor it and prevent spread rather than risking damage from aggressive DIY disassembly.
- Separate lenses with apparent fungus from clean equipment. Fungal spores spread between stored lenses. Keep suspected lenses isolated until inspected or cleaned.
- Photograph through the lens before cleaning to assess real-world image impact. Minor internal fungus in the corners may not visibly affect images at typical apertures — knowing the actual impact helps decide whether professional cleaning is worth the cost.
Frequently Asked Questions
Can lens fungus spread to other lenses?
Yes — fungal spores can spread between lenses stored in close proximity, especially in humid, enclosed storage spaces. If you discover lens fungus, isolate the affected lens immediately and clean or store all lenses separately with silica gel desiccant. Inspect nearby lenses for early signs of growth.
Does lens fungus always affect image quality?
Not always noticeably in the short term. Small amounts of fungus in the outer portions of the lens field may have minimal visible impact on images shot at typical apertures. However, as fungus grows and spreads toward the center, it increasingly reduces contrast and introduces flare, especially when shooting into the light. The fungal etching of the coating is the most damaging aspect — this persists even after the fungus is killed.
How do I know if my lens has fungus?
Shine a bright flashlight through the lens while holding it at various angles in a dark room. Fungus appears as white, gray, or greenish web-like filaments or spots on the element surface. Early fungus is faint and may look like slight haziness. You can also look through the front of the lens toward a bright light source — fungus shows as shadows or patterns on the element.
Is lens fungus covered under warranty?
No — lens fungus is considered environmental damage caused by improper storage and is not covered by manufacturer warranties. Some camera repair insurance policies cover fungus damage; check your specific policy. Prevention is far cheaper than treatment or replacement.
Can I use hydrogen peroxide to kill lens fungus?
Hydrogen peroxide has antifungal properties but is not recommended for camera lens cleaning. Even diluted concentrations can damage anti-reflection coatings, and the residue is difficult to remove completely from optical glass. Stick to 99% isopropyl alcohol or commercial optical lens cleaners for all lens surface cleaning.
Conclusion
Lens fungus is manageable when caught early and prevented effectively. External fungus on front and rear elements can be cleaned with 99% isopropyl alcohol and lens tissue. Internal fungus requires professional disassembly and cleaning for most photographers — the risk of optical misalignment from DIY disassembly usually outweighs the cost savings. The most effective strategy is prevention: dry storage with silica gel, a humidity-controlled cabinet in humid climates, and regular lens use. A lens kept dry stays fungus-free indefinitely.
For related camera and optics care, check out our guide on how to clean eyeglasses and frames for similar lens cleaning techniques. Our guide on how to clean glass streak-free covers the fundamentals of optical surface cleaning in a home context.
