
A dirty furnace flame sensor is one of the most common causes of a furnace that lights briefly and then shuts off — called short cycling. The flame sensor is a small metal rod in the burner area that detects whether the burner is actually lit. When it gets coated with oxidation or mineral residue, it can’t read the flame correctly and shuts down the furnace as a safety precaution. Cleaning it takes about 15 minutes, requires only steel wool or fine-grit sandpaper, and frequently eliminates the need for an expensive HVAC service call. Here’s exactly how to do it.
What You’ll Need
- Fine steel wool (0000 grade) or fine-grit sandpaper (220–400 grit)
- Screwdriver (typically 1/4″ hex or Phillips)
- Clean cloth or paper towels
- Flashlight
- Gloves (optional)
- Camera or phone for reference photos
Safety and Precautions
- Turn off the furnace completely before starting. Turn the thermostat to “Off,” then turn off power at the furnace’s dedicated electrical switch (usually mounted on or near the unit) or at the circuit breaker. Never work on a furnace while powered on.
- Wait for the furnace to cool. If the furnace was recently running, components in the burner area will be extremely hot. Allow at least 30 minutes after shutdown before reaching into the burner area.
- Shut off the gas supply if your furnace instructions or local codes require it for this type of maintenance. The flame sensor cleaning procedure doesn’t typically require gas shutoff, but it’s worth being familiar with your shutoff valve location.
- Know your limits. This is a DIY-appropriate maintenance task. If you’re uncomfortable with any step, call an HVAC technician — furnace repairs done incorrectly can be hazardous.
- Don’t use liquid cleaners or electrical contact spray on the sensor rod. The rod must be completely clean and dry — any residue can interfere with its function.
Understanding the Furnace Flame Sensor
The flame sensor is a simple device: a metal rod (usually made of stainless steel or titanium) in the burner assembly, connected by a single wire to the furnace control board. When the burner fires, a small electrical current flows through the flame from the sensor rod to the burner ground — the flame conducts electricity. The control board monitors this micro-current (typically 2–6 microamps). When the sensor reads current, it knows the flame is lit and keeps the gas valve open. When it reads no current (because a dirty sensor can’t establish the conducting path through the flame), the control board shuts the gas valve as a safety measure — no more than 3–10 seconds after ignition.
A dirty sensor covered in oxidation provides increased resistance that reduces the current below the threshold the control board needs to confirm flame detection. Cleaning removes the oxidation layer and restores normal current conductance.
Step-by-Step: How to Clean a Furnace Flame Sensor
Turn Off Power and Let Cool
Set the thermostat to Off. Turn off the furnace power at the dedicated switch or circuit breaker. If the furnace was running, wait 30 minutes for the burner area to cool before reaching inside.
Locate the Flame Sensor
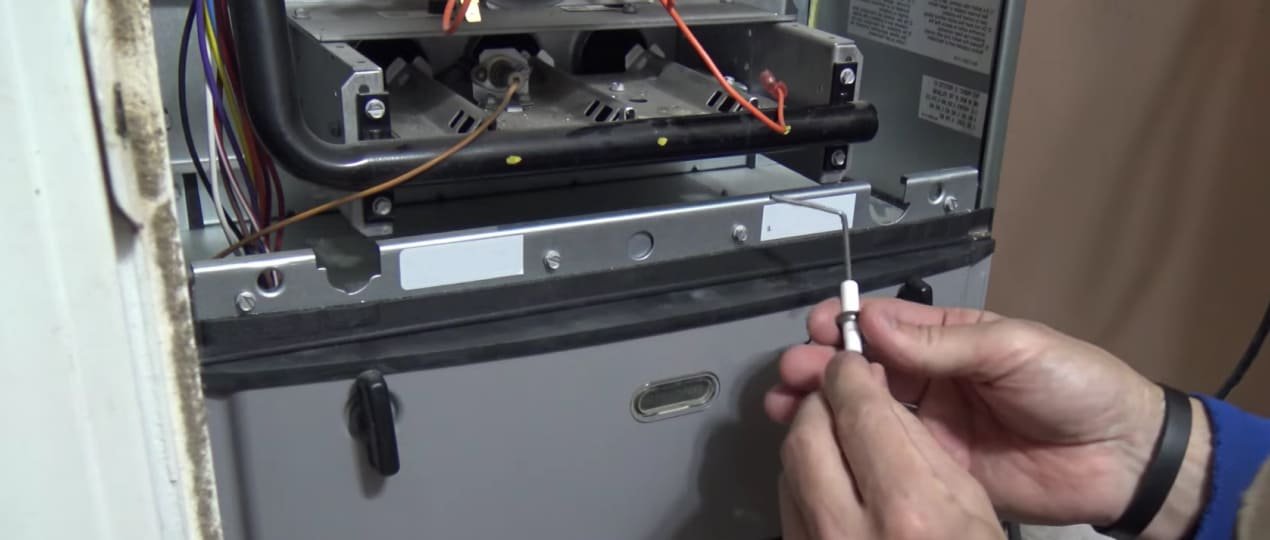
Open the furnace access panel — typically the lower front panel, which lifts off or slides out. The flame sensor is located in the burner assembly area. It looks like a thin metal rod (usually 2–4 inches long, slightly bent at the tip) mounted on a white ceramic insulator. A single wire connects it to the control board. It’s positioned so the rod tip sits in or near the burner flame path.
Photograph Before Removing
Take a clear photo of the flame sensor installation before removing it — this documents how the wire connects and the angle of the rod, which helps with reassembly. Some sensors are angled in specific positions relative to the burner.
Disconnect the Wire and Remove the Sensor
The flame sensor is typically held in place by one mounting screw (usually a 1/4″ hex head or Phillips head) threaded into the burner mounting bracket. Disconnect the wire from the sensor by pulling the electrical connector off — it slides on and off and requires no tools. Remove the mounting screw and carefully slide the sensor out.
Clean the Sensor Rod
The metal rod tip is what needs cleaning. Using 0000 fine steel wool or 220–400 grit sandpaper, lightly rub the full length of the metal rod to remove the oxidation layer (this appears as dark discoloration, a grayish film, or slight corrosion). You only need to remove the oxidation — don’t aggressively sand the rod. A few gentle strokes on all sides of the rod is sufficient. The rod should look clean, bright metal when done.
Clean the Connector and Wire
Wipe the wire connector and any discoloration from the connector terminal with a dry cloth. Check the wire for any cracks or damage while it’s accessible — damaged wires should be replaced before reinstalling the sensor.
Reinstall the Sensor
Slide the clean sensor back into its mounting position, tighten the mounting screw securely (snug, not overtightened — the ceramic insulator can crack), and reconnect the wire connector.
Replace the Access Panel and Restore Power
Replace the furnace access panel (most furnaces won’t start with the panel removed due to a safety interlock switch). Restore power at the switch or circuit breaker, set the thermostat above the current room temperature, and wait for the furnace to cycle on. It should ignite and run through a full heating cycle without shutting off early.
Test and Monitor


Run the furnace through 2–3 heating cycles to confirm the repair was successful. If short cycling continues after cleaning, the sensor may need replacement (typically $15–30 for the part), or there may be a different underlying issue (faulty control board, gas pressure problem, or blocked heat exchanger).
Signs the Flame Sensor Needs Cleaning
- Furnace starts but shuts off after a few seconds (the most common and definitive symptom)
- No heat despite the thermostat calling for it — the furnace attempts to light then fails repeatedly
- Error code on furnace display indicating flame failure or sensor fault (consult your furnace manual for specific codes)
- Furnace works intermittently — starts on some calls and fails on others
When to Replace Instead of Clean
If cleaning doesn’t resolve the short cycling, the sensor may need replacement. Signs the sensor itself has failed:
- The rod is visibly cracked or broken
- The ceramic insulator is cracked or damaged
- Cleaning was performed correctly but short cycling continues
- HVAC technician measures the sensor current and finds it below spec even with a clean rod
A replacement flame sensor is typically $15–30 at HVAC supply houses or online. The installation procedure is identical to the cleaning procedure above.
Pro Tips for Furnace Flame Sensor Maintenance
- Clean the flame sensor during your annual fall furnace checkup. Including the flame sensor in annual pre-season maintenance prevents mid-winter short cycling — which always seems to happen on the coldest night of the year.
- Don’t over-clean. Light surface cleaning is all that’s needed. Aggressive sanding removes too much material and can damage the rod tip that sits in the flame path.
- Check the air filter while you have the furnace open. A clogged air filter causes its own set of furnace problems including overheating and short cycling. Inspect and replace if needed while you have access.
- Label your furnace shutoff switch clearly. The switch near the furnace looks like a regular light switch and is frequently turned off accidentally. Label it clearly to prevent accidental shutdown.
Common Mistakes When Cleaning a Flame Sensor
- Not turning off power before starting. Always de-energize the furnace before opening and working inside.
- Using liquid cleaners. Any residue left on the sensor rod interferes with its function. Dry abrasive cleaning only.
- Over-sanding the rod. The rod is thin and doesn’t need heavy sanding — light strokes to remove oxidation is sufficient.
- Cracking the ceramic insulator. Over-tightening the mounting screw or dropping the sensor can crack the insulator, requiring a full replacement.
- Forgetting to reconnect the wire. Simple but happens — always double-check that the connector is fully seated before testing.
Frequently Asked Questions
How often should a furnace flame sensor be cleaned?
Clean the flame sensor annually as part of your pre-heating-season furnace maintenance, or when your furnace exhibits short cycling symptoms. In areas with hard water or dusty environments, more frequent cleaning may be needed. Most homeowners notice the symptom first (short cycling) rather than cleaning proactively, but annual cleaning prevents the issue entirely.
How do I know if the flame sensor or something else is causing my furnace to short cycle?
A dirty flame sensor is the most common cause, but short cycling also occurs from: clogged air filter (check first — it’s free), overheating from poor airflow, gas supply pressure issues, blocked condensate drain (on high-efficiency furnaces), or a failing igniter. If cleaning the sensor doesn’t resolve the issue, check the air filter and condensate drain before calling a technician.
What does a furnace flame sensor look like?
It’s a thin metal rod, typically 2–4 inches long with a slight bend at the tip, mounted on a white ceramic insulator. It mounts to the burner assembly with one screw and has a single wire with a connector attaching it to the control board. The rod tip is positioned to sit in or adjacent to the flame when the burner fires.
Can I clean the flame sensor without removing it?
Technically you can reach the rod while it’s mounted and rub lightly with fine sandpaper, but this is awkward and you won’t clean as thoroughly. It’s much easier to remove the single mounting screw, take the sensor out, clean it properly, and reinstall. The full procedure takes about 15 minutes.
What happens if the flame sensor is too dirty to clean?
If oxidation is so heavy that cleaning doesn’t fully restore function, or if the sensor is mechanically damaged, replacement is the solution. Flame sensors are inexpensive ($15–30) and the installation procedure is the same as the cleaning procedure described above.
Conclusion
Cleaning a furnace flame sensor is one of the highest-value DIY furnace maintenance tasks available to homeowners — a 15-minute job with $0 in parts that frequently restores full furnace function and avoids a $150+ HVAC service call. The process is simple: power off, remove the sensor, lightly sand the rod to remove oxidation, reinstall, and test. Add it to your annual fall maintenance checklist and you may never experience a short-cycling furnace in the middle of winter again.
For more home heating maintenance, check out our guide on how to clean a chimney. For cleaning the gas components near your furnace, our article on how to clean gas burners and gas logs covers related DIY maintenance tasks.
