A properly sealed garage door keeps out rain, wind, pests, dust, and cold air — and reduces heating and cooling costs if the garage is attached to the home. The seal system has three components: the bottom seal (the rubber strip under the door), the side and top weatherstripping (the vinyl or rubber seals around the door frame), and the threshold seal (optional, but highly effective for uneven floors). This guide covers all three, plus how to fix a garage door that isn’t contacting the floor evenly.
What You’ll Need
| Tools | Materials |
|---|---|
| Measuring tape | Replacement bottom seal (T-slot rubber seal) |
| Utility knife or tin snips | Side and top weatherstripping (vinyl J-seal or brush seal) |
| Drill/driver | Garage door threshold seal (optional, for floor gaps) |
| Screwdriver | Construction adhesive (for threshold) |
| Bucket of soapy water | Replacement seal retainer (if old retainer is bent or cracked) |
| Level | Exterior caulk (for frame-to-wall gaps) |
Safety and Precautions
- Disconnect the opener before working at the bottom of the door. If the opener activates while you’re working on the bottom seal with the door lowered, you could be pinched or struck. Unplug the opener or flip its circuit breaker before any seal work at the door bottom.
- Check for carbon monoxide risks before achieving a very tight garage seal. A tightly sealed garage attached to a living space can allow CO from vehicles, furnaces, or water heaters to accumulate. Ensure all combustion appliances are properly vented before sealing the garage very tightly.
- The door must be fully down to fit the bottom seal correctly. Installing the seal with the door partially open leads to incorrect tension — seal too tight or too loose. Always work with the door in the fully closed position.
Step 1: Inspect the Current Seal Condition
Check All Four Zones Before Buying Materials
- Close the door fully and inspect from inside the garage. Stand near the floor and look for light coming through at the bottom — any visible light means the seal isn’t contacting the floor at that point.
- Check the sides and top: run your hand along the side and top weatherstripping. It should feel firm and continuous — no gaps, no compressed-flat sections, no cracks.
- Open the door and inspect the bottom seal from below: a healthy seal is flexible and slightly spongy. A worn seal is hard, brittle, cracked, or has chunks missing.
- Note the type of bottom seal your door uses: most modern doors use a T-slot seal (the rubber blade inserts into a metal retainer channel on the door bottom) or a nail-on seal (stapled or nailed directly to the door face at the bottom).
Step 2: Replace the Bottom Seal
The Most Common Garage Door Seal Repair
- Measure the full width of the door bottom. Most garage doors are 8, 9, 10, 12, or 16 feet wide. Buy a replacement seal at least 1 foot longer than the door width — you’ll trim to fit.
- For a T-slot seal: spray a light amount of soapy water into the retainer channel on the door bottom. This lubricates the channel and makes inserting the new seal much easier.
- Starting at one end, feed the T-bar edge of the new seal into the retainer channel. Work the seal along the channel by sliding it progressively. The soapy water helps it glide in.
- Once the seal is fully through the channel, let it hang below the door bottom. Close the door — the weight of the door will press the seal against the floor.
- Trim any excess seal at both ends with a utility knife, flush with the door edge.
- For a nail-on seal: remove the old seal and any old fasteners. Position the new seal at the door bottom with the rubber facing down. Drive staples or galvanized nails every 6 inches along the full width.
Step 3: Replace Side and Top Weatherstripping
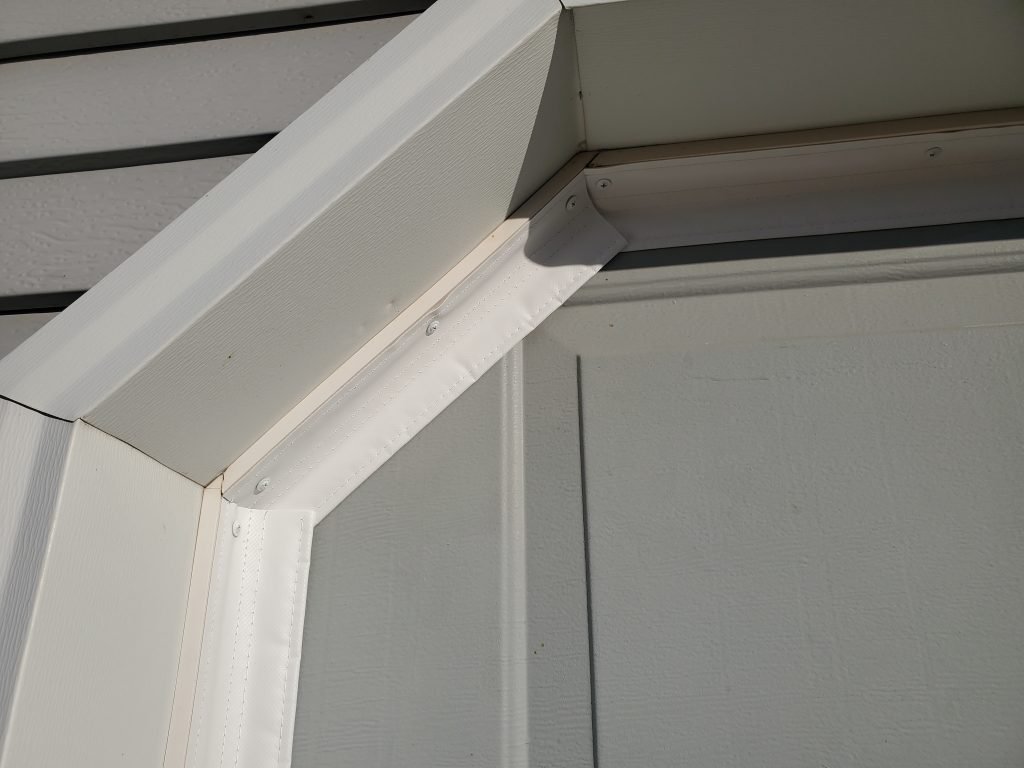
The Door Stop Seals on Three Sides
The side and top weatherstripping attaches to the door stop (the vertical strips on each side of the door opening that the door closes against). Two common types: vinyl J-seal (fits over the door stop edge) and brush seal (a bristle strip that contacts the door face).
- Remove the old weatherstripping by pulling it free from the nailing strip or by removing the screws or staples. Pull the old material completely off and clean any adhesive residue from the door stop surface.
- Measure each side and the top separately. Cut the new weatherstripping to length for each section.
- Start at the top: nail or screw the new weatherstripping to the head door stop (the horizontal stop at the top of the door opening). The seal should press lightly against the door face when the door is closed — contact but not heavily compressed.
- Install each side section: start at the top, nail or press the weatherstripping onto the door stop, and work down to the bottom. Trim any excess flush with the bottom of the door opening.
- Close the door and check for daylight around all three sides. Adjust the seal position by bending the stop slightly inward (for vinyl J-seals) if any gap remains.
Step 4: Install a Threshold Seal (For Uneven Floors)
Eliminates the Bottom Gap Completely — Best for Sloped Floors
If your garage floor is uneven or sloped, the bottom seal alone won’t create a full contact across the entire door width. A threshold seal (a rubber or aluminum strip adhered to the floor at the door base) seals these remaining gaps from below.
- Close the door. Mark a pencil line on the floor along the full width of the door’s bottom edge. This is where the threshold seal will be positioned.
- Clean the floor surface along the threshold line thoroughly — sweep, then wipe with rubbing alcohol or acetone. The adhesive must bond to clean concrete.
- Cut the threshold seal to the door width with a utility knife.
- Apply construction adhesive to the bottom of the threshold seal, position it along the pencil line, and press firmly. Allow to cure for at least 24 hours before operating the door.
- Close the door: the bottom seal should now compress lightly against the threshold rubber, creating a full, continuous seal even across any floor irregularities.
Step 5: Check the Door Bottom Alignment
If the Seal Contacts on Some Spots But Not Others
If the bottom seal only contacts the floor on one side or in the middle — not uniformly — the door may not be level. This is a cable tension or spring tension issue on sectional doors.
- Disconnect the opener. Manually lower the door and observe how it contacts the floor. Mark any high spots (where the door doesn’t contact) and low spots.
- On one-piece tilt-up doors: the springs may need adjustment to level the door. Consult the spring manufacturer specs.
- On sectional doors: the cable tension can be adjusted on each side drum. Tightening one side cable and loosening the other shifts the door level. This requires unwinding and rewinding the drum cable — see the spring and cable adjustment section of your opener manual.
- For minor floor unevenness (under 1/2 inch): a threshold seal handles it without cable adjustment.
Pro Tips and Common Mistakes
- Replace the entire bottom seal, not just damaged sections. Patching a cracked seal with tape or sections of new material creates entry points at the patch seams. A full-width replacement seal is inexpensive and ensures a continuous seal.
- Don’t over-compress the side weatherstripping. The seal should contact the door with light pressure — not squeezed flat. Over-compression makes the door hard to close and compresses the seal permanently, reducing its effectiveness within a season.
- Use soapy water when installing T-slot seals — don’t skip this. Without lubrication, feeding a rubber T-slot seal through the retainer channel is a frustrating struggle. A small amount of soapy water makes it glide in easily in minutes.
- Caulk the exterior frame-to-wall joint. While replacing weatherstripping, check the exterior joint where the door frame meets the siding or masonry. Caulk any gaps with exterior paintable caulk for a complete seal job.
Troubleshooting
| Problem | Likely Cause | Fix |
|---|---|---|
| Light visible at bottom corners only | Door not level or floor not flat at corners | Install threshold seal or adjust door cable tension |
| New bottom seal tears quickly | Seal contacting rough concrete aggressively | Adjust seal tension so it contacts lightly; consider a threshold seal instead |
| Side seal falls off after a few weeks | Adhesive-backed seal on unprimed or dirty surface | Clean and prime the door stop, use staples or nails in addition to adhesive |
| Seal is tight but mice still enter | Small gaps at corners or frame-to-floor joint | Use steel wool in corner gaps (rodents won’t chew through it); install threshold |
| Door hard to open after new weatherstripping | Side seals too thick or positioned too tight | Reposition seals so they just contact the door face without compressing |
Frequently Asked Questions
How often should I replace garage door weatherstripping?
The bottom seal typically lasts 2–5 years on a frequently used door. Side and top weatherstripping lasts 5–10 years. Inspect annually — the first sign is brittleness, cracking, or visible daylight when the door is closed. Replace at the first sign of wear; waiting until it fully fails means months of gaps.
What is the best bottom seal for a garage door?
For standard flat floors: a T-slot rubber seal is the most common and works well. For uneven or sloped floors: a threshold seal (adhered to the floor) combined with a standard bottom seal gives the most complete closure. For very rough floors or extreme weather exposure: a dual-bulb astragal seal provides additional sealing area.
How do I stop bugs from getting under my garage door?
Install a new bottom seal (if the existing one is worn or brittle), add a threshold seal to the floor for complete contact, and inspect the side and top weatherstripping for gaps. Use steel wool packed tightly into any corner gaps — rodents and insects won’t chew through steel wool. Caulk the exterior frame-to-siding joints for additional pest exclusion.
Can I install a garage door threshold seal myself?
Yes — it’s one of the easiest garage door sealing products to install. Clean the floor, cut to width, apply construction adhesive, press in place, and wait 24 hours. The whole job takes about 20 minutes plus cure time.
Why is my garage so cold even with the door closed?
An uninsulated garage door panel itself (not just the seals) is the primary heat loss point in most garages. The seals stop infiltration, but if the door panels are uninsulated single-layer steel, most heat loss is through conduction through the panels. Adding garage door insulation panels (foam board kits are available at hardware stores) significantly improves thermal performance beyond what seals alone can achieve.
Conclusion
Sealing a garage door is a three-zone project: bottom seal, side and top weatherstripping, and threshold for uneven floors. Each component is inexpensive and installable in under an hour, and together they create a continuous barrier against weather, pests, and energy loss. Replace all three at once when any one shows wear — an uneven replacement leaves gaps that undo the improvement on the parts you did fix.
For the full context of weatherproofing your garage area, our guide on how to seal and weatherproof a door covers the entry door between the garage and the home interior. And if the garage door spring or opener also needs service, see our guides on how to fix a garage door spring and how to install a garage door opener.
