A broken garage door spring is one of the most common reasons a garage door won’t open. The spring counterbalances the door weight — without it, the opener motor strains or the door won’t lift manually at all. Torsion springs (the horizontal coil above the door) are the more common type in modern homes and the more dangerous to replace. Extension springs (the long coils running parallel to the horizontal tracks) are slightly more approachable for a careful DIYer. This guide covers both types with clear safety requirements for each.
What You’ll Need
| Tools | Materials |
|---|---|
| Two solid steel winding bars (3/8-inch diameter, 18+ inches long) | Replacement torsion or extension spring (matched to door weight) |
| Adjustable wrench or socket set | Replacement safety cable (for extension springs) |
| Vise grips or locking pliers | Garage door lubricant (silicone or lithium grease) |
| Ladder | Replacement spring hardware if worn |
| Tape measure | — |
| Safety glasses and gloves | — |
Safety and Precautions
- Torsion springs are under extreme tension — this is a serious DIY hazard. A fully wound torsion spring stores enough energy to cause severe injury if released suddenly or improperly. Never use screwdrivers or makeshift tools as winding bars. Only use proper solid-steel winding bars. If you are not comfortable working in close proximity to a tensioned spring, hire a professional — this is one DIY job where the injury risk is real and well-documented.
- Disconnect the opener before working on the spring system. Unplug the garage door opener or flip its circuit breaker. If the opener activates while you’re on a ladder near the spring, the result can be catastrophic.
- Never attempt to wind or unwind a torsion spring with the door in the open position unless you know exactly what you’re doing. The standard procedure is to close the door, lock the tracks, wind the spring, and then release the door. Deviation from this sequence can result in a runaway door.
Step 1: Identify Your Spring Type
Torsion vs. Extension — The Repair Is Different
| Spring Type | Location | Typical on | DIY Difficulty |
|---|---|---|---|
| Torsion spring | Horizontal coil above the door, on the torsion bar | Most modern homes | High — requires winding bars and proper technique |
| Extension spring | Long coils running parallel to horizontal tracks | Older homes and single-car garages | Moderate — less stored energy but safety cable required |
A broken spring will have a visible gap in the coils or a separated coil at the drum end. On torsion springs: look directly above the closed door. On extension springs: look along the horizontal tracks on either side.
Step 2: Buy the Right Replacement Spring
Spring Sizing Is Critical — Wrong Spring = Premature Failure
- For torsion springs: measure the inside diameter of the spring (typically 1.75 or 2 inches), the wire diameter (measured as 10 coils total length, divided by 10), the length of the spring, and note whether it’s a left-wound or right-wound spring (most homes have one of each, wound in opposite directions).
- The critical number is the door weight. Torsion springs are rated by door weight — a 150 lb door needs a very different spring from a 200 lb door. Most suppliers will help you select the correct spring if you provide door dimensions and weight (weigh the door with a bathroom scale under the center bottom edge, or use a spring calculator tool available from spring suppliers).
- For extension springs: measure the length and diameter of the old spring. Extension springs are typically color-coded by door weight; match the color and length exactly.
- Always replace springs in pairs — if one breaks, the other has the same fatigue and will fail soon. Replacing both at the same time saves a second repair call within months.
Step 3: Replace Extension Springs (Lower Risk Method)
For the Long Springs Along the Horizontal Tracks
- Open the door manually to the fully open position. Secure the door in place by clamping locking pliers to the vertical track below the bottom roller. This prevents the door from falling while you work.
- Disconnect the spring: the extension spring hooks onto a pulley or anchor bracket at the front of the track, and connects to the door via a cable system. Note the routing before disconnecting anything — photograph the current setup.
- Remove the old spring and safety cable. The safety cable runs through the center of the spring — it contains the spring if it snaps. Never run the door without safety cables in place.
- Install the new spring: hook it to the anchor bracket at the front and thread the safety cable through the spring and hook it in place.
- Route the cable over the pulley and connect it to the door bracket at the correct tension. The door should balance — when lifted to the halfway point, it should hold its position without drifting up or down. If it drifts, adjust the cable length at the door bracket.
- Remove the locking pliers from the track and test the door manually. The door should lift with roughly 8–10 lbs of force at the bottom edge.
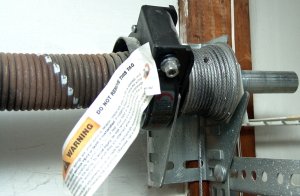
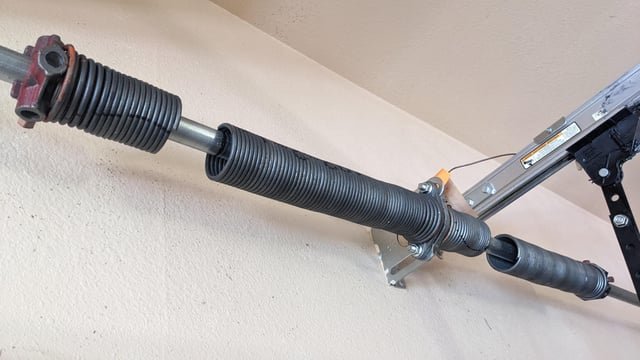
Step 4: Replace a Torsion Spring (Higher Risk — Read Safety Notes First)
The Standard Process for One-Spring or Two-Spring Systems
- Close the door and lock the bottom section to the vertical tracks with locking pliers on both sides, just above the bottom roller bracket. This prevents the door from rising unexpectedly while the spring is wound.
- Unplug the opener.
- Mark the winding cone end of the broken spring with tape to identify how many turns the spring has when correctly wound. Most residential doors require 7.5 turns on a 7-foot door, 8 turns on an 8-foot door (verify with a spring calculator).
- Insert a winding bar into the bottom winding cone hole. Hold the bar firmly — the spring tension releases through the bar. Insert the second bar into the next hole up. Unwind by moving the bars down and swapping them into successive holes. Count the half-turns as you unwind.
- Once fully unwound, loosen the set screws on the spring drum and slide the old spring off the torsion bar.
- Slide the new spring onto the torsion bar with the winding cone on the correct end (left-wound spring on the right side, right-wound on the left). Tighten the set screws on the drum.
- Wind the new spring: insert a bar into the bottom hole of the winding cone, insert the second bar into the next hole up, and push up to advance by a half-turn. Swap bars. Repeat until you reach the correct number of turns. Wind firmly and deliberately — never let go of a bar under tension without the second bar in place.
- Stretch the spring: once fully wound, use a wrench to move the spring outward on the torsion bar by about 1/4 inch before tightening the winding cone set screws. This is the “stretching” step that sets the correct tension.
- Remove the locking pliers. Test the door balance: disconnect the opener and lift the door manually to the halfway point. A correctly tensioned spring will hold the door at mid-height with little or no drift.
Step 5: Lubricate After Spring Replacement
Don’t Skip This — It Extends Spring Life Significantly
- Apply a garage door lubricant (silicone spray or white lithium grease) to the torsion spring coils — coat the entire spring lightly. This reduces friction between coils and significantly extends spring life.
- Lubricate the rollers, hinges, and tracks as well while you have everything accessible.
- Do not use WD-40 on springs or rollers — it’s a solvent, not a lubricant, and it washes out existing lubrication.
Pro Tips and Common Mistakes
- Never use homemade winding bars. Real winding bars are 3/8-inch solid steel, 18+ inches long. Using a screwdriver, a piece of rebar, or a bolt is genuinely dangerous — the bar must be able to withstand the full torque of the spring without bending or slipping out.
- Replace both springs at the same time. If you have a two-spring system and one breaks, replace both. The surviving spring has the same fatigue life and will break within weeks or months.
- Verify the turn count before tightening set screws. Too few turns = door too heavy to open. Too many turns = door springs open uncontrollably. Verify the count with a calculator or manufacturer spec before tightening anything.
- A properly balanced door should float at mid-height. This is the definitive test after any spring replacement. If the door drifts up or down, the tension is wrong and must be corrected before using the opener.
Troubleshooting
| Problem | Likely Cause | Fix |
|---|---|---|
| Door drifts up at mid-height | Too many turns (over-tensioned spring) | Unwind 1–2 turns; retest balance |
| Door drifts down at mid-height | Too few turns (under-tensioned spring) | Wind 1–2 additional turns; retest |
| Opener strains or won’t lift the door | Spring under-tensioned or wrong spring installed | Verify spring rating matches door weight; increase tension |
| Loud bang when operating door | Spring broke suddenly (typically loud crack) | Inspect for broken coil or separated spring end; replace |
| Door uneven (one side lower) | One spring over-tensioned vs. the other | Adjust the tighter spring down by the difference in turns |
Frequently Asked Questions
Is it safe to replace garage door springs yourself?
Extension spring replacement is within a careful DIYer’s capability if you secure the door, use safety cables, and photograph the setup before disassembly. Torsion spring replacement requires specific tools (proper winding bars) and careful technique. If you don’t have solid-steel winding bars and are not comfortable with the safety requirements, hiring a professional is the right call — spring replacement is one of the higher injury-risk garage door repairs.
How long do garage door springs last?
Most residential garage door springs are rated for 10,000 cycles. A door opened and closed 4 times a day will reach 10,000 cycles in about 7 years. Springs rated for 25,000 or 50,000 cycles are available and cost more but last significantly longer.
Can I open my garage door with a broken spring?
You can open it manually, but it will be very heavy — a typical 16-foot double garage door weighs 150–250 lbs, and without the spring counterbalance, you’re lifting most of that weight yourself. Do not use the electric opener with a broken spring — the motor will strain and may burn out, and the door may come down unexpectedly.
Why did my garage door spring break?
Springs break due to metal fatigue from repeated stress cycling — it’s normal wear, not a failure. Rust and lack of lubrication accelerate spring wear significantly. Springs in humid or coastal environments benefit greatly from annual lubrication to extend life.
What is the difference between torsion and extension springs?
Torsion springs coil and uncoil around a central shaft (torsion bar) directly above the door, storing energy through rotational tension. Extension springs stretch and contract along the horizontal tracks on each side of the door. Torsion springs provide smoother operation, last longer, and are safer in failure (they don’t fly off the door), which is why they’re standard on most modern garage doors.
Conclusion
Replacing a garage door spring is a manageable DIY project when you approach it with the right tools and a clear understanding of the risks — especially for torsion springs. The most important steps are: identify the correct replacement spring by measuring and calculating door weight, replace both springs at once, verify the balance test before reconnecting the opener, and lubricate after installation. Done correctly, a new spring should last 7–10 years with minimal maintenance.
Once the spring is fixed, it’s a good time to service the full system. Check our guide on how to install a garage door opener if the motor or opener hardware also needs attention, or our steps on how to seal a garage door to eliminate drafts and pests while the door is working properly.
