Resetting a garage door opener code clears all paired remotes and keypads and lets you re-register only the devices you want to have access. This is the right step when you move into a new home, lose a remote, or want to remove a former resident’s access. The process takes under 5 minutes and involves pressing the “Learn” button on the opener motor unit — the exact steps vary slightly by brand, but the principle is the same for all major residential openers.
What You’ll Need
- Access to the opener motor unit (usually ceiling-mounted in the garage)
- A ladder (if the unit is high)
- New remote controls or keypad (if re-programming from scratch)
- The PIN you want to use for a keypad (if applicable)
Safety and Precautions
- Resetting erases ALL paired devices — remotes, keypads, and connected apps. After clearing, every previously paired device (including your own daily-use remote) will no longer work. You’ll need to re-program every device you want to keep using. Don’t reset unless you’re prepared to immediately re-pair all devices.
- Keep the door closed during the reset. The reset only clears the access codes — it doesn’t affect the door’s mechanical operation. Leave the door closed while resetting to prevent any accidental operation.
Step 1: Locate the Learn Button on Your Opener
The Learn Button Is the Universal Reset Point
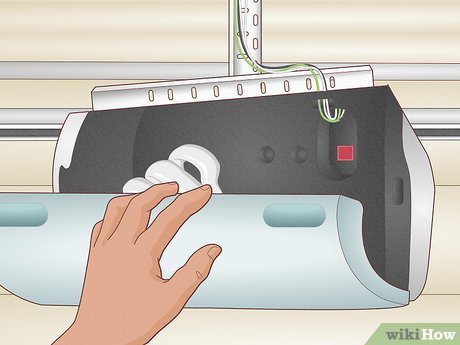
All major residential garage door openers use a “Learn” button to manage remote pairings. It’s located on the motor unit itself — not on the wall button or remote.
- Liftmaster / Chamberlain: The Learn button is on the back panel of the motor unit, near the antenna wire. It’s usually a square button in yellow, green, orange/red, or purple — the color indicates the frequency and generation of the unit. There may also be a light indicator next to the button.
- Genie: The Learn button (sometimes labeled “Program” on older Genie models) is on the back panel of the motor unit or under the light cover. Genie models also often have a small indicator light nearby.
- Craftsman: Similar location to Liftmaster (many Craftsman openers are manufactured by Liftmaster). Look for the Learn button on the rear or side of the motor unit.
- Linear / Overhead Door: Learn or “Program” button on the back of the motor unit, near the antenna.
Step 2: Reset and Clear All Paired Devices
Hold the Learn Button for 6–10 Seconds
- Locate the Learn button as described in Step 1. You may need a ladder to reach the motor unit if it’s ceiling-mounted.
- For Liftmaster / Chamberlain: Press and hold the Learn button for approximately 6 seconds until the indicator light next to it flashes or turns off. Release the button. All paired remotes and keypads are now cleared.
- For Genie: Press and hold the Learn/Program button for approximately 10 seconds until the indicator light flashes rapidly. Release. All devices are cleared.
- For older openers (pre-2000) with DIP switches: These openers use physical switches inside the remote and receiver that must be changed together. Change the DIP switch combination on the motor unit and re-set the same combination on each remote — there is no “Learn” button on these models.
- Test that all old remotes no longer work by pressing any previously paired remote — the door should not respond.
Step 3: Re-Pair Your Remote Controls
Program Remotes After Clearing
- Stand within a few feet of the motor unit. Press and release the Learn button on the motor unit — the indicator light will illuminate for 30 seconds.
- Within those 30 seconds, press and hold the button on the remote you want to pair. Hold it until the opener’s light flashes or you hear two clicks — this confirms the pairing is complete.
- Test the remote: press it and verify the door opens and closes.
- Repeat for each additional remote you want to pair. Each requires a separate Learn button press on the motor unit (30-second window each time).
Step 4: Re-Program the Keypad
Enter a New PIN After Clearing
- Press and release the Learn button on the motor unit to start a 30-second pairing window.
- At the keypad (mounted outside the garage, usually beside the door), enter your new desired PIN. Then press and hold the Enter or Send button until the opener’s light flashes or you hear two clicks.
- Test the keypad: enter the new PIN and verify the door operates.
- For Liftmaster MyQ keypads: these may also need to be re-linked in the MyQ app after being cleared. Open the app and follow the device setup instructions for the keypad model.
- For Genie keypad (Intellicode): enter the new PIN, press the program button on the keypad itself (usually a small button near the battery compartment), and then press the Learn button on the motor unit within 30 seconds.
Step 5: Re-Link Smart Home Integrations
MyQ, Genie Aladdin, and Alexa/Google Home
If your opener connects to a smart home system or app, clearing the Learn button may disconnect these integrations in some configurations.
- For Liftmaster MyQ: open the MyQ app and check if the device still shows connected. If it shows disconnected, follow the in-app setup to re-link the opener. The MyQ bridge or hub may need to be re-paired following the app instructions.
- For Genie Aladdin Connect: open the Aladdin Connect app and check the device status. If re-pairing is needed, follow the in-app pairing instructions specific to your model.
- For Alexa or Google Home integrations: these typically connect through the manufacturer’s app (MyQ, Aladdin, etc.). Re-link the manufacturer app connection first, then check if the Alexa/Google Home skill reconnects automatically.
Pro Tips and Common Mistakes
- Have all remotes and keypads on hand before clearing. The re-pairing process is quick but requires each device to be physically present. Gather all your remotes before clearing so you can re-program everything in one session.
- Don’t hold the Learn button too briefly. A brief press of the Learn button programs a new remote — holding for 6–10 seconds clears all devices. Accidentally clearing when you intended to add is a common mistake. Hold until the light changes distinctly.
- Check the indicator light behavior for your specific model. Light behavior varies: some openers flash once on successful pairing, others click, some turn off. Consult your specific model’s instruction sheet if the behavior is unclear.
- Change the keypad PIN after moving into a new home. Even if you don’t do a full reset, changing the keypad PIN is a simple security step: clear just the keypad (follow the steps above for keypad programming only) and set a new PIN you haven’t shared.
Troubleshooting
| Problem | Likely Cause | Fix |
|---|---|---|
| Remote won’t pair after clearing | Pairing window expired (30 seconds passed) | Press Learn button again; re-try pairing within 30 seconds |
| Keypad still opens door after supposed clear | Didn’t hold Learn button long enough for full clear | Hold Learn button 6–10 seconds until light change; re-test |
| Old remote still works after clearing | Same issue — hold longer for complete clear | Repeat hold 6–10 seconds; test with old remote after |
| Can’t find Learn button | Covered by light fixture or panel | Remove the light cover or access panel on the motor unit |
| MyQ app shows offline after reset | App connection needs re-linking | Follow in-app setup to re-add the device |
Frequently Asked Questions
How do I reset a Liftmaster garage door opener code?
Press and hold the Learn button on the Liftmaster motor unit for approximately 6 seconds until the indicator light turns off or flashes. This erases all paired devices. Then press the Learn button briefly (30-second window) to re-pair each remote or keypad by pressing the device button until the opener light flashes.
How do I reset a Genie garage door opener?
Press and hold the Learn/Program button on the Genie motor unit for approximately 10 seconds until the indicator light flashes rapidly. This clears all paired Intellicode devices. To re-pair, press the Learn button once (30-second window) and press the remote button or follow the keypad re-pairing process.
Can I reset just the keypad without clearing all remotes?
Yes — most modern garage door keypads can be re-programmed to a new PIN without clearing all remotes. For Liftmaster/Chamberlain: enter any existing PIN, press and hold the Enter button until the light flashes, then enter and re-enter the new PIN. Consult your specific keypad model’s instructions for the exact sequence.
Why won’t my remote work after I moved into a new home?
The previous owner’s remotes are paired to the opener. Your remotes need to be paired. Press the Learn button on the motor unit once (creates a 30-second window) and then press your remote button to pair. You may also want to do a full clear first (hold 6–10 seconds) to ensure previous remotes no longer work.
How many remotes can I pair to one opener?
Most modern residential openers can store 40 or more paired remotes. For practical purposes, you can pair as many remotes and keypads as you need without hitting any limit in normal household use.
Conclusion
Resetting a garage door opener code is a 5-minute security step that’s essential when moving into a new home, after losing a remote, or when you want to remove access from a previous user. The key steps are: locate the Learn button on the motor unit, hold it 6–10 seconds to clear all devices, then use brief presses to re-pair each device one by one. Have all your remotes and keypads ready before clearing so you can complete the full re-pairing in one session.
If you’re also upgrading or replacing the opener itself, our complete guide on how to install a garage door opener walks through the full installation process. And if the garage door spring needs attention alongside the opener work, see our guide on how to fix a garage door spring.
