Replacing a garage door is a full day’s work for two people — it involves safely disassembling the old door and hardware, removing the panels, and assembling and hanging a new door section by section. The hardest part isn’t the heavy lifting; it’s handling the torsion spring tension. This guide covers the full replacement process for a sectional garage door (the most common residential type), including when to call a pro for the spring work.
What You’ll Need
Tools
- Winding bars (2 — specifically for torsion springs; do NOT substitute)
- Vice grips or locking pliers (2 pairs)
- Socket wrench set
- Drill and bits
- Level (4-foot)
- Tape measure
- Adjustable wrench
- Stepladder
- Safety glasses
- Heavy work gloves
- Helper (required — do not attempt alone)
Materials
- New sectional garage door kit (panels, track, hardware — comes as a kit)
- Torsion spring(s) — sized for door weight and height (often included in kit or ordered separately)
- Garage door opener bracket (if replacing opener at the same time)
- Lag screws (for track mounting into framing)
- Weatherstripping kit (if not included with door)
- Garage door lubricant (white lithium grease or silicone)
Critical Safety Warning: Torsion Springs
Torsion springs store enormous energy — enough to cause serious injury or death if released improperly. If your existing garage door has a torsion spring (the horizontal spring above the door opening, running along a metal bar), releasing and re-tensioning it requires winding bars and specific technique. Many professional garage door technicians specifically warn DIYers away from torsion spring work without proper training and tools.
Extension springs (the long springs that run along the horizontal tracks on each side) are less dangerous but still require care — always use safety cables threaded through the spring before removing.
If you are not comfortable with spring work, hire a garage door technician for the spring disassembly and re-tensioning steps only, and do the rest yourself. This is the safest approach.
Part 1: Remove the Old Garage Door
Step 1: Disconnect the Garage Door Opener
Pull the red emergency release cord hanging from the opener carriage to disconnect the door from the opener. Unplug the opener from the electrical outlet. This ensures the opener cannot activate while you’re working. If the door is currently closed (which it should be during removal), leave it closed — do not open the door before disconnecting the spring tension.
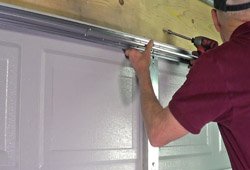
Step 2: Clamp the Tracks to Prevent Spring Release
Place vice grips or locking pliers on the vertical track on each side, just below the lowest roller, to prevent the door from moving while you release the springs. This is your mechanical safety backup.
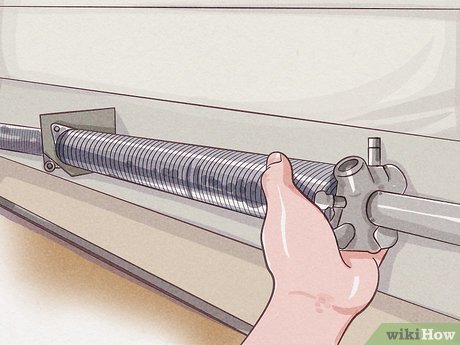
Step 3: Release the Torsion Spring Tension
This step requires winding bars — never use screwdrivers, pipes, or other improvised tools. Insert a winding bar into one of the holes in the winding cone of the torsion spring. Holding the bar firmly, loosen the set screws on the winding cone. Then use the winding bar to unwind the spring one quarter turn at a time, inserting the second winding bar as you go to maintain control. Count the turns as you unwind — you’ll need to add the same number of turns to the new spring. Continue until the spring is fully unwound and has no tension. Repeat for the second spring if your door has two.
If you have extension springs: disconnect the cables from the bottom brackets, then unhook the springs from the S-hooks on the track. Safety cables (if present) will prevent the spring from flying if it slips.
Step 4: Remove the Door Panels
Remove the hinge bolts connecting the panel sections together, starting from the top section. The top section connects to the horizontal track via the top roller bracket — disconnect it from the track first, then lower it. With a helper holding each panel, remove it from the opening. Work down one section at a time until all panels are removed.
Step 5: Remove the Tracks and Hardware
Unbolt the vertical track sections from the door jamb. Disconnect the horizontal track from the ceiling brackets and remove it. Remove the torsion spring bar and center bracket from above the opening. If the jamb or stop molding is damaged, replace it before installing the new door. Check the rough opening height and width — they should match your new door’s rough opening specifications.
Part 2: Install the New Garage Door
New sectional garage doors come as a complete kit with panels, track sections, hinges, rollers, and all hardware. Read the manufacturer’s instruction manual before starting — specific measurements and assembly sequences vary by brand.
Step 1: Install the Bottom Panel First
Set the bottom door panel in the opening, centered side to side. Attach the bottom seal weatherstripping to the bottom rail of this panel if not pre-installed. Install the bottom corner brackets on each side. Insert the rollers into the bottom corner brackets. Do not attach the vertical tracks yet — just set the panel in place with the rollers free.
Step 2: Attach the Vertical Tracks
Place the vertical tracks on each side, slipping the bottom corner bracket rollers into the track. Fasten the track to the door jamb using lag screws into the framing — NOT just into the drywall. Use a level to verify each vertical track is plumb before fully tightening. The track should be parallel to the door edge with about 1/4 inch of clearance between the track and the door panel edge.
Step 3: Add the Remaining Door Panels
With a helper, lift the second panel and set it on top of the first. Connect the two panels at the hinges using the middle hinges from the kit — typically one hinge every 24 inches across the width. Insert the rollers into the vertical track. Repeat for each panel section, working upward, until the top panel is in place. The top panel receives the top roller bracket instead of a standard hinge at the upper corners.
Step 4: Install the Horizontal Tracks
Attach the horizontal track sections to the top roller brackets and connect them to the ceiling via the rear track hangers. The horizontal track must be level — use a level to check before tightening the ceiling hangers. The track should slope slightly (about 1/4 inch drop over the full horizontal length) to help the door travel smoothly. Bolt the curved flag brackets where the horizontal and vertical tracks meet.
Step 5: Install the Torsion Spring and Hardware
Mount the center bracket above the door opening center. Slide the torsion bar through the center bracket and the spring drum on each end. Install the spring(s) on the bar — the winding cones face outward. Attach the cables to the bottom corner brackets on each side of the door, run them up along the door to the cable drums on the torsion bar. Wrap the cable around the drum grooves per the manufacturer’s diagram and secure with the set screw.
Step 6: Wind the Torsion Springs
This is again the highest-risk step. Using winding bars only, wind the spring the number of turns specified in your door kit’s instructions — typically one quarter turn per foot of door height (a 7-foot door gets about 7.5 turns per spring). Wind in the correct direction per the manufacturer’s instructions (left-wound springs and right-wound springs wind in opposite directions). After winding, tighten the set screws on the winding cone. Test spring tension by manually lifting the door to about waist height and releasing it — a properly tensioned door should stay in place (neither drift up nor fall down).
Step 7: Reinstall the Opener and Test
Reconnect the garage door opener to the door via the opener bracket and drive arm. Reconnect power to the opener. Set the opener’s force and travel limits per the opener’s instruction manual — these may need adjustment since the door is new. The opener’s auto-reverse safety must reverse the door when it contacts a 2×4 flat on the floor. Test this safety function before declaring the installation complete. For detailed opener setup, see our guide on How to Install a Garage Door Opener.
Step 8: Install Weatherstripping and Lubricate
Install the side and top weatherstripping around the door opening perimeter. Most kits include a vinyl stop seal for the sides and head. Lubricate all rollers, hinges, and the torsion spring bar with white lithium grease or a dedicated garage door lubricant. Do not use WD-40 on garage door components — it attracts debris and dries out rubber seals.
Pro Tips and Common Mistakes
- Never use improvised tools on torsion springs: Winding bars must fit snugly in the winding cone holes. Screwdrivers or pipes slip under load and the spring can release violently. Purchase proper winding bars before starting.
- Count the unwind turns precisely: Write down the number of turns on the old spring before unwinding. This determines how many turns to put into the new spring for correct tension.
- Lag into framing, not drywall: Track mounting requires structural connection to the door jamb framing. Drywall anchors will pull out under door operation stress.
- Check the door balance before connecting the opener: A properly balanced door lifts easily by hand and stays at waist height unsupported. An unbalanced door puts excessive load on the opener motor.
- Lubricate after every installation, not just at annual service: New rollers and hinges run dry from the factory. A first lubrication after installation extends the component life significantly.
Troubleshooting
The Door Binds or Jumps the Track
This usually means the tracks are not parallel to each other or are not plumb. Check the vertical track spacing at the top and bottom — they should be identical. Re-plumb the track on the binding side and re-secure. Also check that rollers are not worn or seized; worn rollers can cause the door to jump the track under tension.
The Door Won’t Stay Up When Opened Manually
The springs are under-tensioned. Add one quarter turn to each spring using the winding bars, then re-test. Repeat in quarter-turn increments until the door stays in the fully open position without drifting down.
The Opener Reverses Immediately When Closing
The opener force limit is set too low for the new door weight, or the door is binding in the track. First check for binding (clear any obstructions). Then increase the opener’s “close force” per the manual in small increments and re-test. Also verify the opener’s down travel limit is set correctly so the door reaches the floor before the motor reverses.
Frequently Asked Questions
How long does it take to replace a garage door?
For two experienced DIYers, expect 6–8 hours for a standard single-car door replacement and 8–12 hours for a double-car door. First-timers should add 2–4 hours. The spring work adds time and care. Most professional crews complete a single-car door replacement in 3–4 hours.
Can I replace just the garage door panels, not the whole door?
Yes, if your door brand and model is still in production. Panel replacement requires an exact match of panel size, material, and color — even a small mismatch is visible. Contact your door’s manufacturer with the door’s model number (usually on a sticker inside the top section). If panels are unavailable or mismatched, replacing the full door is usually the better option.
How much does a new garage door cost?
Basic single-car steel garage doors start at $300–$600. Mid-range insulated doors run $600–$1,200. Premium carriage-house style wood or fiberglass doors cost $1,500–$4,000+. Professional installation adds $200–$600 for a single door. DIY installation saves the labor cost but requires the right tools and a capable helper.
Do I need to replace the tracks when replacing the garage door?
If the new door is the same size and uses the same track system as the old door, you can often reuse existing tracks. If the new door is a different height (7-foot vs. 8-foot), the track configuration differs and must be replaced. Inspect old tracks carefully for bends, cracks, or excessive wear — damaged tracks cause premature roller wear and binding. When in doubt, use the new tracks included with the door kit.
What size garage door do I need?
Measure the rough opening width and height. Single-car openings are typically 8×7 or 9×7 feet. Double-car openings are typically 16×7 or 18×7 feet. The door width is the opening width; the door height matches the opening height. Add 2 inches of clearance above the finished door for the track hardware. Measure twice — a wrong-sized door is a costly mistake.
Conclusion
Replacing a garage door is one of the most impactful exterior upgrades you can make — new doors dramatically improve curb appeal, insulation, and security. The job is very doable for a two-person DIY team comfortable with mechanical work. The one area that requires extra respect and the right tools is the torsion spring. Handle the springs correctly and the rest of the installation is straightforward. Once the door is in and balanced, it should operate smoothly for 10–15 years before needing significant maintenance.
For related projects, see our guides on How to Fix a Garage Door Spring and How to Seal a Garage Door for weatherstripping details.
