A window well is the curved or rectangular steel or plastic barrier installed around a below-grade basement window to hold back soil, allow light in, and provide emergency egress. Installing one correctly means digging to the right depth, adding drainage gravel, anchoring the well to the foundation, and covering it to keep debris and water out. This guide covers the full process for a standard galvanized steel or polyethylene window well on a poured concrete or block foundation.
What You’ll Need
Tools
- Spade and pointed shovel
- Wheelbarrow (for soil removal)
- Drill with masonry bit (3/8-inch minimum)
- Hammer drill (for concrete or block foundations)
- Tape measure and pencil
- Level
- Caulk gun
- Safety glasses and work gloves
Materials
- Window well unit (galvanized steel or polyethylene, sized to your window width + at least 6 inches on each side)
- Lag bolts or concrete anchors (for fastening well to foundation)
- Pea gravel or crushed stone (for drainage layer — minimum 6 inches depth)
- Landscape fabric (optional — to keep soil from migrating into gravel)
- Masonry sealant or polyurethane caulk (to seal lag bolt holes)
- Window well cover (polycarbonate or metal grate)
- Drain pipe or drain tile (if connecting to a weeping tile system)
Safety Precautions
Before digging, call 811 (USA) to have underground utilities marked. Gas lines, electrical conduits, and water lines frequently run along foundations. Do not dig within 18 inches of a marked utility line without hand-digging carefully.
If the excavation exceeds 4 feet in depth, OSHA regulations require protective systems (shoring, sloping, or shielding). Most window well installations are 2–4 feet deep, but if you encounter soft or unstable soil, stop digging and shore the walls before proceeding.
When drilling into the foundation wall, wear safety glasses — masonry drilling throws sharp chips. Check for any waterproofing membrane on the exterior of the foundation before drilling through it — seal all penetrations immediately.
Sizing Your Window Well
The window well must be wider than the window opening by at least 6 inches on each side (12 inches of total extra width) to allow for comfortable egress and adequate light. For egress windows (required in sleeping rooms), the window well must provide at least 9 square feet of clear floor area if the well is deeper than 44 inches, with minimum dimensions of 36 inches in each direction per IRC code. Check your local building code — egress requirements vary by jurisdiction.
The well depth should allow the window to open fully with the sill at least 8 inches above the bottom of the well. Add 6 inches for the required gravel drainage layer at the bottom, plus any additional depth to reach below the frost line in cold climates (to prevent frost heave from lifting the well). For most basement windows, a well that extends 12 to 18 inches above the bottom of the window opening on the exterior is typical.
How to Install a Window Well
Step 1: Call 811 and Mark Utilities
Before any digging, call 811 — the national “Call Before You Dig” number in the USA — to have underground utilities located and marked. This is free and legally required in most states. Wait at least 3 business days after calling before digging, as the utility company has that window to respond and mark.
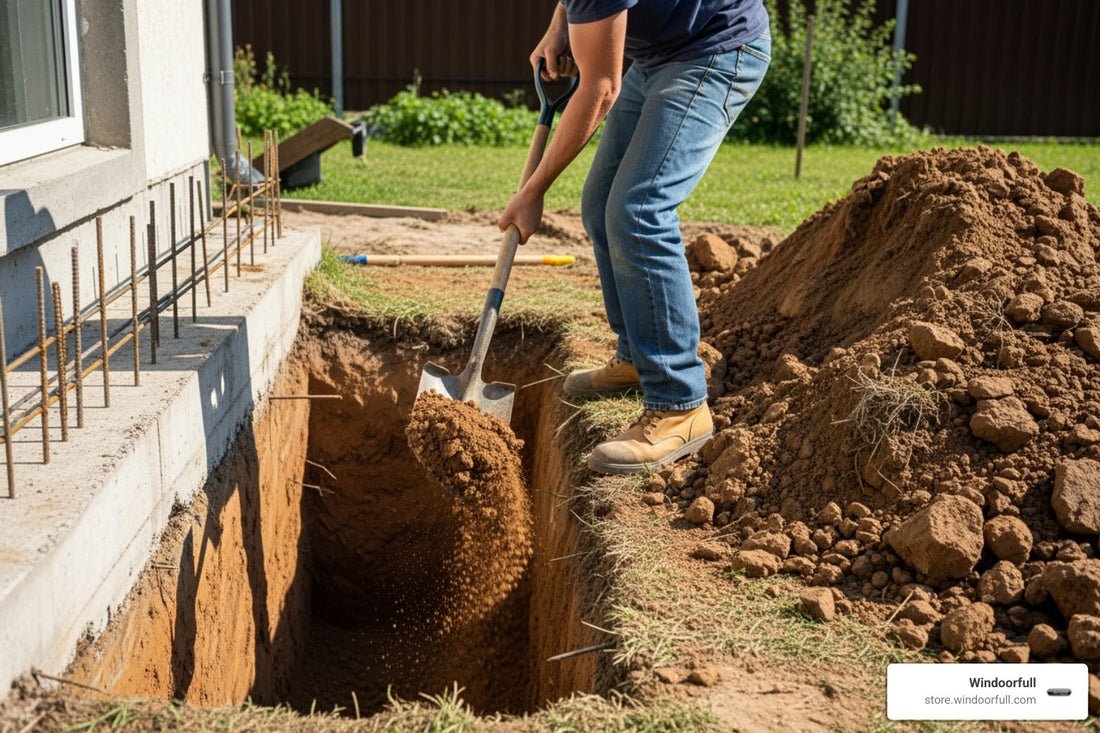
Step 2: Excavate the Area
Dig out the soil in front of the basement window using a spade shovel. The hole should extend at least 6 inches wider than the window well on each side and be centered on the window. Dig to a depth equal to the bottom of the window frame, plus 6 inches for the gravel drainage layer, plus a few inches buffer. Remove all excavated soil away from the hole — don’t pile it next to the excavation where it could collapse back in. For a typical basement window, you may be digging 2.5 to 4 feet deep.
Step 3: Add Drainage Gravel
Pour at least 6 inches of pea gravel or crushed stone into the bottom of the excavation. Compact it lightly by walking on it or tamping with a flat board. This gravel layer is what prevents water from pooling in the window well and pressing against the window — it must be present. If your home has a weeping tile (French drain) system running along the footing, consider connecting the window well drainage to it: run a 4-inch perforated drain pipe from the bottom of the well to the weeping tile system before filling with gravel.
Step 4: Set the Window Well Against the Foundation
Lift the window well unit and press it flat against the foundation wall, centering it over the window opening. The top edge of the well should be at least 2 inches above the finished grade (exterior ground level) — this prevents surface water from flowing into the well. Mark the position of the anchor holes on the foundation wall through the pre-drilled holes in the well’s flange.
Step 5: Drill Into the Foundation and Anchor
Remove the window well and drill anchor holes into the foundation at the marked points using a hammer drill and a masonry bit. For poured concrete, use 3/8-inch concrete anchors (like Tapcons or sleeve anchors). For block foundations, use lag bolts with lead anchors into the mortar joints or block cores. Drill to the anchor’s required depth — typically 1.5 to 2 inches into the foundation. Blow out the holes with compressed air to remove masonry dust before inserting anchors.
Step 6: Seal the Anchor Holes
Before re-positioning the window well, apply a bead of masonry sealant or polyurethane caulk around each anchor hole. This seals the penetration in any exterior waterproofing membrane on the foundation and prevents water from wicking through the bolt holes into the basement. This small step prevents a significant long-term leak path that most DIYers skip.
Step 7: Fasten the Window Well
Reposition the window well against the foundation, aligning the flange holes with the anchor holes. Drive the concrete anchors or lag bolts through the flange and into the foundation. Tighten until the well’s flange is flush and firm against the foundation wall. The well should not rock or flex once anchored.
Step 8: Add Landscape Fabric (Optional)
Drape landscape fabric (geotextile fabric) over the gravel in the bottom of the well and up the inside walls of the well before backfilling. The fabric allows water to pass through while preventing soil from migrating into the gravel layer and reducing its drainage capacity over time. Fold the fabric over the top of the gravel and secure it under the bottom of the well’s flange at the foundation wall.
Step 9: Backfill Around the Well
Backfill the soil around the exterior of the window well, compacting it in 6-inch lifts using a hand tamper or the back of a shovel. Slope the soil away from the foundation at a grade of at least 1 inch per foot for the first 6 feet — this critical slope directs surface water away from the foundation. Do not backfill inside the window well — the interior must remain open and filled with gravel only.
Step 10: Install the Window Well Cover
Install a polycarbonate or metal grate cover over the window well. Covers prevent leaves, debris, animals, and rainwater from filling the well. Polycarbonate (clear plastic) dome covers let in light while keeping out debris — they’re the most popular choice. For egress windows, the cover must be openable from the inside without tools or keys — do not use a locking cover on a sleeping room egress window. Secure the cover to the window well rim with the included clips or hooks.
Pro Tips and Common Mistakes
- Never skip the gravel drainage layer: A window well without drainage gravel is a water trap. Water that fills the well presses against the window seal and eventually leaks into the basement. The gravel is not optional.
- Seal all foundation penetrations: Every bolt hole through the exterior waterproofing membrane is a potential leak path. Apply masonry sealant to each hole before fastening.
- Grade the soil away from the foundation: Even a perfectly installed window well will fail if the surrounding grade slopes toward the foundation. Re-grade as needed when backfilling.
- Use the correct well size for egress: Sleeping rooms in basements legally require egress windows with adequate opening dimensions AND a window well with enough clear floor area for escape. Undersized wells fail inspection and are a life-safety issue.
- Check the cover’s egress compliance: For egress windows, the cover must be openable from the inside. Test this before finalizing installation.
Troubleshooting

Water Is Pooling Inside the Window Well
The most common cause is insufficient or missing drainage gravel, or the gravel has silted over. Dig out the bottom of the well, add fresh pea gravel to a minimum 6-inch depth, and add landscape fabric over the gravel to prevent future silting. If pooling persists after this, the soil around the foundation drains too slowly — connect the well’s gravel bed to a weeping tile or dry well system.
The Window Well Is Pulling Away From the Foundation
The anchor bolts are insufficient for the soil load pressing against the well. The soil behind the well exerts significant lateral pressure. Re-anchor with longer, larger-diameter concrete anchors and add additional anchor points. In clay soils (which expand when wet), this problem recurs — consider adding a French drain behind the well to reduce hydrostatic pressure on the wall.
Debris and Water Keep Getting Into the Well Despite the Cover
The cover fit is inadequate — either the cover is too small or its seam against the foundation has gaps. Replace with a correctly sized cover and seal the back edge of the cover where it meets the foundation with a bead of silicone caulk. Make sure the cover overlaps the well rim by at least 2 inches on all sides.
Frequently Asked Questions
Do I need a permit to install a window well?
If you’re installing a window well as part of a new egress window installation (converting a non-egress window to meet egress code), a building permit is almost always required. If you’re simply adding a well to an existing window with no changes to the window itself, many jurisdictions don’t require a permit — but check locally before starting.
How deep should a window well be?
The bottom of the window well should be at least 6 inches below the bottom of the window frame (for the gravel drainage layer), and the top of the well should sit at least 2 inches above exterior grade. For egress windows, code (IRC R310.2.3) requires that wells deeper than 44 inches provide a permanent ladder or steps.
What size window well do I need?
For a standard basement window, a well that is 6 inches wider than the window on each side and extends 18 inches out from the foundation is a good starting point. For egress windows, the well must provide at least 9 square feet of clear floor area per IRC code, with no dimension less than 36 inches.
Can I install a window well on a concrete block foundation?
Yes — use lag bolts with lead shields driven into the mortar joints, or use Tapcon concrete screws driven into the block cores. Avoid drilling through the face of a block into a hollow core without a solid anchor — the block face can crack. Drill into the mortar joint when possible for the strongest anchor point.
How do I keep my window well from flooding?
Install at least 6 inches of drainage gravel at the bottom of the well, slope the surrounding grade away from the foundation, and install a fitted cover to reduce rainwater entry. For chronic flooding problems, connect the gravel bed to a French drain or weeping tile system that routes water away from the foundation.
Conclusion
Installing a window well is a straightforward excavation and anchoring project — the key details are the gravel drainage layer, sealing the foundation penetrations, and sloping the grade away from the house. Get those three right and your window well will stay dry, stay in place, and serve its job of keeping light coming in and water out for decades. If it’s for an egress window, double-check the sizing and cover requirements with your local building department before backfilling.
For related projects, see How to Replace a Window for a guide on the window itself, and How to Repair a Concrete Floor for basement floor work you might be doing at the same time.
