
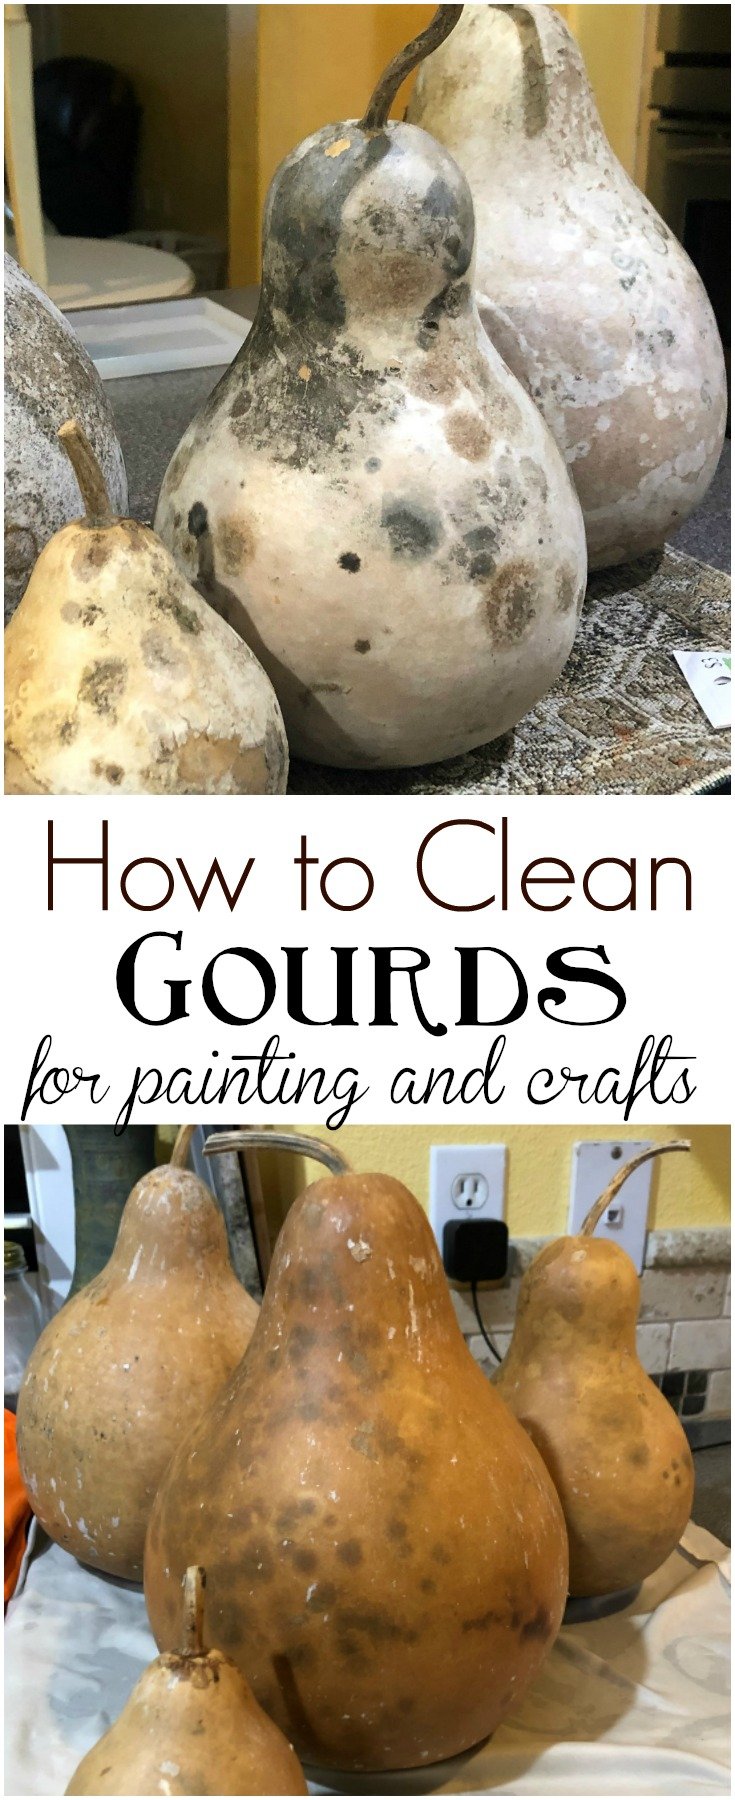
Gourds used for crafts, birdhouses, or home decoration need to be properly cleaned and dried before they can be worked or displayed. Fresh harvested gourds have a soft outer skin that molds during the drying process — this mold is normal and expected, but the exterior needs to be cleaned and scraped off after drying is complete. Properly cleaned and cured gourds last for years and provide an ideal surface for painting, carving, burning, or other decorative techniques. This guide covers cleaning fresh gourds for curing and cleaning fully dried gourds for crafts.
What You’ll Need
- Water
- Dish soap or bleach solution (for mold treatment)
- Stiff scrubbing pad or kitchen scrubber
- Copper pot scrubber or fine steel wool (for dried skin removal)
- Bucket or basin
- Clean cloths or towels
- Sandpaper (100–220 grit)
- Bleach (diluted, for mold prevention)
- Rubber gloves
Safety and Precautions
- Mold on curing gourds is normal. The outer skin molds during the multi-week curing process — this doesn’t mean the gourd is ruined. The gourd’s hard shell beneath remains intact. Clean the mold off the surface as described below.
- Wear gloves when handling moldy gourds. Concentrated mold spores on curing gourds can trigger allergic reactions in sensitive individuals. Work outdoors and avoid breathing the mold dust.
- Don’t rush the drying process. Harvesting and cleaning gourds before they’re fully cured results in soft spots and premature rotting. Gourds must cure completely (typically 1–6 months depending on size) before cleaning for craft use.
- Don’t use excessive water on recently dried gourds. The cleaned shell shouldn’t be soaked — a quick wash and dry is appropriate. Extended water exposure can soften the cured shell and cause internal moisture issues.
Step-by-Step: Cleaning Fresh Gourds for Curing
Harvest at the Right Time
Gourds are ready to harvest when the stem turns brown and dry, and the gourd sounds hollow when tapped. Harvest before the first hard frost. Leave 2–3 inches of stem attached — the stem protects the gourd during the curing process and prevents early moisture entry at the attachment point.
Wipe Off Surface Dirt
Before curing, wipe freshly harvested gourds with a damp cloth to remove soil and debris. For ornamental gourds that will only be displayed for a season (not crafted), this is sufficient cleaning. For gourds intended for long-term crafts, clean more thoroughly.
Apply a Diluted Bleach Treatment (Optional)
Wiping freshly harvested gourds with a 10% bleach solution (1 part bleach to 9 parts water) on the outside surface helps reduce the mold load during curing, preventing some surface mold growth. This is optional but useful in humid climates where mold is heavy during curing. Don’t saturate the gourd — a wipe-down is sufficient.
Cure in a Warm, Ventilated Space
Place gourds in a single layer on a rack, screen, or elevated surface with good air circulation. Turn them every 1–2 weeks so no surface rests against a solid support for extended periods (this prevents flat spots). The curing process takes 1–6 months depending on size. Small ornamental gourds may cure in 4–6 weeks. Large hard-shell gourds (bottle gourds, canteen gourds, birdhouse gourds) take 3–6 months. The gourd is fully cured when it feels lightweight, sounds hollow when tapped, and the seeds rattle inside.
Step-by-Step: Cleaning Fully Dried Gourds for Craft Use
Soak in Warm Soapy Water
Place the dried gourd in a bucket or tub filled with warm water and a generous amount of dish soap. Let soak for 15–30 minutes. The soak softens the dried outer skin and surface mold, making it much easier to scrub off. For heavily molded gourds, a 10% bleach solution can be used instead of plain soapy water.
Scrub Off the Outer Skin
Using a copper pot scrubber, rough scrubbing pad, or fine steel wool (for stubborn areas), scrub the entire gourd exterior. The cured outer skin (which appears as flaking, mottled material, often with mold discoloration) needs to be removed to reveal the smooth tan shell beneath. This takes physical effort — work in sections around the entire gourd surface. The goal is to remove the outer skin layer, not to scrub into the hard shell beneath.
Check for Soft Spots
As you clean, feel for any soft spots — areas where the shell feels spongy or gives under pressure. Soft spots indicate the gourd didn’t cure properly in that area. Small soft spots can be allowed to dry further after cleaning. Large soft spots that go through the shell mean that section has rotted — the gourd may not be usable for all applications but may still work for simple display or partial craft projects.
Rinse and Dry Thoroughly
Rinse the scrubbed gourd with clean water to remove all soap, bleach residue, and loosened skin material. Dry immediately with a clean towel, then allow to air dry completely — overnight at minimum. The cleaned gourd shell should be smooth, uniformly tan to buff colored, and hard to the touch.
Sand for a Smooth Finish (Optional)


For craft projects requiring a smooth, polished surface — painting, pyrography (wood burning), or decoupage — sand the dried gourd surface starting with 100-grit sandpaper, working up to 220 grit for a fine finish. Sand in circular motions over the entire surface. Wipe off dust with a dry cloth before applying any finish or paint.

How to Clean the Inside of a Gourd
For birdhouse gourds or any project requiring an open interior, the inside must also be cleaned:
- Cut the opening (if not already present) according to your project specifications using a jigsaw or Dremel rotary tool.
- Shake out seeds and loose dried organic material.
- Use a long-handled bottle brush or twisted wire wrapped in coarse steel wool to scrub the interior.
- Rinse with water and allow to dry completely with the opening facing down for drainage.
- For birdhouses, a natural (unfinished) interior is preferred by most bird species — don’t paint or varnish the interior.
Pro Tips for Gourd Cleaning and Craft Prep
- Don’t despair over extreme mold during curing. The exterior of a properly cured gourd often looks terrible — black, green, and brown mold patches are completely normal and clean off to reveal a beautiful buff-colored shell.
- Cure outdoors in summer where possible. Outdoor curing provides better air circulation and natural temperature fluctuation that encourages even drying. Keep gourds off the ground and out of direct rain.
- Smaller gourds cure faster. Small decorative gourds are usually craft-ready within 4–6 weeks. Plan your projects accordingly if you’re growing your own.
- Seal before painting. Apply a coat of white gesso or clear sanding sealer before painting to prevent paint absorption into the porous shell and achieve more vibrant paint colors.
Common Mistakes When Cleaning Gourds
- Cleaning before fully cured. A gourd that isn’t fully cured has a soft shell that crumbles and fails during cleaning. Wait for the full curing period.
- Not soaking before scrubbing. Trying to scrub a dry outer skin before soaking is very difficult — the soak is what makes the cleaning step manageable.
- Discarding moldy gourds during curing. Mold on the exterior is expected and normal during curing. It does not mean the gourd has failed.
- Skipping the soft spot check. Working with a compromised gourd through a complex craft project only to have it fail due to a rotten section is disappointing. Check carefully before investing time in craft work.
- Using gourds before they’re completely dry after cleaning. Any residual moisture inside the shell causes future mold, odors, and structural failure in birdhouse or vessel gourds.
Frequently Asked Questions
How long does it take to cure a gourd?
Small ornamental gourds typically cure in 4–8 weeks in warm, well-ventilated conditions. Medium-sized gourds (6–8 inches) take 2–4 months. Large hard-shell gourds (over 12 inches) like bottle gourds and canteen gourds require 4–6 months or longer. The gourd is ready when it’s very lightweight, sounds hollow, and seeds rattle audibly inside.
Can I speed up gourd curing?
Warm temperatures and good air circulation speed curing. Curing outdoors in summer naturally maximizes both. Indoors, a warm room with a fan circulating air accelerates curing. Avoid forced artificial heat from heaters or heat lamps — too-rapid drying causes cracking and uneven curing.
What causes gourds to rot during curing?
Rotten gourds during curing are usually caused by: harvesting before fully mature, damage to the skin during harvest, exposure to heavy rain during curing, or resting on a solid surface that prevents airflow beneath. Using a wire rack or elevated screen prevents most rot issues by maintaining air circulation around the entire gourd.
Can ornamental gourds be used for birdhouses?
Yes — bottle gourds are one of the most popular and effective birdhouse materials for many North American species including purple martins, bluebirds, and wrens. After curing and cleaning, cut the appropriate entrance hole for your target species, add drainage holes in the bottom, and hang with a hook through the neck. Purple martin colonies particularly favor clusters of gourd birdhouses on a central pole system.
How do I preserve a gourd for long-term display?
After cleaning and drying, apply 2–3 coats of clear polyurethane, lacquer, or shellac to the exterior of the gourd. Each coat prevents moisture reabsorption, strengthens the shell, and enhances the natural color. Sand lightly between coats with 220-grit paper for a smooth, professional finish. Properly sealed gourds last 10–20+ years in indoor display.
Conclusion
Cleaning gourds is a two-phase process — curing first, then cleaning the outer skin after drying is complete. The curing phase requires patience and proper air circulation; the cleaning phase requires soaking and physical scrubbing. The mold and discoloration that develop during curing are normal and clean off to reveal a smooth, beautiful shell ready for craft projects, painting, or natural display. With proper technique, a single gourd harvest can provide years of material for creative projects.
For related natural material preparation guides, see our articles on how to clean driftwood and how to clean deer antlers. For yard and garden maintenance, our guide on how to clean artificial grass covers outdoor surfaces in a similar DIY maintenance context.
