Shed doors are one of the most common DIY shed repair and replacement projects — and one of the most satisfying to get right. Whether your existing doors are sagging and rotting or you’re building a new shed from scratch, constructing solid, weather-tight shed doors is achievable in a half-day. This guide covers how to build and hang single swing doors, double swing doors, and the basics of a sliding barn-door setup — all using basic tools and lumber.
What You’ll Need
Tools
- Circular saw or table saw
- Drill/driver and bits
- Carpenter’s square and level
- Tape measure and pencil
- Clamps (bar clamps)
- Safety glasses and work gloves
Materials (for a 4-foot-wide, 6-foot-tall double door)
- 2×4 lumber: 6 pieces at 8 feet (for door frames)
- 1/2-inch exterior plywood: 2 sheets (for door skins) OR T1-11 siding panels
- Exterior screws: 2.5-inch (for frame assembly) and 1.5-inch (for skin attachment)
- Heavy-duty exterior strap hinges: 3 per door leaf (6 total)
- Anti-sag gate kit or tension wire with turnbuckle (one per door)
- Door latch or barrel bolt
- Exterior wood sealer or stain
- Lag screws: 3/8-inch x 3-inch (for hinge-to-frame attachment)
Safety and Precautions
- Shed doors are heavy — a 2×3 foot single door weighs 30–50 lbs; a 4-foot double door set weighs 80–120 lbs. Have a helper to hold doors while hanging hinges.
- Properly shim and level the door frame before hanging doors — a door frame that’s out of square or out of plumb causes binding, premature wear, and gaps that let in weather and pests.
- Use exterior-grade hardware throughout — zinc-plated screws and hinges rust quickly in outdoor environments, leaving stains and losing structural strength. Use hot-dipped galvanized or stainless steel hardware.
- Pre-drill all screw locations in the door frame and siding — splitting the frame lumber at a screw point weakens the connection significantly.
Door Types Explained
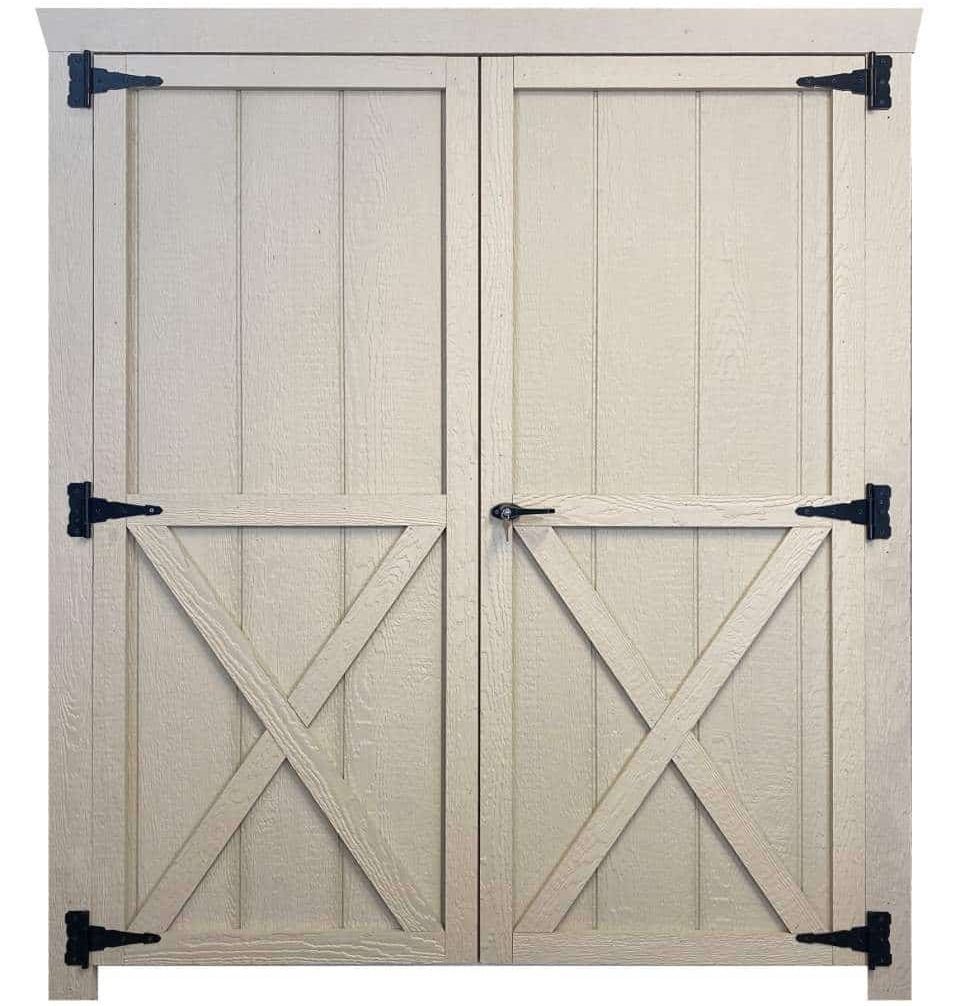
Single swing door: One door panel on hinges, swings open in one direction. Best for small sheds (4 feet wide or less). Simple to build and hang. Double swing doors: Two door panels meeting in the center, each hinged to one side. Best for larger openings (5–8 feet wide). Allows full-width access for riding mowers, wheelbarrows, ATVs. Sliding doors (barn door style): Door slides horizontally on a track rather than swinging. Best when swing clearance is limited. More hardware complexity but no swing space required.
Step-by-Step: How to Build and Hang Shed Doors
Step 1 — Measure the Door Opening Precisely
Measure the width and height of the door opening at the top, middle, and bottom (width) and left, center, and right (height). Openings are often not perfectly rectangular — use the smallest measurement for each dimension. Your door should be 1/2 inch narrower than the opening width and 1/2 inch shorter than the opening height, leaving 1/4-inch clearance gap on each side and 1/4-inch at the bottom. For double doors, divide the width in half and subtract 3/4 inch total from each door to account for the center meeting seam gap.
Step 2 — Cut the Door Frame Members
For each door panel, cut from 2×4 lumber: two vertical stiles at the full door height, one top rail and one bottom rail at the net width (door width minus both stile widths), and one or two center rails depending on door height (add a center rail at mid-height for doors taller than 48 inches). The rails sit between the stiles, so the assembled frame width equals: stile + rail + stile = net width. The frame height is set by the stile length.
Step 3 — Assemble the Door Frame
Lay all frame members on a flat, level surface. Position the top and bottom rails between the stiles. Check for square using a carpenter’s square at each corner — both diagonal measurements must be equal. Apply exterior wood glue to each joint and drive 2.5-inch exterior screws through the stiles into the rails at each corner (two screws per joint). Add the center rail if used, screwing through the stiles into each end. Allow glue to set with the frame clamped flat while you prepare the door skin.
Step 4 — Add the Diagonal Anti-Sag Brace
Every shed door over 24 inches wide needs an anti-sag brace. Install a tension wire with turnbuckle (the most reliable method) running from the bottom hinge-side corner to the top latch-side corner, or cut a 2×4 diagonal in compression running the same direction. This prevents the latch corner from drooping over time. For a door using T1-11 siding as the skin, the full-sheet skin itself provides significant diagonal stiffness — but a wire/turnbuckle system provides additional insurance for wider or heavier doors.
Step 5 — Attach the Door Skin
If using exterior plywood: cut the plywood to the exact door frame dimensions and fasten to the front face of the frame using 1.5-inch exterior screws at 6-inch intervals around the perimeter and 8-inch intervals in the field. The plywood skin significantly stiffens the door and provides the weather barrier. If using T1-11 siding: cut T1-11 to size and fasten the same way — T1-11 combines the structural skin and the finished siding in one panel and is the most popular choice for shed doors. Apply exterior caulk at all panel edges and any gaps.
Step 6 — Mark and Install Hinges on the Door
For a 6-foot tall door, use three heavy-duty strap hinges or T-hinges: one 10 inches from the top, one 10 inches from the bottom, and one in the middle. Mark the hinge centerlines on the hinge-side stile. Drill pilot holes for all hinge screws and fasten the hinge leaves to the door stile using 1.5-inch exterior screws or lag screws. Heavy-duty strap hinges provide the best support for wide shed doors — a 12-inch strap hinge creates 12 inches of leverage against the force of the door weight trying to pull the hinge screws free.
Step 7 — Square the Door Frame Before Hanging
Before hanging, confirm the shed door frame (the rough opening in the shed) is plumb and square. Hold a level against both door jambs vertically and check for plumb. If the jamb is out of plumb, shim the low side with cedar shingle shims until it’s plumb. This step prevents a door that hangs plumb but sits askew in a non-plumb opening. Drive 3-inch screws through the shimmed jamb into the shed framing to lock the shims in place.
Step 8 — Hang the Door
With a helper, hold the door in the opening at the correct position — 1/4-inch gap at the top, 1/4-inch gap at the hinge side, 1/4-inch gap at the latch side, and 1/2-inch gap at the bottom. Prop the bottom of the door at the correct height with a cedar shingle or scrap board shim. With the door held in position, mark the hinge locations on the door jamb. Set the door aside and mount the jamb-side hinge leaves at your marks using 3/8-inch lag screws driven into the shed framing behind the jamb. Lift the door back into position and connect the hinge leaves.
Step 9 — Test the Swing and Install the Latch
Open and close the door several times. It should swing smoothly with consistent gaps all around. Check for binding — a door that binds at the top-latch corner needs the tension wire adjusted; a door that binds at the bottom-hinge corner has an overly plumb or leaning hinge post. Once the swing is correct, install the door latch. A barrel bolt (slide bolt) is the most secure option for a shed door — one at the top of the door leaf and one at the bottom keeps the door firmly shut in wind. A latch padlock hasp adds security.
Step 10 — Weatherstrip and Seal
Apply exterior wood sealer or stain to all door surfaces — both faces, all four edges, and the end grain at top and bottom (end grain absorbs moisture most aggressively). Install foam or rubber door weatherstripping around the door frame jambs for a weather-tight seal. For double doors, install a vertical astragal (a T-shaped piece of trim) on the center seam of one door to create a weather seal between the two panels when closed.
How to Build a Sliding Shed Door (Overview)
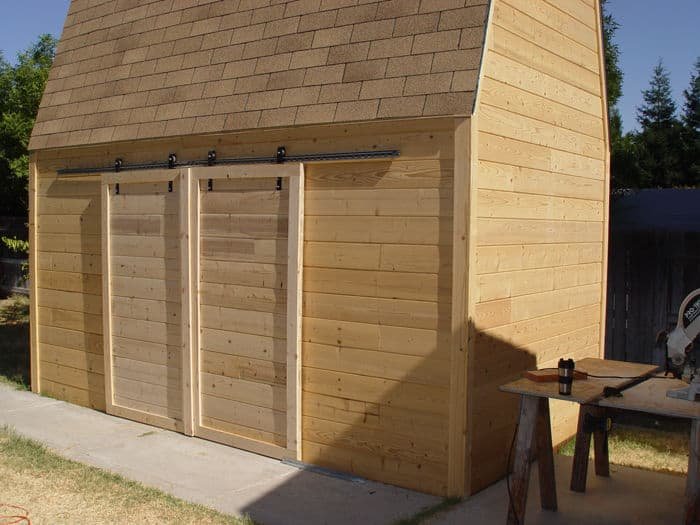
A sliding shed door uses a top-mounted roller track and rollers to allow the door to slide horizontally rather than swing. Build the door panel the same way as above (frame + skin). Install a double-wide structural header above the opening to support the track. Mount the sliding track hardware (available from hardware stores as “barn door hardware” kits) to the header. Hang the rollers on the door top and roll them onto the track. Add a floor-level guide to keep the door from swinging outward. Sliding doors work best for openings where there’s 4+ feet of clear wall space beside the opening to park the sliding door when open.
Pro Tips for Shed Door Building
- T1-11 siding panels are the fastest shed door material — the siding itself serves as the structural skin and the finished exterior at once, eliminating the need for a separate siding step.
- Prime and paint or stain the door before hanging it — all six surfaces (front, back, top, bottom, and both edges) are easy to coat on a flat workbench; they’re much harder to coat after the door is hung.
- Use three hinges minimum on any door over 4 feet tall — three hinges distribute the load and prevent racking far better than two.
- Install a door threshold (a sloped strip of wood or aluminum at the bottom of the opening) to direct rain away from the gap under the door — this prevents water infiltration and reduces rot at the bottom of the door and floor framing.
Frequently Asked Questions
What size lumber should I use for shed doors?
2×4 framing is standard for shed door frames — it provides adequate strength without excessive weight. For very large or heavy doors (over 4 feet wide and 7+ feet tall), use 2×6 stiles for additional stiffness. The door skin is typically 1/2-inch exterior plywood or T1-11 siding (which is approximately 5/8-inch thick).
How do I fix a sagging shed door?
The fix depends on the cause. If the door frame is still square but the door sags at the latch corner: install or re-tension a diagonal wire brace running from the bottom hinge corner to the top latch corner. If the door frame itself has warped or racked: remove the door, disassemble it, flatten the frame (clamp square on a flat surface and add a new diagonal brace), re-skin, and rehang. If the hinge post has leaned: re-plumb and brace the post before adjusting anything else.
Should shed doors open in or out?
Out-swinging doors are preferred for most sheds — they keep rain from dripping into the shed when the door is open, allow the full interior floor space to be usable without door swing clearance, and are less likely to be blocked from opening by snow accumulation inside. The only situation where inswing doors are preferable is on sheds built into hillsides or with limited exterior swing space.
How do I make shed doors that won’t warp?
Build the frame from stable, kiln-dried lumber, add a diagonal brace, attach a full-sheet plywood or T1-11 skin (the skin acts as a stable diaphragm that resists racking), and seal all surfaces including end grain before hanging. Uncoated end grain absorbs moisture rapidly — moisture differential between the coated face and uncoated end grain causes differential expansion and warping. Seal everything.
What is the best wood for shed doors?
Cedar is the premium choice — naturally rot-resistant and stable. Western red cedar or Atlantic white cedar are both excellent. For more affordable doors, use pressure-treated pine for the frame (structural stability + rot resistance) and T1-11 siding panels (factory-primed and durable) for the skin. Avoid using regular construction SPF lumber without sealing — it twists and warps quickly in outdoor environments.
Conclusion
Building solid shed doors is a half-day project when you have the right approach: accurate measurements, a properly framed and braced door, a squared and plumbed door frame, heavy-duty hinges attached with lag screws, and all surfaces sealed against moisture. The diagonal anti-sag brace is the most important single step — every door wider than 24 inches needs one. Get these fundamentals right and your shed doors will function smoothly for the life of the shed.
For the rest of your fence and outbuilding projects, check our guides on How to Build a Wooden Gate and How to Build a Wood Fence for compatible construction techniques.
