Building a wood fence is one of the highest-value DIY projects a homeowner can complete — a professional fence installation runs $15–$45 per linear foot, while a DIY build costs $4–$12 per linear foot in materials. A properly built wood fence, with posts set below the frost line and boards sealed against moisture, lasts 15–25 years. This guide covers post setting, rail installation, and picket or panel attachment for a standard 6-foot privacy fence.
What You’ll Need
Tools
- Post hole digger (manual clamshell style) or gas-powered auger (rent for larger projects)
- Tamper or digging bar
- Carpenter’s level and torpedo level
- String line and stakes (for fence alignment)
- Circular saw or miter saw
- Drill/driver and bits
- Measuring tape and chalk line
- Safety glasses and work gloves
Materials (per 8-foot fence bay)
- Pressure-treated 4×4 posts: 1 per bay + 1 (posts are 8 feet apart, so a 48-foot fence needs 7 posts)
- 2×4 rails: 2 per bay (top and bottom, 8 feet long)
- 1×6 cedar pickets or 6-foot fence panels: enough to cover the bay width
- Concrete mix (2-3 bags per post hole)
- Gravel (for post drainage layer)
- Exterior fence screws (2-inch): 2 lbs per bay
- Post caps (optional, to protect post tops from moisture)
Safety and Precautions
- Call 811 before digging any post holes. Underground utilities must be marked before any fence installation. This is legally required in all US states.
- Check property lines and local codes. Fences must stay within your property. Hire a surveyor if uncertain about your property line location. Most municipalities have setback rules (minimum distance from property line), height limits, and required permits for fence construction.
- Contact neighbors before installing a fence along shared property lines — good neighbor relations and often local ordinances require agreement on fence placement and style for boundary fences.
- Post holes below the frost line prevent frost heave — posts set too shallow will heave in freeze-thaw cycles, tilting and damaging the fence. In most northern US states, the frost line is 24–48 inches deep.
Step-by-Step: How to Build a Wood Fence
Step 1 — Plan the Fence Layout
Walk your property with a measuring tape and mark the planned fence line with stakes and string. Note any grade changes along the route — fences can “step” down a slope in level sections (stepped fence) or follow the slope continuously (racked fence). Mark all gate locations. Calculate the number of posts at 8-foot spacing along the fence line (8 feet on center is standard for 2×4 rails — wider spacing causes rails to sag). Order materials based on your post count and linear footage.
Step 2 — Call 811 and Check Property Lines
Submit a dig request through 811 (or the online portal at 811.com) at least 2–3 business days before your planned start date. Your utility companies will mark underground lines. Verify your property lines with your property deed and survey map — if any doubt, hire a licensed surveyor before installing permanent fence posts. Getting the fence two inches over the property line is a legal problem; discovering it after the fence is built is an expensive one.
Step 3 — Set Corner and End Posts First
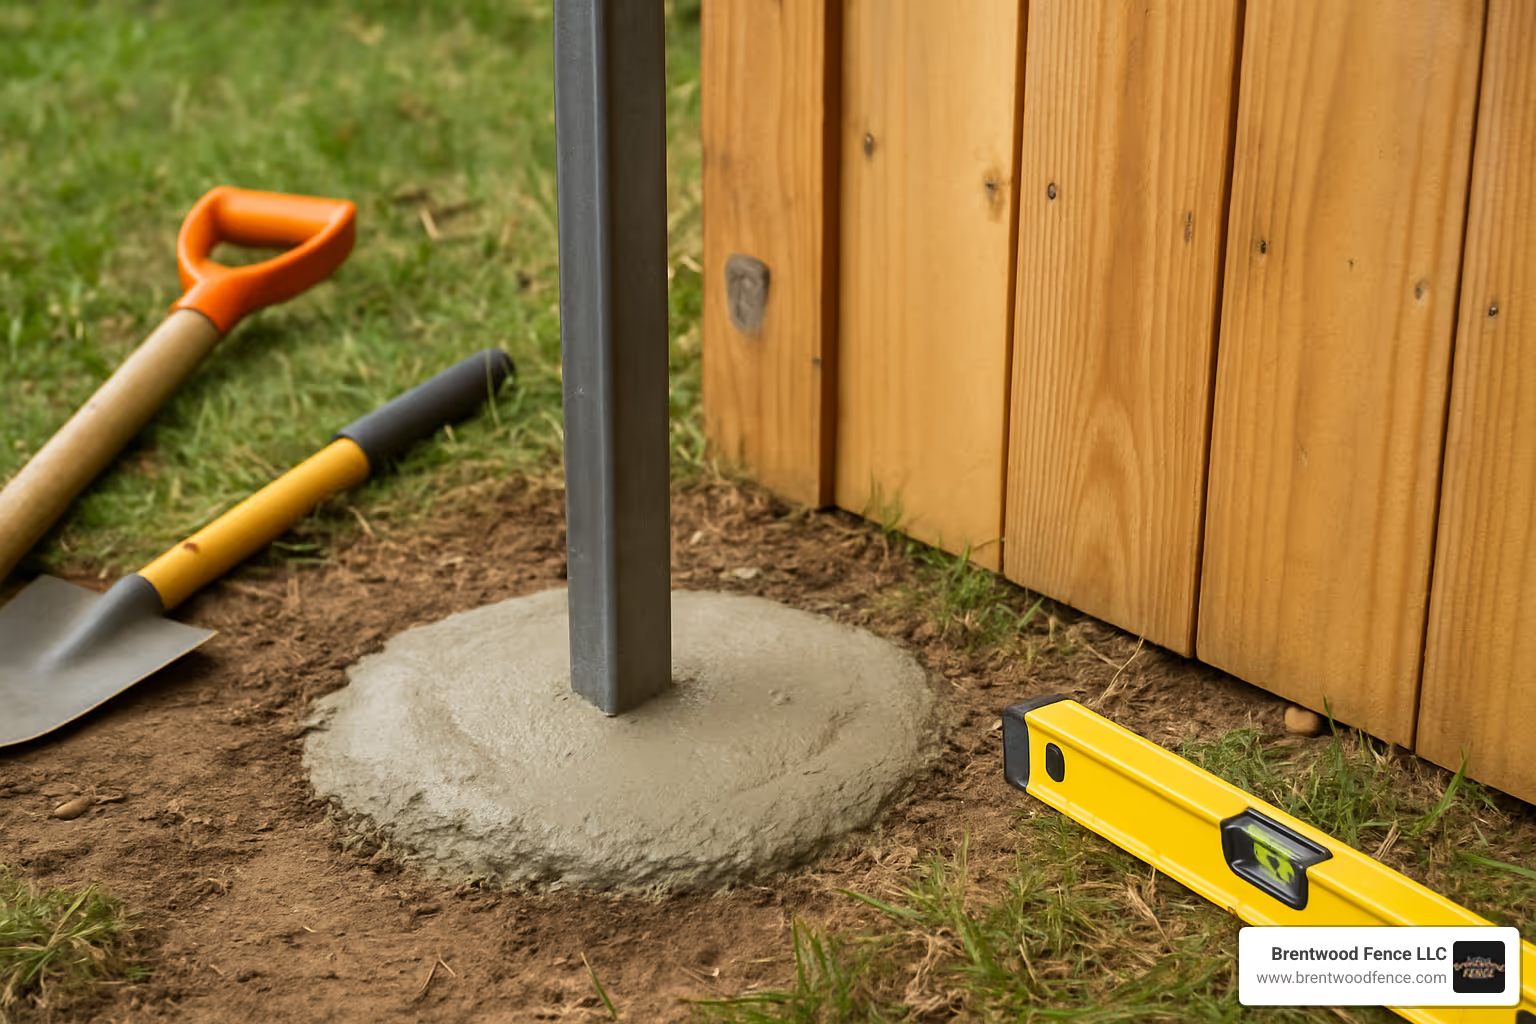
Set the corner and end posts first — these establish the baseline alignment for the entire fence. Dig post holes at each corner and end post location. The hole should be 10 inches in diameter and deep enough to place the post below the frost line plus an additional 6 inches of gravel drainage layer. For a 6-foot fence, posts need to be 8 feet total length (2 feet in the ground + 6 feet above). Add 3–6 inches of gravel to the bottom of each hole for drainage. Set the post in the hole, brace it plumb in two directions with temporary 2×4 diagonal braces, and fill with concrete. Mix concrete in the hole by adding it dry and pouring water over it (for fast-setting mix) or premix in a wheelbarrow and pour in. Allow corner posts to cure 24 hours before stringing the line for the remaining posts.
Step 4 — String the Line and Set Remaining Posts
Once corner and end posts are set, string a taut string line from post to post at the fence height. This string establishes the alignment and top height for all intermediate posts. Dig and set each intermediate post against the string line, checking that the face of each post is plumb (vertical) and its top is at the correct height relative to the string. Use temporary diagonal braces to hold each post plumb until the concrete cures. Set all posts before removing any braces.
Step 5 — Allow Concrete to Cure Fully
Fast-setting concrete (like Quikrete Fast-Setting) achieves working strength in 20–40 minutes and full strength in 24 hours. Standard concrete mix requires 24–48 hours of curing before applying load. Do not attach fence rails or panels before the posts are fully cured — loading posts before concrete sets can tilt them out of plumb and require costly re-setting.
Step 6 — Install the Rails
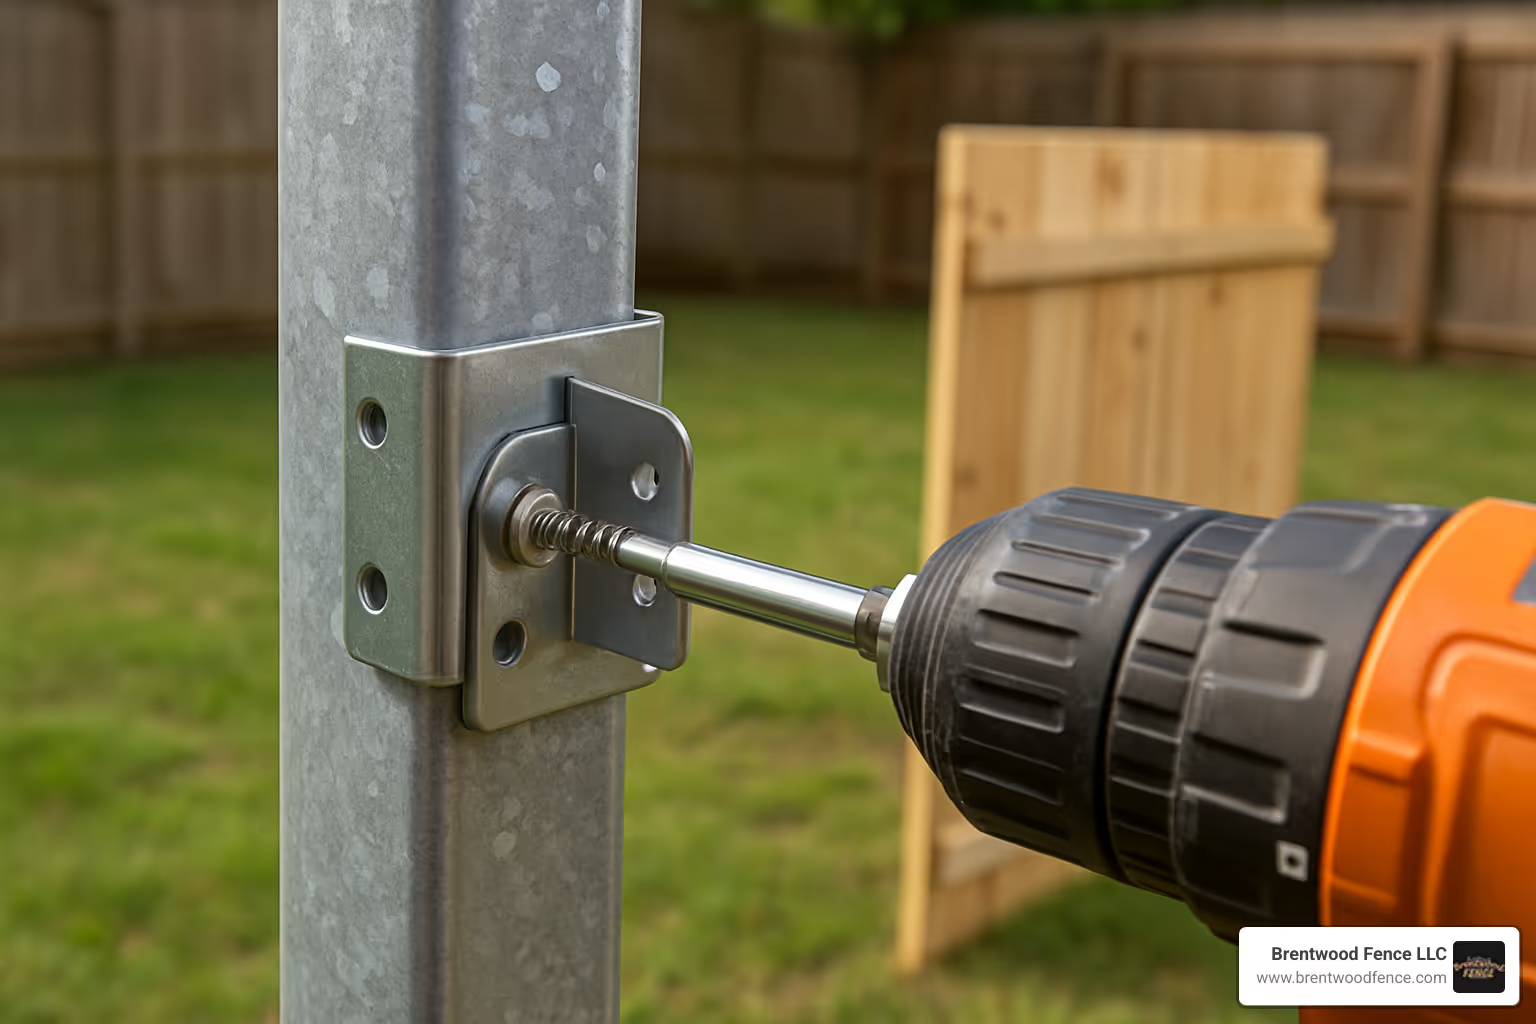
For a standard 6-foot privacy fence, install a top rail and a bottom rail on each bay. Position the top rail 6–8 inches below the post tops (this allows the pickets to run above the rail to the top of the fence) and the bottom rail 6–8 inches above the ground (keeping the bottom of the fence off the wet ground reduces rot). Attach each rail to the post using fence rail brackets (metal L-brackets that hold the rail in a notch) or by toe-nailing the rail into the post with 3-inch exterior screws. Two screws per rail end minimizes future loosening.
Step 7 — Attach the Pickets or Panels
For a privacy fence with individual pickets: start at one corner post and work along the fence. Space pickets consistently — tight against each other for a solid privacy fence, or gapped 1–1.5 inches for a semi-privacy style that allows some airflow (recommended in high-wind areas). Use two screws per picket per rail (four screws total per picket) — pre-drill to prevent splitting. Use a scrap board as a spacer block to keep gaps consistent. Check every 4–5 pickets that you’re still plumb and on-grade. For pre-assembled panels: lift and set each panel between posts and fasten to the rails with screws. Panels are faster but allow less customization for sloped ground.
Step 8 — Cap the Post Tops
Post tops are the primary entry point for moisture that causes post rot. Cut or buy post cap pieces to shed water away from the top end grain. The simplest approach: cut the post top at a 30–45 degree angle with a saw so water runs off. Alternatively, install decorative post caps (flat or pointed) that cover the top end grain entirely. Apply a coat of exterior wood preservative or sealer to all cut end grain on posts — end grain absorbs moisture much faster than face grain and is the primary starting point for wood rot.
Step 9 — Build and Hang Gates
Gates need an extra-strong post on each side — a gate post carries the weight and swing stress of the gate in addition to the fence load. Use 4×6 or doubled 4×4 posts for gate posts, set 2.5–3 feet in the ground in concrete. Build the gate frame from 2×4 lumber: two vertical stiles, two horizontal rails, and a diagonal brace from the bottom hinge corner to the opposite top corner (this prevents the gate from sagging). Attach gate pickets matching the fence pickets. Hang with heavy-duty exterior hinges (a 6-foot gate needs at least two 3-inch hinges) and install a positive-locking gate latch.
Step 10 — Seal and Maintain
Apply a wood preservative, sealer, or exterior stain to the entire fence after installation — this step dramatically extends fence life. Cedar and redwood can be left to weather naturally to gray, but a clear or tinted sealer every 3–5 years keeps them looking fresher. Pressure-treated pine benefits from a semitransparent stain applied within the first year after installation (when the wood is dry enough to absorb finish). Annual inspection for loose pickets, loose post tops, and any signs of rot at ground level allows for early, inexpensive repairs before problems compound.
Pro Tips for Wood Fence Building
- Rent a gas-powered auger for any fence with more than 8 posts — manual post hole diggers are exhausting in hard soil. Auger rental for a day typically runs $70–$120 and dramatically speeds the project.
- Use cedar or redwood for pickets even if the posts are pressure-treated pine. Cedar and redwood naturally resist rot and look significantly better over time than pine pickets.
- Leave picket bottoms 2 inches off the ground. Pickets touching the ground wick moisture and rot from the bottom up. The 2-inch gap keeps them dry.
- Account for wood movement — cedar expands and contracts with moisture changes. Tight joints look great in dry weather but can buckle when wet. A 1/8-inch gap between pickets accommodates this movement without visible gapping when dry.
Frequently Asked Questions
How deep should fence posts be set?
The rule of thumb is to bury 1/3 of the total post length in the ground, plus 6 inches. For a 6-foot fence, use 8-foot posts: 2 feet in the ground plus 6 inches for drainage gravel = 2.5 feet minimum. In areas with a deep frost line (northern US), set posts below the local frost depth — check with your local building department. Frost heave on posts set too shallow is the most common fence failure.
Do I need concrete for fence posts?
Concrete is recommended for any post carrying load or subject to frost heave. It stabilizes the post and resists lateral forces from the fence panels and wind. Gravel backfill is sometimes used as an alternative in areas with excellent drainage and no frost concerns, but concrete provides better stability in most residential applications. Use fast-setting concrete (Quikrete 50 lbs per post is adequate for most fence posts) for convenience.
How far apart should fence posts be?
8 feet on center is the standard spacing for residential wood fences using 2×4 rails. This keeps rails from sagging between posts. Some designs use 6-foot spacing for heavier panels or longer-span applications. Gate openings should have posts set to your exact desired gate width (typically 36–48 inches for a single gate, 8–12 feet for a double drive gate).
What is the best wood for fence posts?
Pressure-treated pine (ground-contact rated, UC4B or UC4C treatment) is the most widely available and affordable option for in-ground posts. Cedar and redwood are naturally rot-resistant but expensive for in-ground use. Black locust posts are exceptionally rot-resistant and the traditional choice in areas where it grows — they last 50+ years in-ground. Avoid untreated standard construction lumber for any in-ground application — it deteriorates in 2–5 years.
How long does a wood fence last?
With proper post depth, concrete setting, and regular sealing: pressure-treated posts last 20–30 years; cedar pickets last 15–20 years with periodic sealing. Untreated pine pickets last 7–12 years. The weakest point is always the post at grade level — where the post transitions from below to above ground, moisture concentration accelerates decay. Using a post base bracket (metal hardware that keeps the post above the concrete, with air gap) extends post life by 30–50%.
Conclusion
Building a wood fence is a skill that pays significant dividends — you’ll save thousands of dollars compared to professional installation and get exactly the fence style you want. Set posts deep in concrete, install rails at top and bottom, attach pickets consistently, cap the post tops, and apply a sealer. A weekend and $500–$1,500 in materials builds a fence that defines your property for decades.
Once your fence is in, complete your outdoor space with our guide on How to Build a Wooden Gate for a matching gate entry. And if you’re building out the full yard, see our How to Build a Backyard Firepit guide for another great weekend project.
