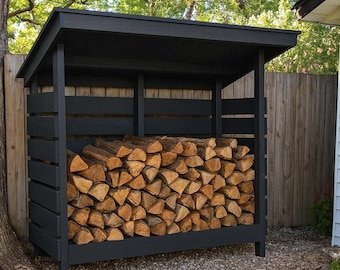
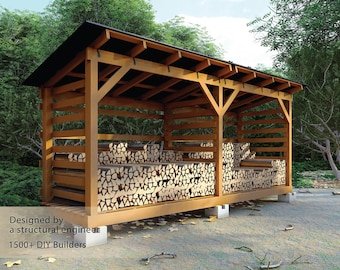
A DIY firewood rack can be built in two to three hours for $30–$80 in lumber — far less than the $80–$200 cost of a comparable store-bought metal rack, and far more customizable. A well-built rack keeps your firewood off the ground, promotes air circulation for seasoning, and organizes wood for easy access. This guide covers a straightforward 4-foot outdoor rack build and a compact indoor log rack version.
What You’ll Need
Tools
- Circular saw or miter saw
- Drill/driver
- Measuring tape and pencil
- Carpenter’s square
- Safety glasses and work gloves
Materials — Outdoor 4-Foot Firewood Rack
- 4×4 lumber, 8 feet long: 2 pieces (for the legs)
- 2×4 lumber, 8 feet long: 4 pieces (for the top and bottom rails and crossbars)
- 3-inch exterior wood screws (1 box)
- Exterior wood sealer or stain (optional, for weather protection)
Materials — Indoor Log Rack
- 2×4 lumber: 2 pieces at 36 inches (uprights), 2 pieces at 18 inches (base cross-members)
- 3/4-inch dowel rod: 3 pieces at 36 inches (horizontal supports)
- 1-1/4 inch wood screws
- Wood glue
Safety and Precautions
- Use pressure-treated or naturally rot-resistant lumber (cedar, redwood) for outdoor racks — standard construction lumber in ground contact or close to ground moisture deteriorates quickly.
- Place the rack on stable, level ground or a concrete pad — firewood is heavy and an unstable rack can tip under a full load.
- A full 4-foot firewood rack holds roughly 1/4 cord of wood, which weighs 500–750 lbs — ensure the surface beneath the rack can support this weight.
- Keep outdoor firewood racks at least 5 feet from your home or garage — wood piles attract pests (termites, carpenter ants, mice) and the distance reduces that risk.
- Wear safety glasses when cutting lumber and using a drill.
Step-by-Step: How to Build a 4-Foot Outdoor Firewood Rack
Step 1 — Cut the Lumber to Length
From your 4×4 boards, cut four leg pieces: two at 36 inches and two at 36 inches (or adjust height to your preference — 36 inches is comfortable for stacking). From your 2×4 boards, cut: two top rails at 48 inches, two bottom rails at 48 inches, and four cross braces at 18 inches (for the end frames). Mark each piece clearly before cutting. Use a miter saw for clean, accurate 90-degree cuts — accurate cuts make assembly far easier.
Step 2 — Build the Two End Frames
Each end frame consists of two 4×4 legs connected by top and bottom horizontal 2×4 cross-braces. Stand two 4×4 legs parallel and upright, spaced 18 inches apart. Position a 2×4 cross brace flush across the top of the legs (the legs will stand inside the cross braces). Drill two pilot holes and drive two 3-inch exterior screws through the cross brace into the top of each leg. Add a second cross brace at the bottom, 4 inches up from the floor (leaving clearance to keep the wood off the ground). This creates a rigid rectangular end frame. Build two identical end frames.
Step 3 — Connect the End Frames with Side Rails
Stand both end frames upright, parallel to each other, spaced 48 inches apart (the length of your rack). Position the 48-inch top rails across the tops of both end frames — one rail on the front face and one on the back face. Drill pilot holes and drive 3-inch screws through the rails into the top cross braces of each end frame. Repeat with the bottom 48-inch rails at the lower cross brace level. You now have a complete box frame with two end frames connected by four horizontal rails.
Step 4 — Check for Square
Before adding any more fasteners, check the assembly for square. Measure diagonally from corner to corner in both directions — if the two diagonal measurements are equal, the rack is square. If they differ, rack the frame by pushing on the longer diagonal corner until both measurements match. A square rack stacks and stores firewood more efficiently and looks more professional. Once square, add a second screw to each rail-to-end-frame joint to lock in the square.
Step 5 — Add Bottom Support Boards
The firewood rests on the bottom rails, but adding two or three 2×4 boards running the length of the rack (front to back) creates a more solid floor and keeps wood from shifting. Cut 2×4 pieces to the interior width (approximately 18 inches) and screw them to the bottom rails spaced evenly across the length. These supports distribute the weight of the wood across the entire rack rather than just the end frames.
Step 6 — Apply Finish and Let Dry
For maximum outdoor lifespan, apply a coat of exterior wood sealer or stain to all lumber before loading the rack with wood. This is easiest to do before the rack is placed on its permanent site. Allow to dry fully per product instructions (typically 24 hours). Alternatively, use pressure-treated lumber throughout — it resists decay and moisture without additional treatment.
Step 7 — Site and Load the Rack
Position the finished rack on level, firm ground — concrete, gravel, or a level lawn. Place it at least 5 feet from any structure. Stack firewood with cut ends facing outward (this is how you can assess whether wood is seasoned — the end grain dries and checks when properly seasoned) and bark side down for the bottom layers and bark side up for the top layers. Don’t over-fill: a firewood rack works best at about 80% capacity — this maintains air circulation for continued seasoning.
How to Build a Simple Indoor Log Rack
An indoor fireside log holder is a smaller project — 30 minutes maximum. Cut two 36-inch 2×4 uprights and two 18-inch base cross-members. Assemble into an H-shape lying flat (the two uprights parallel, connected by the cross-members near each end). Drill three 7/8-inch holes through both uprights at equal intervals (spaced to hold a comfortable number of logs). Slide 3/4-inch dowel rods through all three hole sets and secure with wood glue and a nail at each end. Stand the H-frame upright — the dowels create three horizontal log-holding bars. Sand smooth and finish with stain or clear coat if desired.
Pro Tips for Firewood Rack Building
- Cedar and redwood are the best lumber choices for outdoor firewood racks — they resist rot and insect damage naturally without pressure treatment and look attractive as they weather to gray.
- Don’t skip the pilot holes when driving 3-inch screws into 4×4 lumber — without pilot holes, the wood splits at the screw point, weakening the joint.
- A covered rack extends wood seasoning quality significantly — add a simple metal roof panel or tarp cover on the back two-thirds of the rack to keep rain off the wood while allowing air circulation on the open front.
- Use exterior screws, not interior wood screws, for outdoor builds — interior screws rust quickly outdoors and weaken joints over time.
Common Mistakes to Avoid
- Using standard construction lumber without treatment or sealing: Untreated 2×4 lumber in outdoor conditions can begin to rot in 1–3 years depending on your climate.
- Placing the rack directly against the house: Wood piles against the house wall create moisture trapping, pest entry points, and fire risk. Maintain clearance.
- Skipping the square check: A racked rack doesn’t stack well and wobbles under load — takes 2 minutes to check and fix before adding screws.
- Overloading the rack: Stack wood no higher than the side rails — stacking above the rack’s height makes it top-heavy and prone to tipping.
Frequently Asked Questions
How much wood does a 4-foot firewood rack hold?
A standard 4-foot rack (4 feet long, 3 feet tall, 18 inches deep) holds approximately 1/8 to 1/4 cord of firewood, depending on how tightly the wood is stacked. A full cord of firewood is 4x4x8 feet (128 cubic feet). For a family that burns 2–3 cords per winter, two 4-foot racks or one 8-foot rack is a useful minimum storage target.
What is the best wood to build a firewood rack?
Cedar is the traditional choice — it resists rot naturally, has good strength-to-weight ratio, and is widely available. Redwood is excellent but more expensive. Pressure-treated pine (ACQ treated) is the most affordable option for outdoor use and is rot and insect resistant. Avoid using interior-only lumber grades outdoors — they deteriorate quickly.
How do I keep my firewood rack from sinking into the ground?
Place flat concrete pavers or stepping stones under each leg of the rack. This distributes the rack’s weight across a larger surface area and keeps the wood off the ground. Alternatively, pour small concrete footings for a permanent installation. Avoid placing legs directly on soil — even rot-resistant wood deteriorates faster in direct ground contact.
Do I need to cover a firewood rack?
Partially — covering only the top of the stack (not the front and sides) is ideal. A full cover that blocks airflow slows the seasoning process and can promote mold. A simple back-covered, front-open design keeps rain off the top layers while allowing air to circulate freely through the stack.
How far should a firewood rack be from the house?
At least 5 feet, and ideally 20 feet or more. The 5-foot minimum reduces termite and carpenter ant migration risk; 20 feet is recommended in areas with active termite pressure. Never store firewood against the foundation — the moisture and organic material directly against the house is an open invitation for wood-destroying insects.
Conclusion
A DIY firewood rack is a fast, practical weekend project that costs a fraction of store-bought alternatives. Build the two end frames, connect them with horizontal rails, check for square, and apply a protective finish. The whole project takes two to three hours and yields a sturdy, customized rack that will serve for years. For the indoor version, 30 minutes and a few dowels complete a functional fireside holder.
Next outdoor project: see our guide on How to Build a Backyard Firepit for the perfect companion to your new wood storage. And if you need to enclose your outdoor storage area, check out How to Build a Wood Fence.
