Building a pond — whether a backyard koi pond or an indoor container water feature — is one of the most rewarding DIY projects you can tackle. Both are achievable in a weekend with the right materials and planning. A backyard pond requires excavation and a liner; an indoor pond can be built in a large container with no digging at all. This guide covers both approaches so you can choose the right scale and method for your situation.
What You’ll Need
For a Backyard Pond
- Shovel, spade, and wheelbarrow
- Carpenter’s level and tape measure
- EPDM rubber pond liner or pre-formed rigid pond shell
- Underlayment material (old carpet, pond foam, or purpose-made underlayment)
- Submersible pond pump
- Pond filter (biological or mechanical)
- Pond rocks, boulders, or coping stones
- Garden hose
For an Indoor Pond
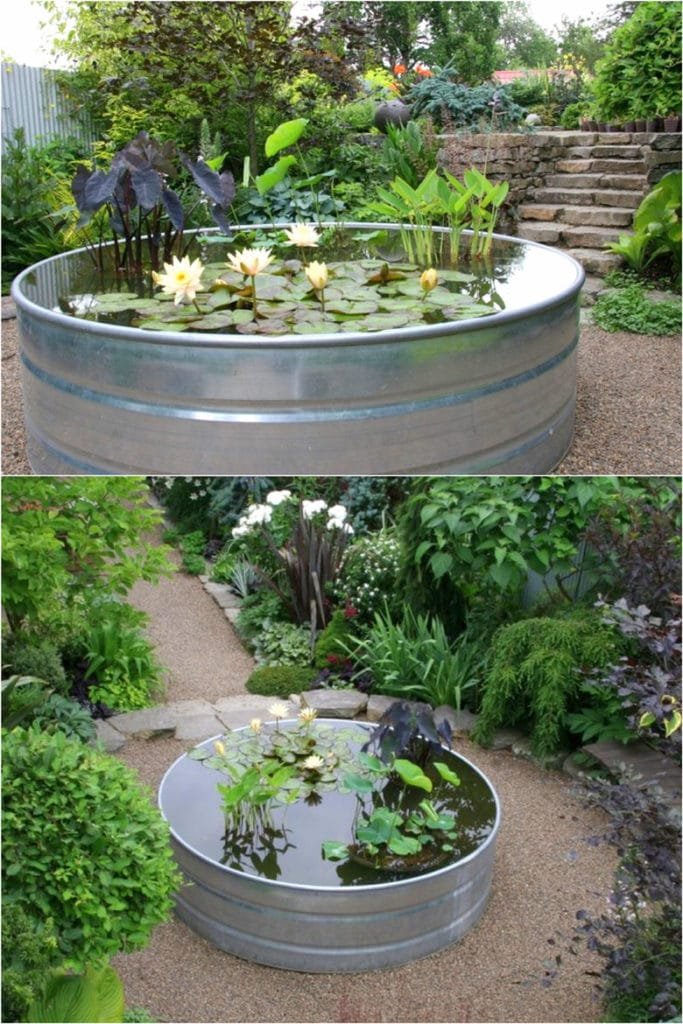
- Large watertight container: galvanized stock tank, large ceramic planter, or purpose-built indoor pond basin (at least 20–30 gallons for fish)
- Submersible pump with fountain head or waterfall attachment
- Aquatic plant pots
- Pond substrate (pea gravel or aquatic soil)
- Aquatic plants
- Fish (goldfish or koi for larger containers)
Safety and Precautions
- Call 811 before any digging for a backyard pond — underground utility lines must be marked by your utility company before you break ground in any US state.
- Child safety: Even shallow ponds (12 inches) are drowning hazards for young children. Install a secure fence or pond cover grid if children are present.
- Electrical safety: Pond pumps and lights operate in close proximity to water. Use only GFCI-protected outlets for all pond electrical equipment — both indoors and outdoors.
- Indoor ponds require moisture management: Any pump or waterfall will generate moisture. Place indoor ponds away from walls and use drip trays or sealed containers to prevent water damage to floors.
- Liner handling: EPDM pond liner is heavy — large liners require two people to position.
Part 1: How to Build a Backyard Pond
Step 1 — Plan the Location and Size
Choose a location that receives 4–6 hours of sunlight daily — enough for aquatic plants to grow, but not so much that algae becomes unmanageable. Avoid areas directly under deciduous trees (falling leaves overload the filtration and decompose in the water). A good starting size for a beginner backyard pond is 6 feet by 8 feet with a depth of 18–24 inches. For koi, you need a minimum depth of 36 inches and a minimum volume of 1,000 gallons to maintain water temperature and provide adequate habitat.
Step 2 — Mark and Excavate
Mark the pond outline on the ground using a garden hose laid in the desired shape, or with marking paint. Start excavating from the center outward. Create multiple depth zones: a shallow shelf (6–8 inches deep) around the perimeter for marginal plants and frogs, and a deeper central zone (18–36 inches) for fish. As you excavate, check the perimeter edge constantly with a long level — the top edge of the pond must be level all the way around, or water will leak out of the low side and expose the liner on the high side.
Step 3 — Prepare the Excavation
Remove all rocks, roots, and sharp debris from the excavated surfaces — anything sharp will eventually puncture a rubber liner. Once the surface is smooth, lay underlayment material over the entire excavation. Underlayment protects the liner from puncture and adds a cushioning layer. Purpose-made pond underlayment (available at pond supply stores) is the best option; old carpet or multiple layers of newspaper work as budget alternatives. Smooth the underlayment to follow the contours of the excavation.
Step 4 — Install the Pond Liner
To calculate EPDM liner size: add twice the maximum depth to each dimension, plus 2 feet for overhang. For a 6×8 foot pond, 2 feet deep: liner = (6 + 4 + 2) x (8 + 4 + 2) = 12 x 14 feet. Unfold the liner over the excavation with equal overhang on all sides. Begin filling the pond with water — the weight of the water will pull the liner down into the shape of the excavation. Smooth out large folds by hand as the water rises. Don’t try to eliminate all small folds — some wrinkles are unavoidable and don’t affect performance.
Step 5 — Install the Pump and Filter
Place the submersible pump in the deepest part of the pond. Run the pump electrical cord up and over the edge — never bury or submerge electrical cords under rocks where they become inaccessible. Connect the pump to a pond filter, positioned at the water’s edge or just outside the pond. The pump circulates water through the filter, which removes debris and maintains biological water quality. For a pond with fish, biological filtration (containing beneficial bacteria that process fish waste) is essential. Size the pump to turn over the entire pond volume every 1–2 hours: for a 500-gallon pond, a minimum 500 GPH pump is required.
Step 6 — Add Edging and Finish the Perimeter
Trim the liner overhang to 6–8 inches beyond the pond edge, then fold it back under the edging rocks or pavers. Never trim the liner too short — errors here are irreversible. Place large flat stones, boulders, or concrete coping around the perimeter, sitting on the folded liner to hold it in place and hide the edge. Arrange rocks naturally, varying sizes and angles. Fill the shallow shelf areas with smooth river rock or pea gravel. Add aquatic plants in the shallow zones and deeper areas as appropriate.
Part 2: How to Build an Indoor Pond
Step 1 — Choose and Prepare the Container
A galvanized steel stock tank (100–300 gallon) is the most popular choice for an indoor pond — it’s watertight, durable, and has an industrial-chic look that works in many interior styles. Large ceramic planters (sealed with pond-safe sealant inside) work well for smaller water features without fish. Pre-made indoor pond kits are also available. Size depends on your goals: 10–20 gallons for a pure plant water feature, 50+ gallons for small fish. Place the container on a reinforced floor area — water weighs 8.34 lbs per gallon, so a 100-gallon indoor pond weighs over 800 lbs when full.
Step 2 — Add Substrate and Plants
Add 2–3 inches of rinsed pea gravel to the bottom of the container. Place aquatic plant pots with aquatic soil (never use regular potting mix — it clouds the water) in the gravel. Good beginner aquatic plants include water hyacinth, water lettuce, dwarf papyrus, and submerged oxygenators like anacharis or hornwort. Position taller plants at the back, smaller ones at the front. Submerged oxygenating plants help maintain water clarity and oxygen levels, especially important in containers with fish.
Step 3 — Install the Pump and Fill
Place a small submersible pump (sized to the container volume) in the container. Connect the pump to a fountain head for a decorative water jet or a small waterfall attachment. Run the cord over the container edge to a GFCI-protected outlet — never use extension cords; use a surge-protected power strip rated for outdoor/wet areas. Fill the container slowly with water, pausing to arrange any displaced gravel or plants. If adding fish, treat the water with a dechlorinator before introducing them and allow the water to cycle (establish beneficial bacteria) for at least one week before adding fish.
Step 4 — Position and Finish
Place the indoor pond in its final location — preferably near a window for light if you have live plants, or under a grow light. Add finishing touches: flat river stones on top of the substrate, driftwood pieces, or decorative elements appropriate to your design vision. Run the pump for a full day before introducing fish to check for leaks and to ensure the pump and filter are functioning correctly.
Pro Tips for Building a Pond
- Oversize your filter — pond filters are rated at their best-case capacity. In practice, a filter rated for 1,000 gallons is appropriate for a 500-gallon pond with fish.
- Add a UV clarifier to the pump/filter circuit for a backyard pond — UV light kills the free-floating algae that causes green water, dramatically improving water clarity.
- Don’t overfeed fish — uneaten fish food breaks down and feeds algae. Feed only what fish consume in 5 minutes, once per day.
- Cover the backyard pond in winter in cold climates — use a pond de-icer to keep a small area ice-free for gas exchange if fish overwinter in the pond.
Frequently Asked Questions
How deep does a backyard pond need to be for fish?
For goldfish in most US climates, 18–24 inches is sufficient — goldfish can overwinter in ponds that don’t freeze solid. For koi, minimum 36 inches is recommended for temperature stability and adequate space. In cold northern climates where ponds may freeze more than 12 inches deep, a deeper pond (36–48 inches) or a pond heater/de-icer is needed to overwinter fish successfully.
How long does it take to build a backyard pond?
For a 6×8 foot backyard pond: excavation takes 4–6 hours with two people and basic tools. Installing the liner, pump, and edging takes another 4–6 hours. Total DIY time is typically one full weekend. The pond will take 1–4 weeks to cycle (establish water chemistry) before it’s ready for fish.
Can I build an indoor pond without fish?
Absolutely — a plant-only water feature is simpler to maintain than one with fish. Without fish, water quality management is much easier (plants naturally filter the water), and you don’t need to worry about feeding schedules, water cycling, or disease. A container with water plants and a small pump creates the sound and visual appeal of a water feature with minimal maintenance.
What is the cheapest way to build a backyard pond?
A pre-formed rigid plastic pond shell eliminates the need for a custom liner and is easier to install than flexible EPDM liner. Basic pre-formed shells (50–150 gallons) start at $50–$150. Combined with a basic submersible pump ($30–$60) and simple rock edging, a basic backyard pond can be built for $150–$300 in materials. Skip UV clarifiers, elaborate filtration, and fish initially — add them as you develop confidence with pond maintenance.
Do I need a permit to build a backyard pond?
Requirements vary by municipality. Most residential backyard ponds under 2 feet deep and 100 square feet in area don’t require a permit, but always check with your local building department before starting. Child safety fencing requirements may apply in some jurisdictions. Call 811 to have utilities marked regardless of whether a permit is required.
Conclusion
Building a pond — whether a landscaped backyard water feature or an indoor container pond — is one of the most enjoyable DIY projects available to homeowners. Plan the location carefully, install the right size liner and pump, and set up proper filtration before adding fish. An indoor pond takes just a few hours and a single container; a backyard pond takes a weekend. Either way, the result is a living, dynamic feature that transforms your space.
For more outdoor build projects, check out our guide on How to Build a Backyard Firepit — a great companion project for the same outdoor living space. And if you’re adding a fence around your yard or pond area, see How to Build a Wood Fence.
