Window insulation film adds a measurable layer of thermal insulation to single-pane or older double-pane windows — the kind of film you stretch across the frame and shrink tight with a hair dryer. It’s a 15–20 minute job per window and typically costs $3–8 per window in materials. Done correctly, it’s nearly invisible and can reduce heat loss through windows by 20–30% according to the U.S. Department of Energy. This guide covers film selection, installation, and the common mistakes that lead to bubbles or film failure.
What You’ll Need
| Tools | Materials |
|---|---|
| Hair dryer or heat gun (low setting) | Window insulation film kit (e.g., 3M Window Film, Duck Brand, Frost King) |
| Scissors | Double-sided tape (included in most kits) |
| Measuring tape | Rubbing alcohol (for surface prep) |
| Clean microfiber cloths | Extra tape (if kit tape is insufficient) |
| Utility knife (optional, for trimming) | — |
Safety and Precautions
- Do not use a heat gun on high — only use low or hair dryer temperature. Excessive heat can melt the film, crack window glass (from thermal shock on cold glass), or damage painted frames. A standard hair dryer set on medium is safer than a heat gun for this job.
- Test the double-sided tape on an inconspicuous spot first. The adhesive in window film kits can leave residue on some painted or finished window frames. Test on a hidden edge before applying the full perimeter tape. Use painter’s tape as a barrier on sensitive frame finishes.
- Don’t install film over vents, seals, or hardware. Film must not cover egress window latches, ventilation slots, or any operable window hardware. Check that the window isn’t an emergency egress window before sealing it — egress windows must remain operable in an emergency.
Step 1: Choose the Right Film for Your Need
Winter vs. Summer Film — They Work Differently
| Film Type | Best For | Notes |
|---|---|---|
| Heat-shrink insulating film (interior) | Winter insulation — reduces cold drafts and heat loss | Creates an air gap; seasonal product — remove in spring |
| Low-E window film (permanent) | Year-round insulation; reduces UV and solar heat gain | Applied directly to glass; permanent; tinted options available |
| Solar control film | Summer heat reduction; reduces AC load | Applied to glass; blocks solar heat gain |
| Privacy film | Privacy; also provides minor insulation benefit | Frosted or one-way mirror finishes available |
This guide focuses on heat-shrink insulating film (the 3M and Duck brand kits), which is the most common DIY winter insulation product.
Step 2: Prepare the Window Frame
Surface Prep Determines Whether the Film Stays All Winter
- Clean the entire window frame surface where the double-sided tape will go — all four sides: top, bottom, and both sides. Wipe with rubbing alcohol on a clean cloth to remove all dust, grease, and moisture.
- Let the frame dry completely — at least 5–10 minutes. The tape will not adhere properly to a damp or dirty surface.
- If your frames are painted with a surface that might be sensitive to adhesive (old paint, lacquered wood, or varnished frames), apply a strip of painter’s tape first and then apply the kit’s double-sided tape over it. This protects the frame and still holds the film.
Step 3: Apply the Double-Sided Tape
The Foundation for the Film — Take Your Time Here
- Measure and cut four pieces of double-sided tape: two for the vertical sides and two for the top and bottom of the frame.
- Starting at the top of the frame, peel and press the tape along the full width. Work down both sides and across the bottom. The tape should form a complete rectangle with no gaps at the corners.
- Do not remove the release liner (the protective paper/film strip) from the tape yet — leave it in place until you’re ready to apply the insulating film.
- Press the tape firmly to the frame across its full length. A credit card or your fingernail works well to press into corners and ensure good contact.
Step 4: Cut the Insulating Film
Cut Oversize — You’ll Trim After
- Unroll the insulating film carefully on a clean, flat surface. Handle it gently — it wrinkles easily and wrinkles that set into the film are difficult to remove even with heat.
- Measure the window opening (frame outer edge to outer edge, all four sides) and cut the film at least 2 inches larger on all four sides. You’ll trim the excess after the film is applied and shrunk.
- Lay the cut film flat and smooth out any existing wrinkles before applying.
Step 5: Apply the Film to the Frame
Peel the Tape Liner and Press the Film in Position
- Peel the release liner from the double-sided tape. Work around the full perimeter, peeling the liner without removing the tape from the frame.
- Starting at the top edge, carefully align the film with the top tape strip and press it firmly across the full width. The film needs to be straight — a crooked start makes the whole job look off.
- Working downward, press the film against the side tape strips, keeping it taut but not stretched. Let the excess hang past the frame edges at the bottom and sides.
- Press the film against the bottom tape strip.
- The film will appear loose and wrinkled at this stage — that’s normal. The heat-shrink step is next.
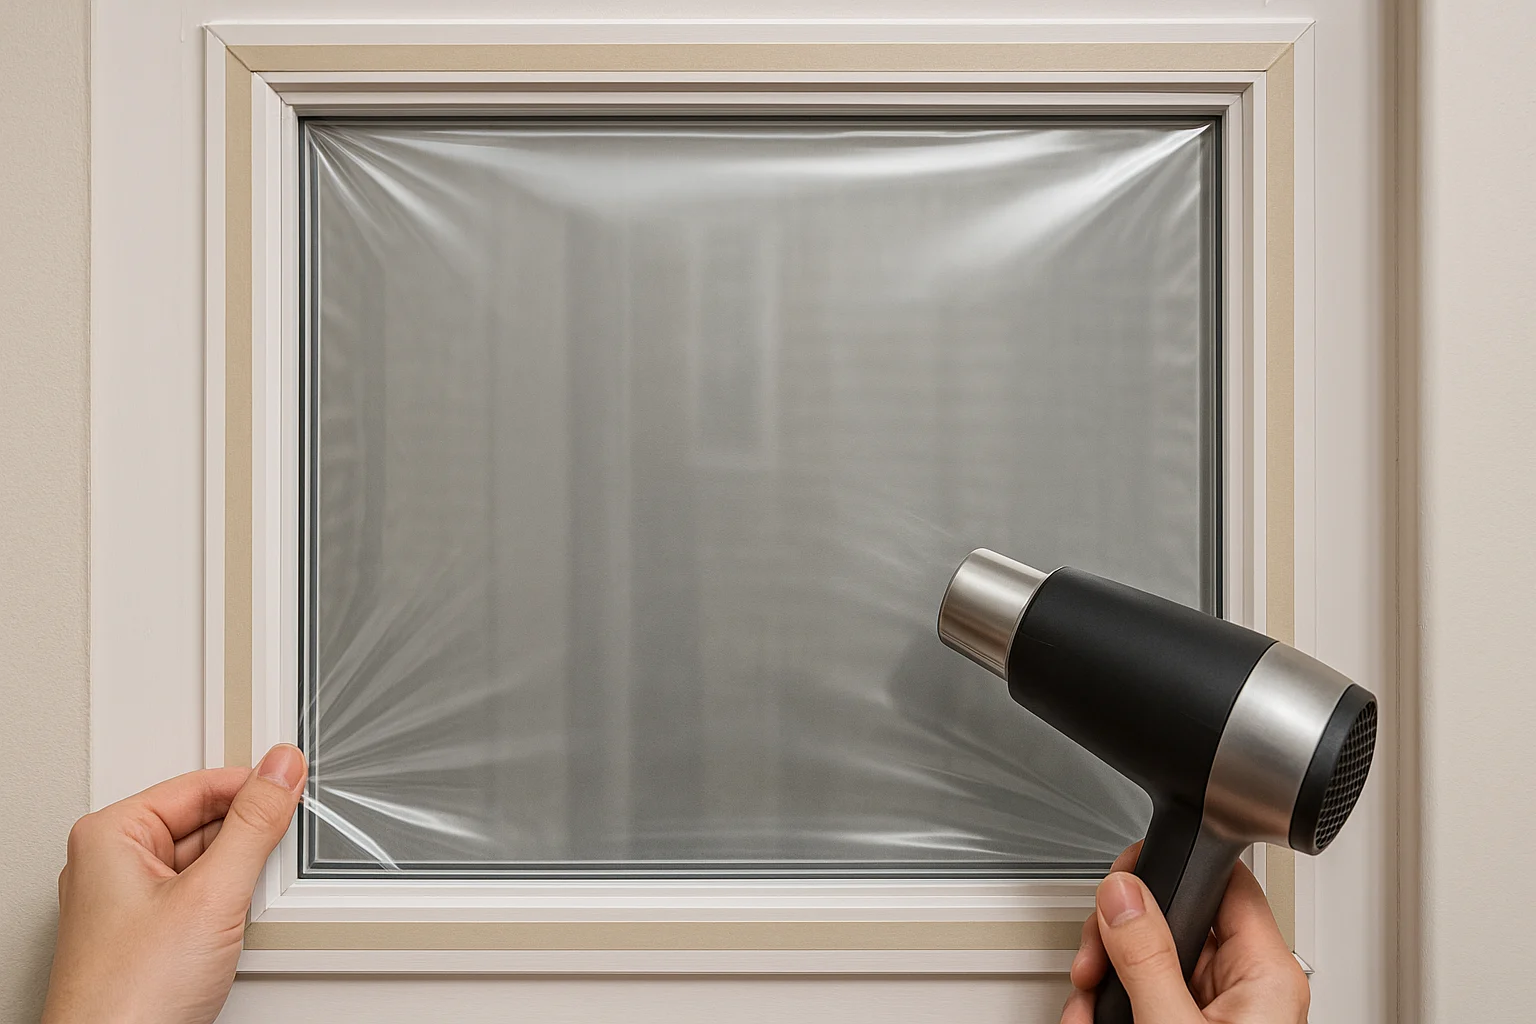
Step 6: Shrink the Film
Hair Dryer on Medium — Work in Sections
- Turn the hair dryer on medium heat. Hold it about 4–6 inches from the film surface.
- Starting at the center of the film, move the dryer in a slow, sweeping motion across the film. You’ll see wrinkles and slack pull tight and disappear as the film shrinks.
- Work from the center outward — driving wrinkles toward the edges rather than trapping them in the middle.
- For stubborn wrinkles near the edges: direct heat at the wrinkle specifically, hold for 3–5 seconds, and the wrinkle should pull out.
- The final result should be a taut, clear film with no visible wrinkles. The air gap between the film and the glass is the insulating layer.
Step 7: Trim the Excess Film
Utility Knife Against the Tape Edge for a Clean Line
- Once the film is shrunk and taut, trim the excess with a utility knife or scissors along the outer tape edge. Run the knife against the tape edge as a guide for a clean, straight cut.
- Take care not to cut into the tape itself — cut just inside or along the tape outer edge so the tape still holds the full film edge.
- Press any lifted film edges back against the tape.
Pro Tips and Common Mistakes
- Clean the frame thoroughly — this is the most skipped step. Oily or dusty frames cause the tape to fail within days or weeks. Rubbing alcohol and a clean cloth takes 60 seconds per window and is the single biggest factor in whether the film stays up all winter.
- Don’t stretch the film when applying. Heat-shrink film should be applied with slight slack, not stretched taut. Stretching causes the edges to lift off the tape when you apply heat. Let the heat do the tightening.
- Work on one window at a time on cold days. Cold glass won’t hold the adhesive as well. On very cold days, warm the room first or use a hair dryer to warm the frame before applying the tape.
- Remove film properly in spring. Peel slowly from one corner, pulling at a low angle to minimize tape residue. If residue remains, remove with a citrus adhesive remover or rubbing alcohol — not a scraper, which may scratch the frame.
Troubleshooting

| Problem | Likely Cause | Fix |
|---|---|---|
| Film falls off within days | Frame not cleaned before tape application | Remove, clean frame with alcohol, reapply tape and new film |
| Film won’t shrink flat — permanent wrinkles | Film was applied with creases already in it | Remove film and start with a fresh piece; handle film gently |
| Bubbles between film and glass | Tape not sealing airtight (small gap) | Press tape corners tightly; add a small piece of extra tape to the gap |
| Tape leaves residue on frame | Adhesive not compatible with frame finish | Remove residue with citrus cleaner; use painter’s tape as a barrier next time |
| Film looks milky or hazy when shrunk | Over-heated — film was scorched | Remove and replace; use hair dryer on medium, not high |
Frequently Asked Questions
How much does window insulation film actually save?
The U.S. Department of Energy estimates that windows account for 25–30% of residential heating and cooling energy use. Heat-shrink insulating film on single-pane windows can reduce window heat loss by 20–30% by creating a small air gap (the same principle as double-pane glass). In very cold climates, the payback period for the film cost is often within the first winter.
Is window insulation film reusable?
Standard heat-shrink insulating film (the kind applied with double-sided tape and shrunk with a hair dryer) is a single-use product. Once removed, the film stretches and cannot be re-shrunk effectively. Adhesive window films (applied directly to the glass without tape) are sometimes reusable if removed carefully.
Does window film prevent condensation?
Interior heat-shrink film significantly reduces condensation because the film surface stays warmer than the cold glass behind it — humid room air condenses on the film surface rather than the glass. For rooms with high humidity (kitchens, bathrooms), this can substantially reduce window condensation problems.
Can I install window film on double-pane windows?
Yes — heat-shrink insulating film adds another layer of insulation even over double-pane windows, though the benefit is less dramatic than on single-pane glass. It’s most cost-effective on older single-pane or dated double-pane windows where the original thermal seal has failed.
How do I remove window insulation film in spring?
Start at one corner, grasp the edge of the film, and pull slowly at a low angle (parallel to the frame, not straight out perpendicular). Slow, steady peeling minimizes adhesive residue. If any residue remains, apply rubbing alcohol or a citrus-based adhesive remover on a cloth and rub gently.
Conclusion
Window insulation film is one of the highest-ROI winter home improvements you can make — the material cost is negligible and the installation takes minutes per window once you’ve done the first one. The critical factors are: clean the frame before applying tape, don’t stretch the film before shrinking, and work from center to edges with the hair dryer to pull wrinkles out rather than push them to the corners. A well-installed film should stay clear and taut through the entire heating season.
If you’re doing a full winter weatherproofing push, our guide on how to seal and weatherproof a door covers the complementary process for exterior doors. And for any windows with damaged or dirty frames that need cleaning before film installation, see our guide on how to clean aluminum window frames.
