Installing a door jamb means building the finished wood frame that sits inside the rough framed opening and holds the door in place. Done right, the jamb is plumb, square, and shimmed solid — so the door swings freely, closes flush, and latches every time. This guide covers a standard interior pre-hung door jamb installation from a bare rough opening to a fully shimmed, nailed, and trimmed door frame.
What You’ll Need
Tools
- Tape measure
- Level (4-foot minimum)
- Hammer or nail gun (16-gauge finish nailer preferred)
- Circular saw or miter saw
- Utility knife
- Drill and bits
- Pry bar
- Pencil
Materials
- Pre-hung door unit (door slab + door jamb assembled) OR door jamb lumber (typically 4-9/16 in. or 6-9/16 in. wide, depending on wall thickness)
- Wood shims (cedar shim packs)
- 16d framing nails or 3-inch deck screws (for rough frame attachment)
- 8d finish nails or 2-inch finish nails (for jamb attachment)
- 3-inch wood screws (for hinge and strike plate reinforcement)
- Fiberglass insulation scraps (for gaps around jamb)
- Casing trim (door stop + interior casing)
Safety Precautions
Door slabs are heavy — solid-core doors weigh 60–100 pounds and require two people to position safely. Never attempt to hold and nail a full door unit alone; always have a helper. When using a nail gun, keep fingers clear of the path of fire and never bypass the safety tip. If cutting pressure-treated lumber, wear a dust mask — the preservatives are harmful when inhaled.
Understanding the Door Jamb
A door jamb has three parts: the hinge jamb (the side where hinges mount), the latch jamb (opposite side), and the head jamb (the horizontal top piece). Together they form a three-sided frame that fits inside the rough opening. The rough opening is typically 2 inches wider and 2 inches taller than the finished door size — this extra space gives you room to shim the jamb plumb and level.
For a pre-hung door unit, the jamb comes assembled around the door slab. Your job is to fit the entire pre-assembled unit into the rough opening, shim it plumb and level, and nail it in place. If you’re building a door jamb from scratch, you’ll cut and assemble the three jamb pieces yourself before hanging the door slab.
How to Install a Pre-Hung Door Jamb (Most Common)
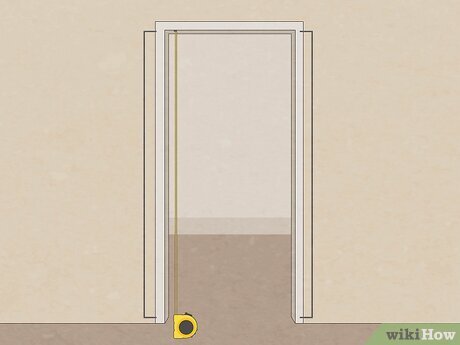
Step 1: Prepare the Rough Opening
Check the rough opening with a level on both sides and across the top. The rough opening does not need to be perfectly plumb — that’s what shims are for — but it should be within 1 inch of plumb on either side. Clear away any excess drywall, nails, or debris. Measure the opening: width should be door width + 2 inches (e.g., 34 inches for a 32-inch door), and height should be door height + 2 inches (e.g., 82 inches for an 80-inch door).
Step 2: Set the Pre-Hung Unit Into the Opening
With a helper, lift the pre-hung door unit and set it into the rough opening from the interior side. The door should open into the room as intended. Rest the bottom of the hinge jamb on the subfloor (or finished floor if already installed). Do not force it — if it won’t fit, check for protruding nails or framing lumber and trim as needed.
Step 3: Shim and Plumb the Hinge Jamb First
The hinge side is always set first. Place a 4-foot level against the hinge jamb face. Slide a pair of cedar shims (one from each side, opposed) behind the jamb at the hinge locations — typically at the top hinge, middle, and bottom hinge. Adjust shims until the hinge jamb reads perfectly plumb on the level. Drive one 8d finish nail through the jamb and shim into the rough framing to temporarily hold it while you check.
Step 4: Check and Adjust the Head Jamb
Open the door slightly and check the head jamb (top of the frame) with a level. It should read level across its length. If it’s not level, it means the rough opening header is not level — shim under the low side of the door unit at the floor to bring the head jamb level. Recheck the hinge jamb plumb after any floor shimming.
Step 5: Shim and Set the Latch Jamb
With the hinge jamb plumb and head jamb level, adjust the latch jamb. The gap between the door slab and the latch jamb (the “reveal”) should be consistent: approximately 1/8 inch along the full height of the door. Slide shims behind the latch jamb at the strike plate height and at the top and bottom. Adjust until the reveal is even. Check plumb again — the latch jamb does not need to be independently plumb as long as the reveal is consistent and the door swings correctly.
Step 6: Nail the Jamb Permanently
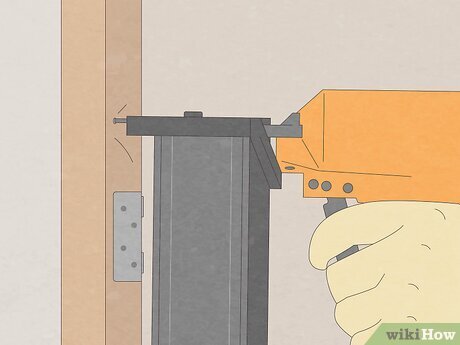
Once the unit is shimmed plumb, level, and square, nail through the jamb at each shim location using 8d finish nails or a 16-gauge nailer. Drive two nails per shim location: one near the door stop and one near the exterior edge of the jamb. At hinge locations, drive one 3-inch screw through the jamb, through the shim, and into the rough framing — this provides critical structural reinforcement at high-stress points.
Step 7: Score and Break the Shims Flush
Using a utility knife, score each shim deeply where it protrudes beyond the face of the jamb. Snap the shim off with a quick outward flick. The shims should break cleanly and sit flush with or slightly behind the jamb face. Any shim proud of the jamb face will cause casing trim to sit unevenly.
Step 8: Insulate the Gaps
Before installing casing, stuff small handfuls of fiberglass insulation (not expanding foam — it can push jambs out of plumb) into the gaps between the jamb and rough framing. This improves energy efficiency for exterior doors and reduces sound transmission for interior doors. Do not overstuff — just enough to fill the cavity loosely.
Step 9: Install Casing Trim
Measure and miter-cut your casing trim at 45-degree angles for the two upper corners. Set the casing back from the inside edge of the jamb by about 3/16 inch (the “reveal line”) — mark this with a pencil before nailing. Nail the casing with finish nails driven into both the jamb edge and the wall framing. Set nail heads slightly below the surface with a nail set for a clean finish.
Step 10: Test the Door and Make Final Adjustments
Open and close the door several times. It should swing freely, close flush with the jamb face, and latch cleanly on the first try. Check the reveal gap around the door slab — it should be even (approximately 1/8 inch) on both sides and the top. If the door rubs or won’t latch, see the Troubleshooting section below.
How to Build and Install a Door Jamb From Scratch
If you’re replacing only the jamb (not the door slab) or building a custom-width opening, you’ll need to cut jamb lumber to size and assemble the frame yourself.
Step 1: Choose the Correct Jamb Width
Jamb width must match your wall thickness. Standard interior walls with 2×4 framing and drywall are typically 4-9/16 inches thick — use 4-9/16 in. door jamb lumber. Walls with 2×6 framing need 6-9/16 in. jamb stock. Measure your actual wall thickness at the rough opening before purchasing.
Step 2: Cut the Three Jamb Pieces
Cut the head jamb to the width of the rough opening minus the thickness of both side jambs. Cut both side jambs to the height of the rough opening minus the head jamb thickness. For an 80-inch door, the side jambs will typically run 81 inches tall (door height + 1/2 inch for clearance above the door). Use a miter saw for clean, square cuts.
Step 3: Assemble the Jamb Frame
Join the head jamb to the tops of the side jambs using 3-inch screws or 16d nails. The head jamb sits on top of the side jambs (butt joint). Glue is optional — the shims and wall nailing do most of the holding.
Step 4: Install Per Steps 2–10 Above
Set the assembled jamb frame into the rough opening and follow the shimming, plumbing, nailing, and trimming steps described in the pre-hung installation section. After the jamb is installed, hang the door slab using surface-mounted or mortised hinges.
Pro Tips and Common Mistakes
- Shim at every hinge, not just top and bottom: A jamb shimmed only at the ends can bow in the middle, causing the door to bind at mid-swing. Always shim at each hinge location.
- Never use expanding foam to fill the gap around a door jamb: Spray foam expands significantly and can push a shimmed jamb out of plumb. Use fiberglass batt scraps or backer rod instead.
- Set the casing reveal consistently: A 3/16-inch reveal looks intentional and tight. Use a combination square to mark the reveal line on all three sides before nailing casing.
- Check diagonal measurements: Before fully nailing, measure corner to corner diagonally across the door opening. If both diagonals match, the frame is square. A difference of more than 1/4 inch means the unit needs adjustment.
- Pre-drill finish nails near the end of casing: Casing tends to split at the mitered corners. Pre-drilling a small pilot hole prevents splits and keeps joints tight.
Troubleshooting
The Door Swings Open or Closed on Its Own
This means the hinge jamb is not plumb — it’s leaning slightly out of vertical, which makes gravity pull the door open or closed. Loosen the finish nails near the top or bottom of the hinge jamb, adjust the shims to correct plumb, and re-nail.
The Door Won’t Latch
The strike plate and latch are misaligned. Check whether the latch hits high, low, or to one side of the strike plate hole. If high or low: the latch jamb shims need vertical adjustment. If to one side: the latch jamb needs to move toward or away from the door. Minor misalignment (less than 1/8 inch) can be corrected by filing the strike plate opening slightly with a metal file. For more serious issues, see our guide on How to Fix a Door That Won’t Latch.
There’s a Gap Between the Door Slab and the Head Jamb
The head jamb is not level. Either the subfloor shimming is uneven or the rough opening header sags. Add shims under the door unit at the floor to raise the low side until the head jamb reads level with a 4-foot level.
Frequently Asked Questions
What’s the difference between a door frame and a door jamb?
Technically, the door jamb is the three-sided wood frame (hinge jamb, latch jamb, head jamb) that fits inside the rough opening. The door frame is a broader term that includes the jamb plus the casing trim installed around the jamb on both sides of the wall. In casual use, the terms are often interchangeable.
How wide should a rough opening be for a door jamb?
Rough opening width should be the finished door width plus 2 inches. A 32-inch door needs a 34-inch rough opening. Rough opening height should be door height plus 2 inches — 82 inches for an 80-inch door. This 2-inch extra on each dimension gives you room to shim the jamb plumb and square.
Can I install a door jamb without a pre-hung unit?
Yes — you can build the jamb from flat lumber stock, install it in the rough opening, then hang the door slab separately using surface-mounted or mortised hinges. This is common in renovation work where you’re replacing only the jamb and keeping the existing door slab.
How do I know what width door jamb lumber to buy?
Measure your wall thickness at the rough opening — measure from the face of the drywall on one side to the face of the drywall on the other. Standard 2×4 walls with drywall on both sides measure 4-9/16 inches. Walls with 2×6 framing measure 6-9/16 inches. Purchase jamb stock that matches this measurement exactly.
How long does it take to install a door jamb?
For a pre-hung door unit installed by a careful DIYer, budget 1.5 to 3 hours including shimming, nailing, shim trimming, insulating, and installing casing. Building a jamb from scratch adds 30–60 minutes for cutting and assembling. Experienced carpenters can set and trim a pre-hung door in under an hour.
Conclusion
Installing a door jamb comes down to three fundamentals: plumb hinge jamb, level head jamb, and consistent reveal. Everything else — shimming, nailing, trimming — serves those three goals. Take the time to check plumb and level before driving any permanent fasteners, and you’ll end up with a door that opens, closes, and latches perfectly for years.
Once your jamb is in, check out How to Hang a Door for the next steps on setting hinges and installing a door slab, and How to Install a Door Knob for the finishing hardware.
