
Repairing a door frame yourself is practical for three common types of damage: surface rot on an exterior frame, cracks or splits from settling or impact, and splintered kick-in damage around the strike plate. Each requires a different approach. The repair time ranges from 1 hour for crack fills to a full weekend for full jamb replacement. This guide walks through all three methods so you can tackle exactly what you’re dealing with.
What You’ll Need
| Tools | Materials |
|---|---|
| Pry bar and hammer | Two-part epoxy wood filler (e.g., Bondo) |
| Utility knife | Construction adhesive (Liquid Nails or similar) |
| Chisel (1-inch) | Replacement door jamb lumber (clear pine, 1×4 or 1×6) |
| Miter saw or circular saw | 3-inch exterior wood screws |
| Drill/driver | Wood preservative primer (for exterior) |
| Sanding block (80- and 120-grit) | Paintable exterior caulk |
| Putty knife | Matching exterior or interior paint |
| Level and measuring tape | Door reinforcement plate (for kick-in repairs) |
Safety and Precautions
- Wear eye protection and gloves when prying or chiseling. Splinters and wood chips travel at unexpected angles. Safety glasses are especially important when demolishing rotted or splintered sections.
- Test exterior frames for lead paint before sanding or cutting (pre-1978 homes). Use an inexpensive home lead test kit. If positive, wet-sand and collect dust rather than dry-sanding, and dispose per EPA RRP guidelines.
- On exterior doors, secure the entry while the frame is open. If you’re doing a full jamb replacement, you’ll have an open doorway. Work during daylight hours and have a way to secure the opening temporarily if you need to stop.
Step 1: Diagnose the Damage Type
The Right Method Depends on the Cause
Probe the damaged area with a screwdriver or awl before buying materials. This tells you what you’re actually dealing with:
| What You Find | Damage Type | Method to Use |
|---|---|---|
| Wood feels soft, spongy, or crumbles | Rot (often exterior bottom) | Sections 2–3 (epoxy fill or partial replacement) |
| Clean crack or split along the grain | Settling, impact, or seasonal movement | Section 4 (glue and clamp, or epoxy fill) |
| Splintered wood around strike plate | Kick-in (forced entry attempt or actual) | Section 5 (reinforcement plate + frame repair) |
| Frame is racked, out of square | Foundation settling | Section 6 (full jamb shimming or replacement) |
Step 2: Repair Soft Rot With Epoxy Wood Filler
Best for Localized Rot That Hasn’t Gone Through the Full Jamb
- Use a chisel or utility knife to remove all soft, rotted material. Scrape and dig until you hit solid wood on every side. Leaving any rot behind means it will spread under your repair.
- Let the area dry completely — at least 24–48 hours if it was damp. Apply a wood hardener (such as Minwax Wood Hardener) to any remaining wood that feels soft but solid. Let it cure per the label (usually 4 hours).
- Mix two-part epoxy wood filler according to directions. Work quickly — most have a 5–10 minute pot life. Pack it firmly into the void with a putty knife, overfilling slightly.
- Let it cure fully (20–30 minutes to firm, 24 hours to full hardness). Epoxy filler can be carved, shaped, and sanded like real wood once cured.
- Shape with a chisel, then sand with 80-grit and finish with 120-grit to blend seamlessly with the surrounding frame.
- Prime with an exterior-grade primer (use a high-quality oil-based or shellac primer for best moisture resistance), then apply two coats of matching exterior paint.
- Caulk all edges and joints with paintable exterior caulk to seal out future moisture.
Step 3: Replace a Severely Rotted Section
When Rot Has Gone Too Deep for Filler
If the rot extends through the full thickness of the jamb, or affects a large area (more than 6 inches long), a partial or full jamb replacement is more reliable than filler.
- Use a pry bar and hammer to carefully remove the door stop strip (the narrow strip the door closes against). Set it aside if it’s in good shape.
- Cut out the rotted section with a reciprocating saw or circular saw. Make clean, square cuts above and below the damage.
- Measure and cut a replacement piece from clear pine lumber that matches the original jamb profile. Many home centers stock pre-milled door jamb stock in standard widths.
- Prime ALL six sides of the replacement piece with exterior wood primer before installation. This is the single most important step — raw end grain absorbs moisture immediately and starts rotting the repair.
- Apply construction adhesive to the back of the replacement piece and drive 3-inch screws through it into the rough framing. Countersink the screws.
- Fill screw holes, sand smooth, prime, and paint. Caulk all joints with paintable exterior caulk.
Step 4: Repair Cracks and Splits in the Frame
For Clean Cracks From Settling or Impact
- Assess whether the crack is surface-only or goes through the jamb. A crack that goes all the way through weakens the frame structurally — use epoxy and reinforce with screws.
- For a surface crack: inject wood glue into the crack with a syringe or squeeze bottle. Clamp the crack closed with bar clamps or wrap tightly with ratchet straps. Wipe away squeeze-out. Leave clamped for at least 4 hours.
- For a deep or through crack: fill with two-part epoxy mixed to a slightly runny consistency so it flows into the crack. Let cure, then drive a 3-inch screw through the frame into the rough jamb to reinforce the repair.
- Sand the repaired area, spot-prime, and paint to match.
- If the crack is at the strike plate area, see Section 5 for the stronger reinforcement approach.
Step 5: Repair Kick-In Damage at the Strike Plate
Reinforce First — Then Repair Cosmetically
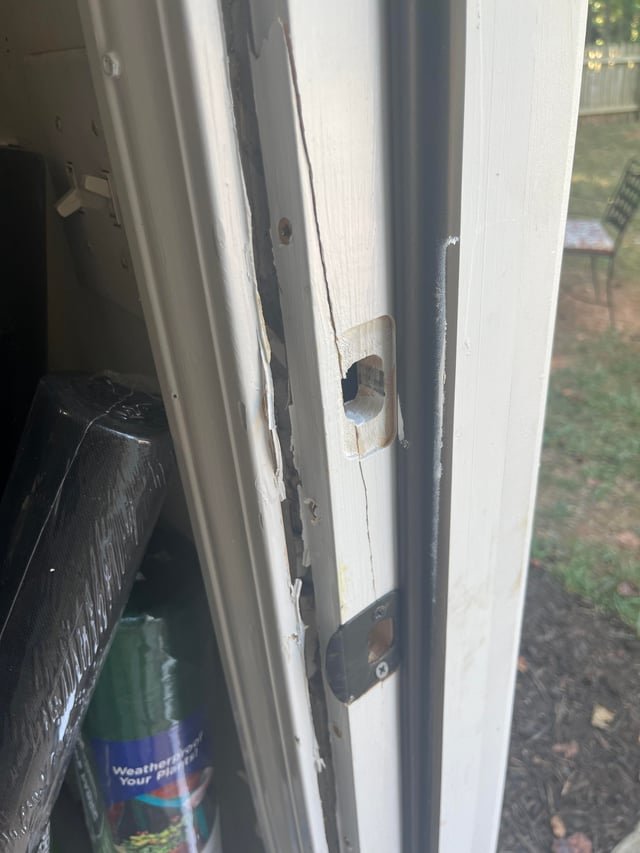
Kick-in damage splinters the door frame at the strike plate because the standard 3/4-inch strike plate screws only grip the door stop and jamb, not the structural framing. The real fix is a door reinforcement plate, not just cosmetic patching.
- Remove the old strike plate and all splintered wood. Clean up the area with a chisel — remove everything loose.
- Fill the void with two-part epoxy wood filler, packing it firmly and overfilling slightly. Let it cure completely (24 hours for full hardness).
- Install a door reinforcement plate (a steel plate that wraps around the jamb edge, available at hardware stores for $15–30). This steel plate is anchored with 3-inch screws that penetrate through the jamb and into the structural stud behind it.
- Mark and cut the mortise for the new strike plate opening. Chisel a clean mortise so the strike plate sits flush.
- Install the strike plate with 3-inch screws — not the 3/4-inch screws included in the package. Drive them at least 2-3/4 inches into the framing stud behind the jamb.
- Sand the epoxy fill, prime, and paint the repaired area. The reinforcement plate is visible but can be painted over once in place.
Step 6: Fix a Racked or Out-of-Square Frame
When the Door Won’t Hang or Close Properly
If the frame is out of plumb or out of square due to settling, the door will swing open or closed by itself, rub the frame, or not latch. This requires shimming the frame back into square rather than surface repairs.
- Check the jambs with a level — both the hinge side and latch side, and the head jamb across the top.
- Remove the door stop strips. Carefully pry the interior trim (casing) away from the wall without damaging it.
- Look for the shims between the rough frame and the door jamb. Add or remove shims to bring the jamb back to plumb and level.
- Drive 3-inch screws through the jamb and shims into the rough framing to lock the corrected position in place. Check plumb and square repeatedly as you work.
- Replace the door stop strips and rehang the door. Test for smooth operation before replacing the trim.
- Reinstall the casing trim with finish nails, fill nail holes, caulk, and paint.
Pro Tips and Common Mistakes
- Prime ALL surfaces of any replacement wood before installation. Every exposed surface — top, bottom, back, and edges — must be sealed before the wood goes in. Unprimed surfaces that are then enclosed against the wall will rot from trapped moisture.
- Never use standard spackle on exterior frames. Interior joint compound is water-soluble and will wash out in rain. Use two-part epoxy filler or exterior-rated wood filler for any outdoor frame repair.
- Address the source of moisture before repairing rot. If the exterior caulk is failed, the flashing is wrong, or water drains toward the frame, the new repair will rot just as fast. Fix the water intrusion first.
- Check that the door still hangs plumb after any frame work. Even minor frame shifts affect hinge alignment. Test the door swing and latch engagement before calling the job done.
Troubleshooting
| Problem | Likely Cause | Fix |
|---|---|---|
| Epoxy filler falls out after a few months | Rotted wood not fully removed before filling | Remove all filler, dig out all rot, apply hardener, refill |
| Paint peels from repaired area | Skipped primer or used wrong primer type | Sand back to bare filler, apply shellac primer, repaint |
| Door still rubs after frame repair | Frame not fully plumb after shimming | Re-check level and plumb; re-shim and re-drive screws |
| Strike plate doesn’t align after repair | Jamb shifted during repair | Use the lipstick transfer method to relocate the strike plate |
| Water still getting in after rot repair | Failed flashing or caulk at top of frame | Re-caulk all joints; check and replace door frame flashing |
Frequently Asked Questions
Can I repair a rotted door frame without replacing the whole jamb?
Yes, if the rot is localized and hasn’t spread through the full thickness of the jamb. Epoxy wood filler creates a durable repair on areas up to 6–8 inches, and when properly sealed, it won’t rot again. Beyond that, a partial or full jamb replacement is more reliable.
How much does it cost to repair a door frame yourself?
A crack repair with wood glue costs under $10 in materials. An epoxy fill repair for rot costs $20–40. A full jamb replacement with materials runs $40–80 depending on wood and hardware. A door reinforcement plate for kick-in damage costs $15–30 on top of the cosmetic repair materials.
How do I know if the damage is repairable or if I need a new frame?
Probe the rot with a screwdriver: if solid wood starts within 1 inch in all directions, epoxy repair is appropriate. If the entire cross-section is soft, replace that section. If the frame is badly racked and the rough framing behind it is also damaged, a full replacement is the right call.
How long does epoxy wood filler last on an exterior door frame?
When properly applied to clean wood, topped with quality exterior primer and paint, and caulked at all joints, epoxy wood filler repairs on exterior frames routinely last 10–20 years or more. The key variables are complete rot removal, proper sealing, and maintaining the paint and caulk over time.
Can I paint over an epoxy wood filler repair?
Yes. Two-part epoxy wood filler sands, primes, and paints exactly like wood. Use a high-quality primer — shellac-based or oil-based exterior primer works best — to ensure the finish coats bond well and the repair blends seamlessly with the surrounding frame.
Conclusion
Repairing a door frame is well within DIY range for all three common damage types. Surface rot and cracks respond well to epoxy filler when you remove all compromised material first and seal every surface before painting. Kick-in damage is best fixed by adding a steel reinforcement plate — not just cosmetic patching — to make the repair stronger than the original. For settling issues, shimming the frame back to plumb is the root fix that everything else depends on.
Once the frame is solid, make sure the door hardware is performing well too. See our guide on how to fix a door that won’t latch if the strike plate alignment needs work, or our steps on how to replace a door handle if you’re refreshing the hardware at the same time.
