You can fix a hole in a door without replacing it — if you know what type of door you have and how big the damage is. Small holes (under 1 inch) get filled with epoxy or spackling. Medium holes (1–4 inches) need a backing patch and joint compound. Large holes or punch-throughs in hollow-core doors need a solid backing insert. This guide covers every scenario, including hollow-core and solid wood doors.
What You’ll Need
| Tools | Materials |
|---|---|
| Utility knife or drywall saw | Two-part epoxy or wood filler |
| Putty knife (3-inch and 6-inch) | Lightweight joint compound (all-purpose) |
| Sanding block | Fiberglass mesh patch (self-adhesive) |
| Drill/driver | Backer board (thin plywood or hardboard) |
| Measuring tape and pencil | Spray foam (low-expansion) |
| Paint roller or brush | Primer and matching paint |
| Safety glasses and dust mask | Fine sandpaper (120- and 220-grit) |
Safety and Precautions
- Wear eye protection and a dust mask when sanding. Joint compound and wood filler dust are irritants. Work in a ventilated area and keep dust away from your face.
- Check for electrical or plumbing lines before cutting. On exterior doors or wall-adjacent panels, verify there’s nothing in the void before using a saw. Interior hollow doors are nearly always safe, but it’s a good habit.
- Test for lead paint on older doors (pre-1978). Sanding painted surfaces in older homes can release lead dust. Use a home lead test kit before sanding, and follow EPA guidelines if the result is positive.
Step 1: Identify Your Door Type and Hole Size
The Fix Depends on What You’re Working With
Before you touch anything, knock on the door near the damage. A hollow sound means hollow-core (a thin skin over a cardboard honeycomb interior — the most common interior door). A solid thud means solid wood or solid-core, which holds filler much better.
| Hole Size | Door Type | Method |
|---|---|---|
| Under 1 inch (screw hole, small dent) | Either | Wood filler or spackle, sand, paint |
| 1–4 inches | Hollow-core | Mesh patch + joint compound over foam backing |
| 1–4 inches | Solid wood | Two-part epoxy wood filler, sand, paint |
| 4 inches or larger (fist-sized or bigger) | Hollow-core | Hardboard backer insert + joint compound + skim coat |
| Full panel damage | Either | Panel replacement or door replacement |
Step 2: Fix Small Holes Under 1 Inch (Any Door Type)
The Fast 30-Minute Repair
- Clean the area: remove any loose chips, splinters, or paint flakes with a utility knife. The surface needs to be dry and dust-free.
- For hollow doors with a visible void: push a small amount of low-expansion spray foam into the hole with the straw applicator. Let it expand just enough to fill the cavity — don’t overfill. Let it cure fully (about 1 hour), then trim any excess flush with a utility knife.
- Fill the hole flush with two-part epoxy wood filler or lightweight spackle. Apply slightly proud (a little above flush) since filler shrinks as it dries.
- Let the filler dry completely (check product label — usually 1–4 hours).
- Sand with 120-grit to bring the patch flush with the door surface, then finish with 220-grit for a smooth finish.
- Wipe the area with a damp cloth to remove dust, then prime and paint to match.
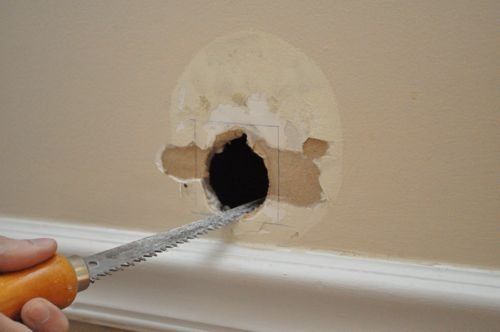
Step 3: Fix Medium Holes (1–4 Inches) in Hollow-Core Doors
The Mesh Patch and Foam Method
This is the most common DIY repair — a hollow-core door damaged by a doorknob strike or foot. The trick is filling the void before applying the patch, so the compound has something to adhere to.
- Use a utility knife to clean up the hole edges into a smooth oval or rectangle. Ragged edges make patching harder and the repair shows more clearly under paint.
- Lightly spray low-expansion foam into the void. Don’t overfill — you just need a foam backing that the compound can sit on. Let it expand and cure, then trim flush with a utility knife.
- Apply a self-adhesive fiberglass mesh patch (available at any hardware store for under $5) centered over the hole. Press it firmly onto the door surface.
- Apply a thin layer of all-purpose joint compound over the mesh with a 3-inch putty knife. Feather the edges out 2–3 inches beyond the mesh to blend into the door surface.
- Let the first coat dry completely (at least 4 hours, or overnight). It will shrink and show the mesh — that’s normal.
- Apply a second coat with a 6-inch putty knife, feathering wider. Let dry fully.
- Sand with 120-grit to blend, then 220-grit for a finish-ready surface. Wipe clean.
- Prime the patched area with a PVA or shellac-based primer (regular latex primer can raise grain on compound). Let dry, then apply two finish coats of matching paint.
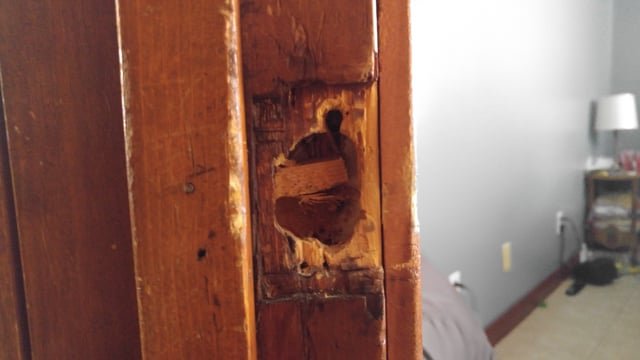
Step 4: Fix Medium Holes (1–4 Inches) in Solid Wood Doors
Two-Part Epoxy for a Rock-Solid Repair
Solid wood doors are simpler to patch because the material holds filler well without needing a backing insert or foam. Two-part epoxy wood filler (Bondo, Minwax High-Performance Filler, or similar) creates a bond almost as hard as the original wood.
- Clean and dry the hole thoroughly. Remove any loose wood fibers with a utility knife or small chisel.
- Mix the two-part epoxy according to package directions — typically a 50/50 ratio on a disposable surface. Work quickly; most products have a 5–10 minute working time.
- Pack the epoxy firmly into the hole with a putty knife, slightly overfilling. Press it in firmly to eliminate air pockets.
- Let it cure fully — typically 20–30 minutes for handling, but check the label for full cure time.
- Shape and sand with 80-grit to rough shape, then 120-grit, then 220-grit for a paint-ready surface.
- For painted doors: prime and paint to match. For stained or clear-finish doors: the repaired spot will not take stain the same way as wood grain. Consider using a color-matched wood touch-up marker, or consult a finishing specialist.
Step 5: Fix Large Holes (4 Inches or Bigger) in Hollow-Core Doors
The Hardboard Backer Insert Method
A large punch-through in a hollow-core door needs a rigid backing panel inserted into the void before patching. Without it, the compound has nothing solid to bond to and will crack.
- Use a utility knife and straightedge to square off the hole into a clean rectangle. Cut back to solid, flat door skin on all four sides.
- Measure the interior space of the void and cut a piece of thin hardboard or 1/4-inch plywood to fit inside. The piece should be slightly larger than the hole opening but still slide into the void space.
- Drill two small holes through the hardboard piece, thread wire or a long screw through, and use these as a handle to maneuver the backer into place inside the door.
- Apply construction adhesive around the edges of the backer panel and press it tight against the inside surface of the door skin from within the void. Hold it in place until the adhesive grabs (a few minutes). Remove the wire handles.
- Cut a piece of thin hardboard to cover the hole on the outside surface, cut to exactly fit the opening.
- Glue and screw this cover panel flush with the door face. Countersink the screws so the heads sit slightly below the surface.
- Fill the screw holes and all seams with joint compound. Apply two or three thin coats, feathering each one wider. Sand between coats.
- Prime and paint the entire door face (not just the patch) for the most seamless result.
Pro Tips and Common Mistakes
- Don’t skip the primer. Unpainted joint compound absorbs paint differently than the surrounding door face. Use PVA or shellac-based primer on the patch before painting or the repair will ghost through the finish coat.
- Apply thin coats, not one thick one. Joint compound and spackle shrink as they dry. One thick coat will crack. Two or three thin coats with full drying between each gives a flat, durable result.
- Feather the edges wide. The wider you feather joint compound past the patch edge, the less visible the seam. For a door, aim to feather out at least 3–4 inches in every direction.
- Paint the whole door panel, not just the patch. Spot-painting rarely matches exactly — paint sheen and color shift over time. If the door matters visually, repaint the entire face.
- Don’t use standard spackling on holes bigger than 1 inch. It shrinks too much and may crack or fall out of larger voids. Use all-purpose joint compound or two-part epoxy for anything larger than a small ding.
Troubleshooting
| Problem | Likely Cause | Fix |
|---|---|---|
| Patch sinks or cracks after drying | Too thick in one coat, or no backing | Apply multiple thin coats; add foam or mesh backing |
| Paint looks different on the patch | Skipped primer | Sand patch lightly, apply shellac primer, repaint |
| Patch is soft or crumbles | Surface was damp or dusty when applied | Remove old patch, clean and dry surface, reapply |
| Foam expanded too much through hole | Over-applied spray foam | Trim excess flush with utility knife when fully cured |
| Seams show through paint | Edges not feathered far enough | Sand and add another feathered coat; reprime before painting |
Frequently Asked Questions
Can you fix a hollow-core door without replacing it?
Yes, in most cases. Small and medium holes are very repairable with foam backing, mesh patches, and joint compound. Large punch-throughs can be repaired with a backer insert method, though very large or multiple holes may make replacement more cost-effective.
What’s the best filler for a hole in a door?
For small holes (under 1 inch): lightweight spackle or wood filler works fine. For medium holes with backing: all-purpose joint compound over a mesh patch is the most durable option. For solid wood doors: two-part epoxy wood filler (such as Bondo) gives the hardest, most sandable result.
How do I make the patch invisible?
The key steps are: prime the patch with PVA or shellac primer before painting, feather the joint compound edges as wide as possible, and paint the full door panel rather than spot-painting. Lighting and paint sheen also affect visibility — flat paint hides imperfections better than satin or semi-gloss.
How long does it take to fix a hole in a door?
A small hole takes 1–2 hours including drying time. A medium hole with the mesh-patch method takes a full day (two coats of compound with drying time between). A large hole with the backer-insert method takes 1–2 days from start to finish coat.
Should I replace the door instead of patching it?
Replace the door if the damage is more than 50% of a panel, if the structural integrity of the door is compromised, or if it’s an exterior door (exterior doors need solid insulation and weathersealing that patches can’t restore). For typical hollow-core interior doors, patching is almost always the better value.
Conclusion
Fixing a hole in a door is a straightforward DIY repair once you match the method to the door type and hole size. Small holes are a 30-minute job. Medium holes take a day with the mesh-patch method. Large punch-throughs require the backer-insert technique but are still very doable. The finish work — priming, feathering, and full-panel painting — is what separates a patch you can’t see from one that’s obvious from across the room.
Once the hole is fixed, make sure the underlying cause is addressed too. If a doorknob swinging too far caused the damage, install a door stop before it happens again. If you’re also dealing with hinge or alignment issues, check our guide on how to fix a rubbing door or our steps for how to repair a door frame to get your door working like new.
