
A vinyl pool liner can last 10–15 years if properly maintained, but staining, algae growth, and scum line buildup will degrade both its appearance and its lifespan if left untreated. Cleaning a vinyl pool liner is mostly done in the water with a soft brush and the right chemistry — the key is using only vinyl-safe products and never scrubbing with anything abrasive. This guide covers routine liner brushing, waterline scum removal, stain identification and treatment, and algae elimination safely and effectively.
What You’ll Need
- Pool vinyl brush (nylon bristles — NOT stainless steel)
- Telescoping pole
- Pool vacuum (manual or automatic)
- Soft sponge or non-abrasive scrub pad
- Vinyl-safe pool liner cleaner (Spray Away, BioGuard, or similar)
- White vinegar (for calcium and mineral deposits)
- Vitamin C tablets or ascorbic acid powder (for metal stains)
- Pool enzyme cleaner (for oil and scum line)
- Chlorine shock (calcium hypochlorite or sodium dichloro)
- Algaecide (pool-grade, vinyl-safe)
- Pool water test kit or test strips
- Rubber gloves and safety glasses
Safety Precautions
Never use chlorine tablets, granular shock, or concentrated pool chemicals directly on the vinyl liner — always dissolve granular chemicals in a bucket of water before adding to the pool, and allow them to disperse before brushing the liner. Direct contact with undissolved chlorine can bleach and degrade vinyl permanently. Never use a stiff wire brush, pumice stone, or abrasive scrubber on vinyl — scratches permanently damage the surface and create microscopic channels that harbor algae. Wear rubber gloves when applying concentrated vinyl cleaners or algaecides.
Understanding Vinyl Pool Liner Stains
Stain color is your best diagnostic tool. Identifying the stain type before treating it prevents using the wrong product, which can set the stain permanently:
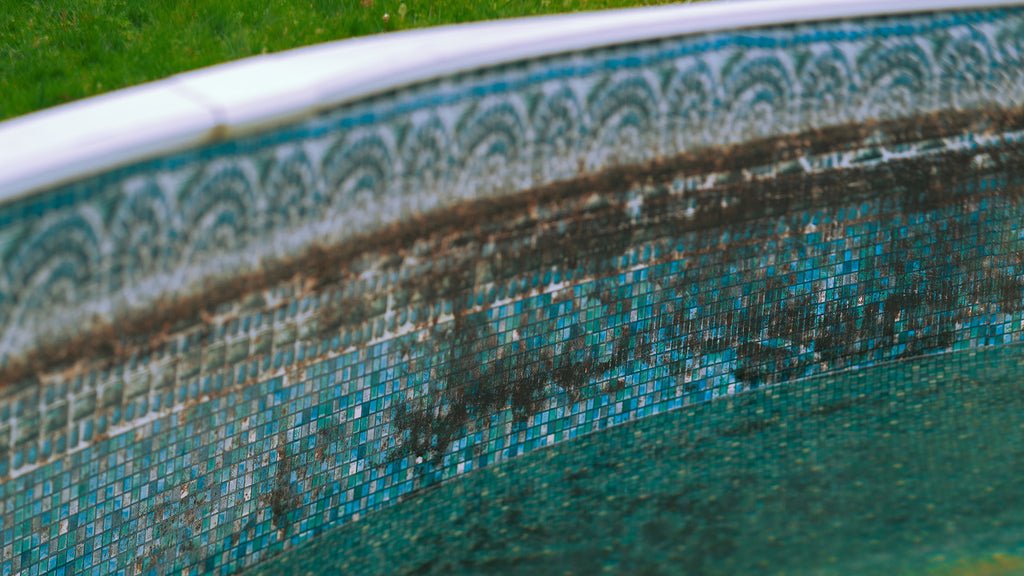
- Green, black, or brown algae: The most common problem — live biological growth, usually in corners, on steps, or on shaded walls. Treat with chlorine shock and algaecide.
- Yellow or mustard-colored patches: Mustard algae — a stubborn, chlorine-resistant variety that clings to walls. Requires a specific mustard algae treatment.
- Blue-green or teal stains: Copper staining from copper-based algaecides or corroded copper pipes. Treat with ascorbic acid (Vitamin C).
- Rust-colored or reddish-brown stains: Iron staining from well water or corroded metal fittings. Also treat with ascorbic acid.
- White chalky deposits (waterline or underwater): Calcium scale from hard water or imbalanced chemistry. Remove with white vinegar or a calcium scale remover.
- Gray or brown scum line at the waterline: Body oils, sunscreen, and environmental debris bonded to the liner surface. Remove with an enzyme-based pool cleaner or vinyl-specific liner cleaner.
Routine Liner Brushing and Maintenance
Step 1: Brush the Entire Liner Weekly
Attach a nylon pool brush to your telescoping pole. Brush the entire liner surface at least once per week — walls, floor, corners, and steps. Use long, overlapping strokes on the walls (brush from the waterline down to the floor), and use back-and-forth strokes across the floor toward the main drain. This weekly brushing dislodges algae spores before they can establish, and knocks settled debris toward the drain for vacuuming. Never use a metal-bristle brush on vinyl — it gouges and permanently damages the surface.
Step 2: Vacuum the Pool Floor
After brushing, vacuum the pool floor to remove the disturbed debris. For algae treatment, vacuum to waste (bypass the filter) so you’re not recirculating algae through the filter system. Move the vacuum head slowly in straight, slightly overlapping passes — rushing leaves tracks of undisturbed debris. Pay extra attention to corners and steps where debris settles heaviest.
Step 3: Clean the Waterline Weekly
The waterline is where body oils, sunscreen, pollen, and atmospheric fallout concentrate into a visible scum ring. Once per week, apply a vinyl liner cleaner or pool enzyme product to a soft sponge and wipe the waterline band. Work in a circular motion with light pressure — never scrub aggressively at the waterline. For an enzyme-based approach, add a pool enzyme maintenance product to the pool weekly to break down oils before they bond to the liner, significantly reducing waterline buildup.
Deep Cleaning: Algae Treatment
Step 1: Test and Balance Water Chemistry First
Before shocking, test your pool water. Target: pH 7.2–7.6, alkalinity 80–120 ppm, chlorine 1–3 ppm. Adjust pH and alkalinity first — chlorine is far less effective outside the proper pH range. Low pH (acidic water) and high pH both cause problems, but low pH is particularly damaging to vinyl liners over time.
Step 2: Shock the Pool
Pre-dissolve calcium hypochlorite shock in a bucket of water (never add granules directly to pool — they will bleach the liner). Pour the dissolved solution into the pool around the perimeter while the pump is running. Shock to raise free chlorine to 10–20 ppm for green algae, and to 30 ppm for mustard algae. Run the filter continuously for 24 hours. The pool water will likely turn cloudy green — this is normal and indicates dead algae.
Step 3: Brush Aggressively (With a Nylon Brush)
After shocking, brush all walls, floor, and steps vigorously with a nylon brush. Dead algae that has bonded to the liner must be mechanically dislodged so the filter can remove it. Pay particular attention to corners, steps, and any shaded areas where algae is heaviest.
Step 4: Run the Filter and Vacuum to Waste
Run the filter continuously for 24–48 hours. The water should clear progressively. Once the bulk of the algae has settled (usually 12–24 hours), vacuum the pool floor to waste — this removes the dead algae from the pool entirely rather than recirculating it through the filter. Backwash your filter after the full cleaning process.
Step 5: Add Algaecide
Once chlorine levels have dropped to normal swimming range (below 5 ppm), add a vinyl-safe algaecide per its label directions. Algaecide as a preventive treatment — added every 1–2 weeks — prevents algae from reestablishing. Note: do not use copper-based algaecides on vinyl pools — copper ions cause permanent blue-green staining on vinyl liners.
Treating Metal Stains (Iron and Copper)
Metal stains from iron (rust-colored) or copper (blue-green) respond to ascorbic acid treatment. Add 1 pound of ascorbic acid powder (Vitamin C) per 10,000 gallons of pool water with the filter running, and brush the stained areas. Metal stains should dissolve within 30 minutes. After treatment, add a metal sequestrant to the water to keep dissolved metals in solution and prevent them from redepositing. Test and re-balance pool chemistry — ascorbic acid lowers pH and alkalinity significantly.
Cleaning the Waterline Scum Ring
For established waterline scum (the grey/brown ring at the water surface), drop the water level 2 inches below the scum line. Apply a dedicated vinyl liner cleaner (Spray Away, BioGuard Stow Away, or similar) to the exposed waterline area with a soft sponge. Let it sit for 2 minutes, then wipe in circular motions. For thick buildup, apply the cleaner, cover with plastic wrap, and let sit for 5 minutes before wiping — the wrap prevents evaporation and allows more contact time. Rinse thoroughly before refilling to the normal water level.
Pro Tips and Common Mistakes
- Never drop chlorine tablets directly on the liner: Chlorine tablets sitting on the liner floor will bleach a permanent circle into the vinyl within hours. Always use a floating dispenser or an in-line feeder.
- Don’t use copper algaecides on vinyl pools: Copper ions cause permanent teal staining on vinyl liners. Use a non-copper, vinyl-safe algaecide (look for polyquat 60 or sodium bromide formulations).
- Maintain balanced water chemistry year-round: Acidic water (low pH) eats away at vinyl plasticizers over time, causing the liner to become brittle and wrinkle. Keep pH in the 7.2–7.6 range consistently.
- Treat stains early: Fresh stains (less than 2 weeks old) respond to treatment that won’t work on set stains. Diagnose and treat at first appearance.
- Winterize properly to prevent staining: Stains that develop under a winter pool cover are often the worst because they have months to set. Balance chemistry, add a stain and scale treatment, and brush the liner thoroughly before covering for winter.
Troubleshooting
The Algae Returns Within Days of Treatment
Recurring algae almost always means insufficient sanitizer or a filter that isn’t running long enough. The pool needs at least 8 hours of filter run time per day in summer. Check that your chlorine feeder is working, that your shock dosage was sufficient (many people under-shock), and that the filter is clean and operating at proper flow rate.
There Are White Blotchy Spots on the Liner Floor
White or gray blotchy areas on the floor are typically calcium scale or calcium scaling over algae residue. Treat with a pH-down product (muriatic acid, diluted and poured slowly into the pool — never near the liner floor) to lower pH to 7.0 temporarily, which dissolves calcium deposits. Brush the affected areas during treatment. Balance water chemistry afterward to prevent recurrence.
The Liner Has Faded or Bleached Patches
Faded patches are permanent UV damage or bleach damage from improperly added chlorine. They can’t be reversed by cleaning. To minimize future fading, use a sun-safe pool stabilizer (cyanuric acid) to protect chlorine from UV degradation — this reduces the amount of chlorine needed to maintain sanitation, which reduces cumulative chemical exposure to the liner.
Frequently Asked Questions
Can I use household bleach to clean a vinyl pool liner?
No — household bleach (sodium hypochlorite at 6–8.25%) is far too concentrated for direct application to a vinyl liner. It will permanently bleach and weaken the vinyl. Pool-grade sodium hypochlorite (liquid chlorine at 10–12.5%) is diluted into the pool water, not applied directly — this is an important distinction.
How do I remove a brown stain from my vinyl pool liner?
Brown stains are almost always iron (rust). Rub a Vitamin C tablet directly on the stain as a spot test — if it lightens within 30 seconds, it’s an iron stain. Treat with ascorbic acid as described in the metal staining section above, then add a metal sequestrant to prevent recurrence.
How do I clean pool liner stains above the waterline?
Drop the water level 2 inches below the stained area, then apply a dedicated vinyl liner cleaner with a soft sponge. For mineral deposits, use white vinegar on a cloth. Never use abrasive cleaners or scrubbers above the waterline — scratched vinyl above the waterline is visible and permanent.
How long does a vinyl pool liner last?
With proper maintenance, a vinyl pool liner lasts 10–15 years. The main lifespan killers are: chronic low pH (acid water weakens the PVC), UV exposure on the waterline and above, and physical damage from dragging heavy objects across the floor. Maintaining balanced water chemistry and using a UV stabilizer (cyanuric acid) extend liner life significantly.
Can I drain my vinyl pool to clean it?
Avoid fully draining a vinyl pool — the liner can shrink, crack, or float if groundwater pressure is present. If the pool must be drained for repair, do so only under professional guidance and refill as quickly as possible. For cleaning, all work should be done with the pool full or at normal water level.
Conclusion
Keeping a vinyl pool liner clean comes down to three habits: brush weekly, maintain balanced water chemistry year-round, and treat stains immediately before they set. Regular brushing prevents algae from establishing, balanced chemistry prevents both biological and mineral staining, and prompt stain treatment means using the simple ascorbic acid or enzyme solutions instead of aggressive treatments that stress the liner. Do these things consistently and your vinyl liner will stay bright, flexible, and watertight for its full lifespan. For related pool area maintenance, see our guide on How to Clean a Floor for pool deck care tips.
