Cleaning a CPU fan involves removing accumulated dust from the heatsink fins and fan blades using compressed air and a soft brush — without touching electrical components with bare hands or introducing any moisture. For a desktop, open the case, hold the fan blades still, and use compressed air in short bursts. For a laptop, it’s more involved: you’ll need to open the bottom panel and locate the fan assembly. This guide covers both, includes the anti-static precautions that matter, and tells you when cleaning alone isn’t enough.
Why CPU Fan Dust Is a Bigger Problem Than It Looks
The CPU (Central Processing Unit) is your computer’s most heat-sensitive component. It generates significant heat under load and relies entirely on the heatsink and fan to stay within safe operating temperatures. When the heatsink fins pack with dust, thermal transfer drops — and the CPU temperature rises. The result is a cycle of problems: the fan spins faster and louder trying to compensate, thermal throttling kicks in (the CPU deliberately slows itself to cool down), and in severe cases the system shuts down to prevent component damage.Most computers should be cleaned every 6–12 months in normal home environments. Homes with pets, heavy smokers, or dusty conditions may need it more frequently. If your computer fan is running audibly louder than it used to, or the machine feels warm to the touch during light use, dust accumulation is the most likely cause.
What You’ll Need
Compressed air can (the standard cleaning method)
Small soft-bristle brush (clean artist’s brush or makeup brush — not stiff)
Anti-static wrist strap (strongly recommended)
Phillips screwdriver (for opening desktop case and laptop back panel)
Thermal paste (if you’re removing the heatsink for deep cleaning)
Isopropyl alcohol 90%+ (for thermal paste removal — not for any other components)
If You Don’t Have Compressed Air
Compressed air is the standard tool and is available at any office supply or electronics store for $5–$8. If you genuinely can’t access it:
A manual air blower (the bellows-style squeeze bulb used for camera lens cleaning) works for light dust — it’s slower but produces no moisture
A battery-powered electric air duster (rechargeable compressed air alternative) costs $20–$30 and is reusable indefinitely — a worthwhile investment for regular cleaners
Do NOT use lung-power to blow on components — human breath contains moisture that damages electronics and introduces oils and bacteria. Do NOT use a household hair dryer — the motor inside produces static electricity.
Safety Precautions — Critical for Electronics
Shut down completely and unplug from the wall. For laptops, also remove the battery if it’s accessible. A computer in sleep mode still draws power — it must be fully off.
Discharge static electricity before touching components. Static discharge from your hands can permanently damage CPU, RAM, and motherboard components. Touch a grounded metal object (like the metal part of the unplugged power strip) or use an anti-static wrist strap attached to the computer case.
Hold fan blades still when using compressed air. Compressed air spinning a fan at uncontrolled speed can cause the motor to generate electricity (back-EMF) or physically damage the bearings. Always hold the fan blades with a finger or a pencil while spraying.
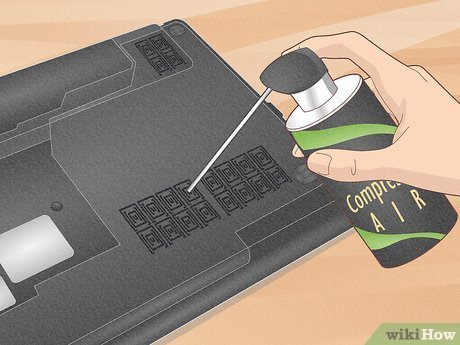
Use compressed air in short bursts only — long continuous sprays lower the can temperature and can cause condensation and liquid to expel. Keep bursts under 2 seconds each.
Tilt the can to 45° or keep it upright — tilting past 45° causes liquid propellant to expel rather than gas. Liquid propellant on a motherboard causes immediate damage.
Never use a vacuum cleaner directly on PC components — household vacuums generate significant static electricity. Use compressed air to loosen dust and a soft brush to sweep it away from components.
Method 1: Cleaning a Desktop CPU Fan and Heatsink
Step 1 — Power Down, Unplug, and Open the Case
Shut down Windows or macOS completely — not sleep or hibernate, full shutdown. Unplug the power cable from the back of the computer. Press the power button once with the cable unplugged to discharge any remaining capacitor charge in the system.Remove the side panel of the desktop case. Most modern cases use thumbscrews at the back. Slide the panel off or swing it open on its hinge. Ground yourself by touching the metal case frame before reaching inside.
Step 2 — Identify the CPU Heatsink and Fan
The CPU heatsink is the largest metallic component on the motherboard — a rectangular or tower-style block of aluminum fins with a fan mounted on top. It sits directly over the CPU, which is hidden beneath it. Identify it before doing anything else. Also note any other fans in the case (case intake/exhaust fans, GPU fan) — you should clean those too while the case is open.
Step 3 — Remove Dust with Compressed Air and Brush
Hold the CPU fan blades still with one finger. Direct compressed air in short bursts through the heatsink fins from the side — the goal is to blow dust out through the fins, not deeper into them. Work from multiple angles around the heatsink to clear dust from between all the fin layers.Use your soft brush to gently sweep loosened dust off the fan blades, heatsink top surface, and surrounding motherboard area. Avoid touching any component pins, RAM slots, or the motherboard surface directly. The brush is for sweeping dust away — let the compressed air do the actual dislodging.Work with the case tilted or positioned so dust falls out and away from the motherboard — not back onto it. A workspace near an open door or window helps clear the released dust from the air.
Step 4 — Clean Case Fans and Air Vents
While the case is open, clean all other fans: front intake fans, rear exhaust fans, and any side panel fans. Same technique — hold blades, use compressed air in short bursts, follow with soft brush. Also clean the mesh intake filters if your case has them (many slide out for rinsing in water — wash separately, dry fully before reinstalling).
Step 5 — Close Case and Test
Replace the side panel and thumbscrews. Reconnect the power cable. Power on and monitor CPU temperature using a free tool like HWMonitor or Core Temp. With a properly cleaned heatsink, idle CPU temperatures should drop noticeably — typically 5–15°C depending on how much dust was present.
Method 2: Cleaning a Laptop CPU Fan
Laptop CPU fan cleaning is more involved than desktop cleaning because access requires opening the bottom panel. The actual cleaning step is simpler — there’s less dust volume — but the disassembly requires more care.
Step 1 — Power Down and Open the Bottom Panel
Fully shut down the laptop. Remove the battery if it’s accessible from the outside. Most modern laptops have the battery integrated and require bottom panel removal to access it — in this case, simply ensure the laptop is fully powered down.Remove all screws from the bottom panel. Note that some laptops have screws hidden under rubber feet — peel the feet back to check. Use a plastic pry tool or spudger (not a metal screwdriver) to gently release any panel clips around the perimeter. Work slowly and patiently around the edges — forcing it snaps clips that are difficult to replace.
Step 2 — Locate the CPU Fan and Exhaust Vent
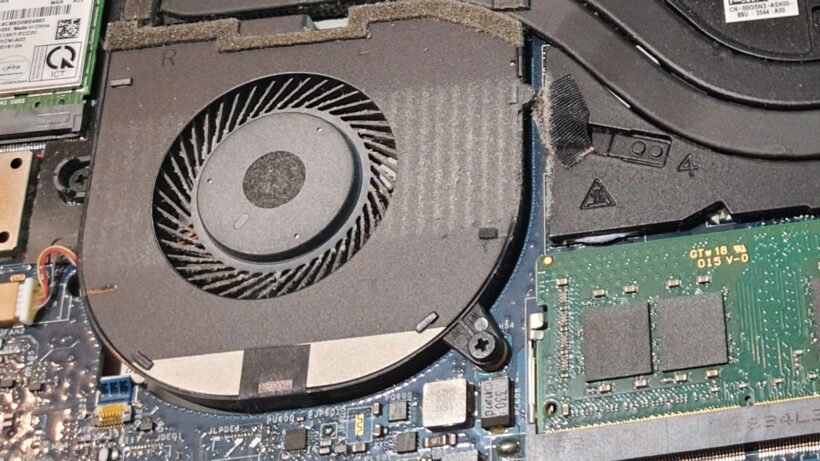
Inside the laptop, locate the CPU fan — a small, thin fan connected to the heatsink pipe that runs across the board. Identify the exhaust vent location on the laptop’s edge or back — this is where you’ll direct compressed air to blow dust out.
Step 3 — Clean the Fan and Exhaust Path
Hold the fan blades still with a toothpick or pencil through the fan grille. Use short bursts of compressed air directed at the fan blades and the heatsink fins. Direct bursts at the exhaust vent from the inside — you’ll see a small dust cloud exit from the laptop’s vent opening, which confirms it’s working.Use the soft brush to gently sweep any remaining dust from accessible surfaces. Keep all cleaning away from the RAM, storage drive, and any connector ports.
Step 4 — Reassemble and Test
Replace the bottom panel and reseat all screws — do not overtighten as laptop panel screws strip easily. Replace any rubber feet over their screw positions. Power on and check temperatures with your system’s hardware monitor or a third-party tool.
When Cleaning Alone Isn’t Enough: Thermal Paste
If your computer’s CPU temperatures remain high after thorough cleaning, old or degraded thermal paste is the next culprit. Thermal paste is a gray compound applied between the CPU surface and the heatsink’s base — it fills microscopic gaps to maximize heat transfer. Over 3–5 years, thermal paste dries out, shrinks, and cracks, creating air gaps that severely reduce thermal transfer.Reapplying thermal paste requires removing the heatsink (4 screws typically), cleaning the old paste off both surfaces with isopropyl alcohol 90%+, applying a fresh pea-sized amount of new thermal paste (Arctic Silver or similar), and reinstalling the heatsink. This is a legitimate DIY task for careful users and commonly drops CPU temperatures by 10–20°C on older machines.
Frequently Asked Questions
How often should I clean my CPU fan?
Every 6–12 months for desktops in normal home conditions. Homes with pets or heavy dust may need it every 3–4 months. For laptops, every 12 months is typical. If your fan is audibly louder than usual or temperatures are higher, clean it regardless of schedule.
Can I use a regular vacuum to clean my CPU fan?
No. Household vacuums generate static electricity that can permanently damage sensitive PC components. Use compressed air to dislodge dust and a soft brush to sweep it away from the area. If you need to vacuum, use an anti-static vacuum specifically designed for electronics cleaning.
My laptop fan is very loud but the vents don’t seem dusty — what’s happening?
Laptop fans can become loud from bearing wear (a grinding or rattling noise) or from thermal paste degradation causing sustained high-speed fan operation even with clean vents. Open the bottom panel and confirm the fan is spinning freely and without wobble. If the bearing is worn, the fan needs replacement. If the fan spins freely and is clean, reapplying thermal paste is the next step.
How do I know if my CPU is overheating?
Download a free temperature monitoring tool — HWMonitor, Core Temp, or Speccy for Windows; iStatMenus for Mac. Under light load (web browsing, light documents), most desktop CPUs should stay below 50°C. Laptops typically run 50–70°C under light load. Sustained temperatures above 90°C under load indicate a cooling problem. Temperatures above 95–100°C will cause automatic thermal shutdown to prevent damage.
A Clean CPU Fan Is a Cool, Quiet, Fast Computer
CPU fan cleaning is one of the highest-impact maintenance tasks for computer performance and longevity — and one of the most ignored. Twenty minutes of work with a can of compressed air can meaningfully reduce operating temperatures, eliminate fan noise that’s been annoying you for months, and extend the useful life of your machine by years.If you’re doing a full computer clean-up, check out our guide on how to deep clean and organize your garage — the same tools you used for this repair form the foundation of a capable DIY workspace.{
“@context”: “https://schema.org”,
“@type”: “HowTo”,
“name”: “How to Clean a CPU Fan”,
“description”: “Step-by-step guide to cleaning a CPU heatsink and fan on desktop and laptop computers to prevent overheating and reduce fan noise.”,
“totalTime”: “PT30M”,
“tool”: [
{“@type”:”HowToTool”,”name”:”Compressed air can”},
{“@type”:”HowToTool”,”name”:”Soft-bristle brush”},
{“@type”:”HowToTool”,”name”:”Anti-static wrist strap”},
{“@type”:”HowToTool”,”name”:”Phillips screwdriver”}
],
“step”: [
{“@type”:”HowToStep”,”name”:”Power Down and Unplug”,”text”:”Full shutdown, unplug power cable, press power button once to discharge capacitors.”},
{“@type”:”HowToStep”,”name”:”Open Case or Bottom Panel”,”text”:”Remove case side panel (desktop) or bottom panel screws and clips (laptop).”},
{“@type”:”HowToStep”,”name”:”Hold Fan Blades and Use Compressed Air”,”text”:”Hold fan blades still. Short compressed air bursts through heatsink fins from multiple angles.”},
{“@type”:”HowToStep”,”name”:”Sweep Loosened Dust with Soft Brush”,”text”:”Gently brush loosened dust away from components. Do not touch component surfaces.”},
{“@type”:”HowToStep”,”name”:”Clean Case Fans and Vents (Desktop)”,”text”:”Clean all additional case fans and intake filter mesh with same method.”},
{“@type”:”HowToStep”,”name”:”Reassemble and Monitor Temperatures”,”text”:”Close case, reconnect power, boot up, check CPU temps with monitoring software.”}
]
}
About the Author
I'm Steve Davila, founder of GuideGrove. I started this site after years of running into home cleaning and DIY guides that skipped the important steps or assumed too much. Every guide here is written the way I wished I'd found it — with the full process, the common mistakes, and the details that actually make the difference.