Regrouting bathroom tile involves removing old, damaged grout, thoroughly cleaning the tile seams, mixing and applying new grout with a float, and then carefully cleaning off any excess. This DIY project significantly enhances your bathroom’s appearance and restores the waterproof barrier between tiles. It’s a practical way to refresh your space and prevent moisture issues, extending the life of your tiled surfaces.
- Always prioritize safety with proper gear and ventilation.
- Thorough preparation is crucial for a lasting and professional-looking finish.
- Work in small sections to manage grout application and cleaning effectively.
- Clean excess grout promptly to prevent stubborn haze from forming.
- Allow adequate curing time before exposing newly grouted areas to moisture.
Safety First: Essential Precautions
Before you begin any regrouting project, prioritizing safety is paramount. Working with old grout can create a lot of dust, and new grout contains chemicals that require careful handling. Always wear appropriate personal protective equipment (PPE) to protect yourself.
- Eye Protection: Safety glasses or goggles are essential to shield your eyes from dust, debris, and grout splashes.
- Gloves: Wear chemical-resistant gloves to protect your hands from grout, which can be irritating to the skin.
- Dust Mask/Respirator: A dust mask or respirator is crucial to avoid inhaling fine grout dust, which can be harmful to your respiratory system.
- Ventilation: Ensure the bathroom is well-ventilated by opening windows and using an exhaust fan. This helps dissipate dust and chemical fumes.
- Knee Pads: If working on floor tiles, knee pads can provide comfort and protection during extended periods of kneeling.
Supplies Checklist for Regrouting
Having all your tools and materials ready before you start will make the regrouting process smoother and more efficient. A well-prepared workspace prevents interruptions and ensures you have everything needed at each step.
Tools You’ll Need:
- Grout saw or oscillating tool with a grout removal blade
- Utility knife (for tight corners or caulk removal)
- Shop vacuum or regular vacuum with a brush attachment
- Stiff-bristled brush or grout brush
- Buckets (for mixing grout and rinsing sponges)
- Grout float (rubber-edged applicator)
- Grout sponge (hydrophilic sponge designed for grout cleanup)
- Drill with a mixing paddle attachment (for larger batches of grout)
- Caulk gun (if re-caulking corners or edges)
- Drop cloths or plastic sheeting
- Painter’s tape
Materials You’ll Need:
- New grout (sanded for wider joints, unsanded for narrower joints, or epoxy grout)
- Grout sealer (penetrating type recommended for cementitious grouts)
- Caulk (silicone or acrylic latex with silicone, color-matched to grout if desired)
- Tile cleaner or degreaser
- Clean rags
Quick-Start Guide to Regrouting
For those eager to get started, here’s a condensed overview of the regrouting process. This quick guide highlights the main actions involved in refreshing your bathroom tile.
- Prepare: Clear the area, protect surrounding surfaces, and gather all necessary tools and materials.
- Remove Old Grout: Carefully scrape out the old, damaged grout from between the tiles.
- Clean: Thoroughly clean the empty grout lines to remove all dust and debris.
- Mix Grout: Prepare the new grout according to the manufacturer’s instructions.
- Apply: Use a grout float to press the new grout firmly into the tile lines.
- Clean Excess: Wipe away excess grout from the tile faces with a damp sponge.
- Cure & Seal: Allow the grout to cure completely, then apply a grout sealer.
How to Regrout Bathroom Tile: The Step-by-Step Process
Regrouting your bathroom tile is a rewarding DIY project that can dramatically improve the look and longevity of your tiled surfaces. Follow these detailed steps for a successful outcome.
Step 1: Prepare Your Workspace
Begin by removing all items from the bathroom, such as toiletries, rugs, and shower curtains. Lay down drop cloths or plastic sheeting to protect fixtures, flooring, and other surfaces from dust and grout splatter. Use painter’s tape to mask off any areas you don’t want grout to touch, like adjacent walls or trim.
Step 2: Remove Old Grout
This is the most labor-intensive part of the process. Use a grout saw or an oscillating tool with a grout removal blade to carefully scrape out the old grout. Work slowly and steadily, aiming to remove at least two-thirds of the old grout’s depth. Be cautious not to chip or damage the edges of your tiles. For corners and edges, a utility knife can help remove old caulk or stubborn grout.
Step 3: Clean the Grout Lines
Once the old grout is removed, thoroughly clean the empty grout lines. Use a shop vacuum to suck up all dust and debris. Then, scrub the lines with a stiff-bristled brush and a tile cleaner or degreaser to remove any remaining residue, mold, or mildew. Rinse the area with clean water and allow it to dry completely before proceeding. Any moisture can compromise the new grout’s adhesion.
Step 4: Mix the New Grout
Follow the manufacturer’s instructions precisely when mixing your new grout. Add the recommended amount of water to the dry grout mix in a clean bucket. Use a drill with a mixing paddle attachment for larger batches, or a trowel for smaller amounts, to mix until the grout reaches a smooth, consistent, peanut butter-like texture. Avoid mixing too much at once, as grout has a limited working time.
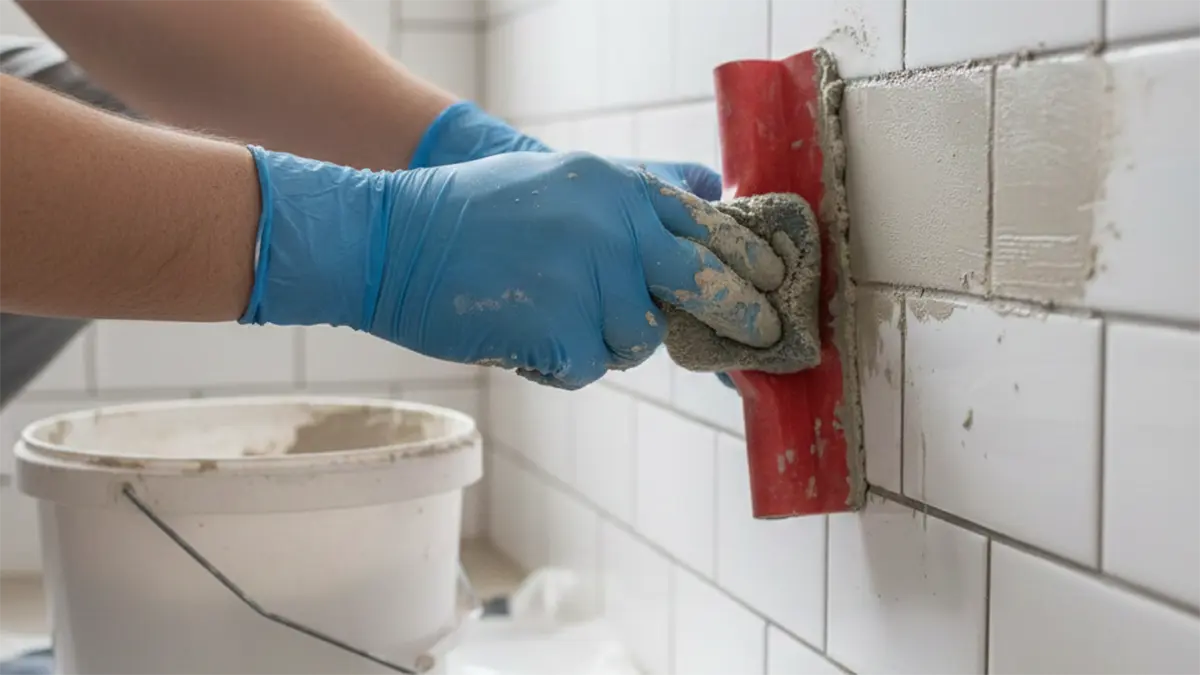
Step 5: Apply the Grout
Scoop a small amount of mixed grout onto your rubber grout float. Hold the float at a 45-degree angle to the tile surface and spread the grout firmly into the grout lines, ensuring they are completely filled. Work in small sections, typically 3×3 feet, to prevent the grout from drying too quickly. Apply pressure to force the grout deep into the joints, then use the float at a 90-degree angle to scrape off excess grout from the tile faces.
Step 6: Clean Off Excess Grout
After applying grout to a section, wait about 10-20 minutes for it to set slightly (check manufacturer’s recommendations). Then, use a damp grout sponge to wipe away the excess grout from the tile surfaces. Wipe diagonally across the grout lines to avoid pulling grout out of the joints. Rinse your sponge frequently in a bucket of clean water, wringing it out thoroughly before each wipe. Repeat this process until the tiles are clean and the grout lines are smooth and even. You may need to change your rinse water multiple times.
Step 7: Cure and Seal
Allow the new grout to cure for the time specified by the manufacturer, typically 24-72 hours, before exposing it to water or heavy use. Once fully cured, apply a penetrating grout sealer. This step is crucial for cementitious grouts as it helps protect against moisture, stains, and mildew. Follow the sealer’s instructions for application and drying time. Re-caulk any corners or expansion joints with a color-matched caulk.
Common Regrouting Mistakes and How to Fix Them
Even experienced DIYers can encounter issues during a regrouting project. Knowing common mistakes and their solutions can save time and frustration.
- Not Removing Enough Old Grout: If old grout remains too deep, the new grout won’t bond properly or will look uneven. Fix: Go back and carefully remove more of the old grout until the lines are sufficiently deep and clean.
- Improper Grout Mixing: Grout that’s too wet will be weak and crumbly; too dry, and it’s hard to work with and won’t adhere well. Fix: Always follow manufacturer instructions precisely. If a batch is mixed incorrectly, it’s best to discard it and mix a fresh one.
- Applying Too Much or Too Little Grout: Too much leads to excessive cleanup and haze; too little results in incomplete, weak joints. Fix: Use the grout float at a 45-degree angle to press grout in, then at 90 degrees to scrape off excess. Practice on a small, inconspicuous area first.
- Not Cleaning Excess Grout Quickly Enough: Dried grout haze is much harder to remove than wet grout. Fix: Work in smaller sections and clean as you go. For stubborn haze, use a specialized grout haze remover, following product instructions carefully.
Addressing Regrouting Challenges
Sometimes, specific situations can present additional hurdles during regrouting. Knowing how to tackle these can ensure a smoother project.
Dealing with Stubborn Old Grout
If old grout is particularly hard or thick, a manual grout saw might not be enough. Consider renting or purchasing an oscillating multi-tool with a diamond-grit grout removal blade. These tools significantly speed up the removal process and are more effective on tough grout. Always wear extra eye and respiratory protection when using power tools.
Uneven Grout Lines
Uneven grout lines can result from inconsistent application or not pressing the grout firmly enough. To achieve uniform lines, ensure you apply consistent pressure with the grout float. When wiping, use a damp, not soaking wet, sponge and wipe diagonally to avoid pulling grout out of the joints. If lines are slightly uneven after drying, a fine-grit sanding block can gently smooth them, but this should be done with extreme care.
When to Consider Professional Help
While regrouting is a manageable DIY task, there are times when calling a professional is the best option. If you encounter extensive tile damage, structural issues behind the tiles, or if the area to be regrouted is very large and complex, a professional tiler can ensure the job is done correctly and efficiently. They have specialized tools and expertise for challenging situations.
Maintaining Your Newly Grouted Tiles
After all your hard work, proper maintenance will help keep your newly grouted tiles looking fresh and extend the life of the grout. Simple habits can make a big difference.
- Regular Cleaning: Clean your tiled surfaces regularly with a pH-neutral cleaner. Avoid harsh, acidic, or abrasive cleaners, which can degrade grout and sealer over time.
- Prompt Spill Cleanup: Wipe up spills immediately, especially colored liquids, to prevent staining the grout.
- Avoid Scrubbing with Harsh Brushes: While a stiff brush is good for initial cleaning, avoid overly aggressive scrubbing on new grout, which can wear down the surface.
- Re-seal Periodically: Cementitious grouts should be re-sealed every 1-2 years, or as recommended by the sealer manufacturer, to maintain their protective barrier against moisture and stains.
Frequently Asked Questions About Regrouting
How often should you regrout bathroom tile?
The frequency of regrouting depends on several factors, including the type of grout, the amount of traffic, and cleaning habits. Generally, cementitious grout may need regrouting every 8-16 years, or sooner if you notice cracking, crumbling, or persistent discoloration. Epoxy grout is much more durable and rarely requires regrouting.
What tools do I need to regrout bathroom tile?
Key tools include a grout saw or oscillating tool for removal, a shop vacuum for cleaning, a grout float for application, and a grout sponge for cleanup. You’ll also need buckets, a mixing paddle for your drill, and potentially a utility knife for tight spots.
Can I regrout over existing grout?
It is generally not recommended to regrout over existing grout. New grout needs a clean, porous surface to bond properly. Applying new grout over old can lead to poor adhesion, cracking, and a significantly reduced lifespan for the new grout. Always remove the old grout first for the best results.
How long does it take for new grout to dry?
New grout typically takes 24 to 72 hours to fully cure, depending on the grout type, humidity, and temperature. While it may be dry to the touch sooner, it’s crucial to wait the full recommended curing time before exposing it to water or heavy use to ensure maximum strength and durability.
Is regrouting bathroom tile a difficult DIY project?
Regrouting bathroom tile is a moderately challenging DIY project. It requires patience, attention to detail, and a willingness to work carefully. While not overly complex, the labor involved in removing old grout and the precision needed for applying new grout can be demanding for beginners. However, with proper preparation and tools, it is achievable for most homeowners.
What kind of grout should I use for bathroom tile?
For most bathroom applications, sanded grout is used for joints wider than 1/8 inch, providing strength and preventing shrinkage. Unsanded grout is suitable for joints 1/8 inch or narrower. Epoxy grout is an excellent, highly durable, and stain-resistant option for bathrooms, though it can be more challenging to work with and typically has a faster working time.
Conclusion
Regrouting your bathroom tile is a transformative project that revitalizes your space and reinforces its protection against moisture. By carefully following the steps of removing old grout, preparing the surfaces, applying new grout, and proper cleaning, you can achieve professional-looking results. Remember to prioritize safety and allow adequate curing time for a lasting finish. With a little effort, your bathroom will look refreshed and be better protected for years to come.
