To clean grout in your shower, begin by clearing any loose debris. Apply a suitable cleaner, such as a baking soda paste or a diluted vinegar solution, directly to the grout lines. Allow it to sit briefly before scrubbing thoroughly with a stiff-bristled brush and rinsing with clean water.
- Start with a clear shower and remove loose debris.
- Choose the right cleaning solution for your grout type.
- Always test cleaners in an inconspicuous area first.
- Scrub diligently with a stiff brush or specialized grout brush.
- Rinse thoroughly to remove all cleaning residue.
- Prioritize safety with proper ventilation and protective gear.
Why Shower Grout Gets Dirty and Needs Cleaning
Shower grout, the porous material between your tiles, is constantly exposed to moisture, soap scum, body oils, and minerals from hard water. This creates an ideal environment for mildew, mold, and bacteria to thrive, leading to discoloration and an unhygienic appearance. Regular cleaning is crucial not only for aesthetics but also for preventing the degradation of the grout itself and maintaining a healthy bathroom environment.
Over time, neglecting grout cleaning can lead to deep-seated stains that are much harder to remove. Mold and mildew can also spread, potentially causing respiratory issues for sensitive individuals. Addressing these issues proactively helps preserve the integrity of your shower tiles and extends the life of your bathroom surfaces.
Supplies Checklist for Effective Grout Cleaning
Before you begin the cleaning process, gather all the necessary tools and materials. Having everything on hand will make the task more efficient and ensure you can complete it safely and effectively.
- Protective Gear: Rubber gloves, eye protection, and a face mask (especially when using stronger cleaners or in poorly ventilated areas).
- Cleaning Brushes: A stiff-bristled brush, a dedicated grout brush, or even an old toothbrush for tight corners.
- Cleaning Solutions:
- Baking soda
- White vinegar
- Hydrogen peroxide (3%)
- Oxygen bleach (powdered, for tough stains)
- Commercial grout cleaner (ensure it’s safe for your grout and tile type)
- Mild dish soap
- Spray Bottles: For applying liquid solutions evenly.
- Buckets: Two buckets – one for clean water, one for rinsing dirty tools.
- Sponges or Cloths: For wiping and rinsing.
- Old Towels: For drying surfaces.
- Ventilation Fan or Open Window: Crucial for air circulation.
How to Clean Grout in Shower: A Step-by-Step Guide
Follow these steps to effectively clean the grout in your shower, tackling dirt and grime for a refreshed look.
- Prepare the Shower Area: Remove all bottles, soaps, and other items from the shower. Give the entire shower a quick rinse with warm water to wet the grout and remove any loose surface dirt or hair. This initial rinse helps prepare the grout for cleaning solutions.
- Apply a Mild Cleaning Solution: For general cleaning, start with a baking soda paste or a vinegar solution.
- Baking Soda Paste: Mix baking soda with a small amount of water to form a thick paste. Apply this paste directly onto the grout lines.
- Vinegar Solution: Mix equal parts white vinegar and water in a spray bottle. Spray the solution generously onto the grout.
- Let it Dwell: Allow the chosen cleaning solution to sit on the grout for 10-15 minutes. This dwell time is crucial as it allows the cleaner to penetrate the grime and loosen it, making scrubbing more effective. For tougher stains, you might extend this time slightly.
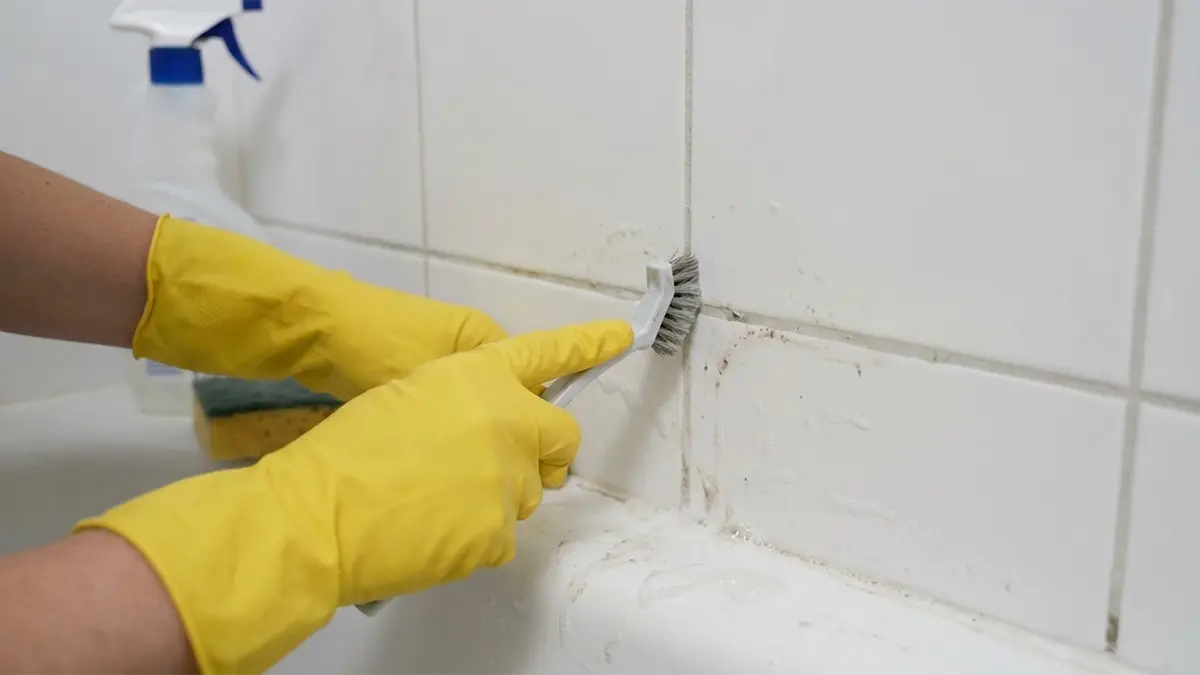
- Scrub the Grout: Using a stiff-bristled brush, a grout brush, or an old toothbrush, vigorously scrub the grout lines. Apply firm pressure in small, circular motions or back-and-forth strokes. Pay extra attention to areas with visible discoloration or mold.
- Rinse Thoroughly: After scrubbing, rinse the entire shower area with clean, warm water. Ensure all cleaning solution and loosened grime are washed away. You may need to use a clean sponge or cloth to wipe down the tiles and grout, ensuring no residue remains.
- Dry the Area: Use an old towel or a squeegee to dry the shower surfaces. Removing excess moisture helps prevent new mold and mildew from forming immediately after cleaning.
Tackling Stubborn Stains and Mold
Sometimes, a mild cleaner isn’t enough for deeply embedded dirt or persistent mold. For these tougher challenges, you’ll need to escalate your cleaning approach.
Hydrogen Peroxide for Discoloration
Hydrogen peroxide (3%) is an excellent, non-toxic alternative for brightening discolored grout. Apply it directly to the grout lines and let it sit for 10-15 minutes before scrubbing and rinsing. It works by oxidizing stains, helping to lift them from the porous surface.
Oxygen Bleach for Heavy Stains
For severe staining or widespread mold, powdered oxygen bleach can be highly effective. Mix the oxygen bleach with water according to the product instructions to form a paste or solution. Apply it to the grout, let it sit for 30 minutes to an hour, then scrub and rinse thoroughly. Always ensure good ventilation when using oxygen bleach.
Commercial Grout Cleaners
Many commercial grout cleaners are available, formulated to tackle specific types of stains like soap scum, hard water deposits, or mold. Always read the product label carefully to ensure it’s compatible with your grout and tile type, especially if you have natural stone. Test any commercial cleaner in an inconspicuous area first to prevent damage or discoloration.
Essential Safety Precautions for Grout Cleaning
Cleaning grout, especially with stronger chemicals, requires careful attention to safety. Protecting yourself and your bathroom is paramount.
- Ventilation is Key: Always ensure adequate ventilation by opening windows or running the bathroom exhaust fan. This helps dissipate fumes from cleaning products, preventing respiratory irritation.
- Wear Protective Gear: Don rubber gloves to protect your skin from harsh chemicals and prolonged exposure to water. Eye protection is crucial to prevent splashes from irritating or damaging your eyes. A face mask can offer additional protection against fumes and airborne particles.
- Test in an Inconspicuous Area: Before applying any new cleaning solution to your entire shower, test it on a small, hidden section of grout. This helps ensure the product won’t discolor, etch, or damage your grout or surrounding tiles.
- Never Mix Chemicals: Do not mix different cleaning products, especially bleach with ammonia or vinegar. This can create dangerous, toxic fumes that are extremely harmful.
- Follow Product Instructions: Always read and adhere to the manufacturer’s instructions for any commercial cleaning product you use. Pay attention to recommended dwell times, dilution ratios, and safety warnings.
Common Mistakes to Avoid When Cleaning Shower Grout
Avoiding common pitfalls can save you time, effort, and potential damage to your shower. Be mindful of these mistakes during your cleaning routine.
- Using Harsh Abrasives: Avoid steel wool, metal brushes, or highly abrasive scrubbers that can scratch or erode the grout surface, making it more susceptible to future staining.
- Applying Undiluted Bleach: While bleach can kill mold, using it undiluted can damage grout, especially colored grout, and may not be the most effective long-term solution for deep stains. It also poses significant health risks due to fumes.
- Neglecting Ventilation: Cleaning in a closed, unventilated bathroom can lead to inhaling harmful fumes, causing dizziness, nausea, or respiratory issues.
- Skipping the Test Spot: Failing to test a new cleaner on an inconspicuous area can result in irreversible damage or discoloration to your grout or tiles.
- Not Rinsing Thoroughly: Leaving cleaning solution residue on the grout can attract more dirt, create a sticky film, or even continue to etch the grout over time.
- Ignoring Grout Sealing: Unsealed grout is highly porous and will quickly absorb dirt and moisture. Neglecting to seal clean grout makes future cleaning much harder.
Maintaining Clean Grout: Prevention Strategies
Once your grout is sparkling clean, the goal is to keep it that way for as long as possible. Implementing a few simple prevention strategies can significantly reduce the frequency and intensity of deep cleaning.
- Seal Your Grout: This is perhaps the most important preventive measure. Grout sealer creates a protective barrier that repels water, soap scum, and stains. Apply a high-quality penetrating grout sealer after cleaning and reapply every 6-12 months, or as recommended by the product manufacturer.
- Wipe Down After Each Shower: A quick wipe-down of shower walls and grout lines with a squeegee or a microfiber cloth after each use can prevent soap scum and hard water buildup. This simple habit makes a huge difference.
- Ensure Proper Ventilation: Always run your bathroom exhaust fan during and for at least 20-30 minutes after showering. If you don’t have a fan, open a window to allow moisture to escape, which inhibits mold and mildew growth.
- Use Daily Shower Sprays: There are many daily shower sprays available that help prevent soap scum and mildew. A quick spray after each shower can keep surfaces cleaner between deep cleans.
- Address Issues Promptly: If you notice a small spot of mold or discoloration, address it immediately rather than letting it spread. A quick spot clean is much easier than a full deep clean.
- Use Mild Soaps: Opt for liquid body washes over bar soaps, as bar soaps tend to leave more soap scum residue that can build up on grout.
Frequently Asked Questions
How often should I clean the grout in my shower?
For optimal hygiene and appearance, aim for a light cleaning of your shower grout weekly or bi-weekly. A deeper, more thorough cleaning should be performed every one to three months, depending on shower usage, ventilation, and how quickly dirt and grime accumulate.
What is the best homemade solution for how to clean grout in shower?
A highly effective homemade solution involves a paste made from baking soda and water, followed by a spray of equal parts white vinegar and water. Apply the baking soda paste, spray with vinegar, let it fizz, then scrub and rinse. This combination helps lift stains and disinfects.
Can I use bleach to clean shower grout?
While bleach can kill mold and whiten grout, it should be used cautiously and diluted. Undiluted bleach can damage grout, especially colored varieties, and its fumes can be harmful. Oxygen bleach is often a safer and equally effective alternative for tough stains and mold.
How do I remove black mold from shower grout?
To remove black mold, try a paste of oxygen bleach and water, allowing it to sit for 30-60 minutes before scrubbing. Hydrogen peroxide is another effective option. Always ensure good ventilation and wear protective gear when tackling mold.
What tools are best for scrubbing grout?
The best tools for scrubbing grout include a stiff-bristled brush specifically designed for grout lines, an old toothbrush for intricate areas, or a small detail brush. These tools allow you to apply concentrated pressure directly to the grout without damaging surrounding tiles.
Is sealing grout necessary after cleaning?
Yes, sealing grout after cleaning is highly recommended. Grout is porous, and a sealer creates a protective barrier that repels water, soap scum, and stains, making future cleaning much easier and preventing mold and mildew growth. Reapply sealer periodically as recommended by the product.
Conclusion
Cleaning the grout in your shower is a manageable task that significantly enhances the appearance and hygiene of your bathroom. By following a systematic approach, utilizing appropriate cleaning solutions, and prioritizing safety, you can effectively remove dirt, grime, and mold. Remember that regular maintenance and sealing are key to keeping your grout looking its best and reducing the need for intensive cleaning in the future. With these steps, you’ll enjoy a cleaner, healthier shower space.
