First: Does Your Shower Faucet Actually Use a Washer?
This is the step most guides skip entirely, and it’s the reason many homeowners attempt this repair on the wrong type of faucet and then can’t figure out why it didn’t work.Only one faucet type uses a traditional rubber seat washer: the compression faucet. Here’s how to identify yours:- Compression faucet (washer-style): Has two separate handles — one hot, one cold. You tighten the handle clockwise to shut off flow. You can feel it compressing as you close it. This guide applies to you.
- Cartridge faucet (no washer): Can be single or double handle. Smooth quarter-turn or lift-and-turn action. The internal mechanism is a replaceable cartridge, not a washer. A different repair.
- Ball faucet (no washer): Single handle that rotates in multiple directions. Uses a ball mechanism with springs and rubber seats. Another different repair.
What You’ll Need
| Item | Purpose | Cost |
|---|---|---|
| Flat-head screwdriver | Remove decorative cap | Own |
| Phillips screwdriver | Handle set screw | Own |
| Adjustable wrench | Packing nut removal | Own |
| Needle-nose pliers | Gripping stem in tight spaces | Own |
| Replacement seat washer | The actual fix — match exact size | $0.50–$2 |
| Replacement O-ring (correct size) | Replace alongside washer | $1–$3 |
| Silicone plumber’s grease | Lubricate stem and O-ring | $4–$6 |
| Cloth or electrical tape | Protect finish on wrench jaws | Own |
| Drain plug or rag | Catch small parts — critical | Own |
| Flashlight | See inside shower valve wall cavity | Own |
Safety Precautions
- Locate your shower shutoff valve BEFORE you touch the faucet. Not all showers have a dedicated shutoff — if yours doesn’t, you’ll need to shut off the main house supply. Find this out first so you’re not hunting for it with water flowing.
- Open the shower handle after shutting off supply to bleed line pressure. This prevents a face full of water when you pull the stem.
- Cover the drain with a rag or plug. The packing nut screw and washer screw are small and will disappear down the drain instantly. This is not a theoretical risk — it happens to every plumber at least once.
- Protect finished surfaces on your wrench. Wrap the wrench jaw with electrical tape or a rag before gripping any chrome or polished surface. Chrome scratches permanently.
- Do not overtighten when reassembling. Snug is sufficient for all connections here. Overtightening the packing nut or handle screw cracks the faucet body.
Step-by-Step: Replacing the Shower Faucet Washer
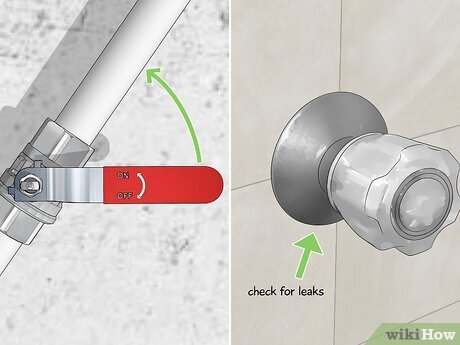
Step 1 — Shut Off the Water Supply
Locate the shutoff valve for the shower. On most homes it’s behind an access panel — a small removable panel in the wall adjacent to the shower (often in a closet behind the shower wall). Turn the valve clockwise until fully closed. If there’s no dedicated shutoff, turn off the main house supply at the meter.After closing the valve, open the shower handle to release remaining water pressure and drain the last water from the supply lines. Have a towel ready for residual drips when you pull the stem.Step 2 — Remove the Decorative Cap and Handle Screw
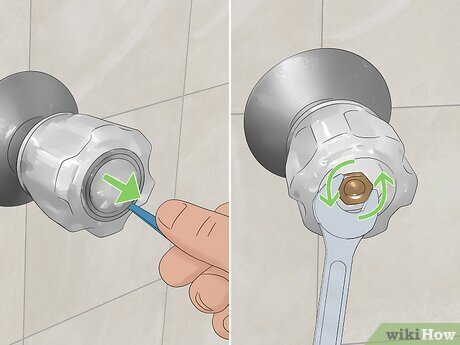
Look at the center face of the faucet handle for a small decorative cap labeled “H” (hot) or “C” (cold), or unmarked on single-handle valves. Pry it off with a flathead screwdriver — use gentle pressure and a cloth under the screwdriver to protect the handle surface. Underneath is a Phillips screw or an Allen set screw. Remove it completely and set it in a bowl.Pull the handle straight toward you. If it doesn’t release easily, don’t pull hard — rock it gently side to side. Mineral deposits often bond handles in place. A few drops of penetrating lubricant (WD-40) around the handle base and a 5-minute wait will release the most stubborn handles without force.Step 3 — Remove the Packing Nut
With the handle off, the packing nut is now visible — a hexagonal nut (usually ½ to ¾ inch) encircling the valve stem. Use your wrapped adjustable wrench to turn it counterclockwise. It may be stiff from years of service — steady, even pressure rather than jerking. Hold the escutcheon plate (the trim ring against the wall tile) steady with your other hand to avoid putting torque stress on the wall fitting.Step 4 — Pull Out the Valve Stem
The valve stem is a threaded cylinder that screws into the faucet body. Grip it with needle-nose pliers or your fingers and turn counterclockwise to unscrew. Pull it straight out once it’s free. Have your towel positioned — a small release of water follows the stem out.Examine the stem carefully — you’ll see two rubber components:- Seat washer: A flat rubber disc at the bottom of the stem, held by a small brass screw. This is what you’re replacing.
- O-ring: A rubber ring seated in a groove around the body of the stem, midway up. Replace this alongside the washer — they wear at the same rate, and replacing both now prevents a repeat repair in 6 months.
Step 5 — Match Your Replacement Washer Precisely
Remove the seat washer by unscrewing the small brass screw at the stem’s base. Take this washer to the hardware store in person — do not guess the size. Seat washers range from ½ inch to ¾ inch outer diameter in common sizes, and also come in flat and beveled (cone-shaped) types. Installing the wrong profile causes a leak even if the diameter is correct.A washer assortment pack ($8–$12) gives you the right size plus spares for any other compression faucets in your home — kitchen sink, bathroom lavatory, outdoor spigots. Worth having on the shelf.Step 6 — Install the New Washer and O-ring
Press the new seat washer into the cup at the base of the stem. Reinstall the brass screw firmly — not stripped, but not hand-tight either. The washer should sit flat and flush with no gap or rocking.Slide the old O-ring off the stem groove and roll on the correctly-sized replacement. Apply a thin coat of silicone plumber’s grease to the O-ring, the stem threads, and the packing nut threads. This lubricates the assembly, extends part life, and makes future disassembly much easier. Use silicone grease only — petroleum-based greases (including regular Vaseline) degrade rubber over time.Step 7 — Reassemble the Faucet
Thread the stem clockwise back into the faucet body until fully seated — firm hand pressure, not wrench-tightened. Thread the packing nut back on and snug it with the wrapped wrench — not torqued, just firmly seated. Replace the handle, its set screw, and the decorative cap.Step 8 — Restore Water and Test
Open the shutoff valve slowly — a gradual turn avoids water hammer. With the shower handle in the closed position, watch the faucet body and stem area for any seeping. Turn the handle on and off several times to confirm the drip has stopped.If water still drips from the spout: the valve seat is likely pitted — see troubleshooting below. If water seeps around the stem: tighten the packing nut a quarter-turn at a time until it stops.
Troubleshooting: Still Dripping After the New Washer?
- Fix 1 — Valve seat grinder: A valve seat grinder (or “seat dresser”) costs $10–$20 and resurfaces the metal seat in place. Insert it into the faucet body, make several firm turns, and the grinder’s cutting wheel smooths the pitted surface. Simple and effective.
- Fix 2 — Replace the faucet: If the seat is deeply corroded, cracked, or if you can’t find a compatible seat grinder, replacing the entire faucet valve body is the practical solution. At this point, a licensed plumber for 1–2 hours of work ($100–$200) makes more sense than further DIY attempts on a failing valve.
When to Call a Plumber
- Your faucet is a cartridge or ball-valve type — this repair doesn’t apply
- The packing nut or stem is corroded and won’t move without risk of cracking the wall fitting
- Water seeps through the wall near the faucet — possible pipe connection failure
- You shut the valve and water still flows — the shutoff valve itself is failing
